A Power Surge on USB Port error typically occurs when a USB device attempts to draw more power than the USB port can safely provide, leading to a “power surge” warning from the operating system. USB ports are designed to supply a certain amount of power to connected devices, but if a device tries to pull more power than the port can handle, it can trigger this error.
Symptoms – ( The effects of a power surge on the USB port )
- A notification from Windows indicating a pop-up of a power surge on a specific USB port.
- USB devices connected to the affected port may not work or disconnect intermittently.
- The system may freeze or experience other performance issues.

Why USB Port Does not Have Enough Power
This issue can arise for several reasons, such as:
1. Overloading the USB Port: If too many high-power devices are connected to a single USB port or hub or a single device draws more power than the port’s rating, it can cause a surge.
2. Faulty or Damaged USB Devices: A malfunctioning USB device may attempt to draw more power than necessary, triggering the power surge error.
3. Faulty USB Port: A physical issue with the USB port, such as a short circuit, can cause an overload.
4. Outdated or Corrupted Drivers: Incorrect or outdated drivers can cause the computer to mismanage power distribution to USB ports, leading to errors.
5. USB Hub Issues: A USB hub could be faulty or underpowered, causing surges if devices require more power than the hub can supply.
Expert Recommended Methods: Fix Power Surge On USB Port On Windows
Here are some steps to fix the issue:
Method 1. Unplug All USB Devices
1. Unplug all USB devices connected to your PC, including external drives, printers, etc.
2. Restart your computer. After it boots up, reconnect the USB devices one by one to see if the issue persists.
3. Inspect the affected USB port for any visible damage or debris.
4. If the port is damaged, you may need to have it repaired by a professional or use a different port.
Method 2. Activate Hardware Troubleshooter
The built-in Hardware Troubleshooter in Windows can help resolve the issue. Here’s how to use it in Windows 10:
1. Search for “CMD” in the taskbar’s search box. When the Command Prompt is visible in the search result, right-click on it and select “Run as administrator” to open it.
2. In the “Command Prompt,” type the following command: msdt.exe/id devicediagnostic and press Enter on your keyboard.
3. In the popup window that appears, click Next to begin diagnosing and troubleshooting the issue.

4. Follow the on-screen instructions to complete the troubleshooting process.
5. Once the hardware troubleshooting is complete, check to see if the issue has been resolved.
Method 3. Update USB Drivers
Update Graphics Drivers via OEM Websites
1. Visit the official website of your device’s manufacturer (e.g., Dell, HP, Lenovo).
2. Navigate to the support, drivers, or downloads section.
3. Enter your device’s model or serial number to find the correct drivers and updates for your hardware.
4. Download the latest drivers, firmware, or BIOS updates available for your device.
5. Double-click the downloaded file to start the installation process, and follow the on-screen prompts.
6. Restart your computer after the installation to apply the changes.
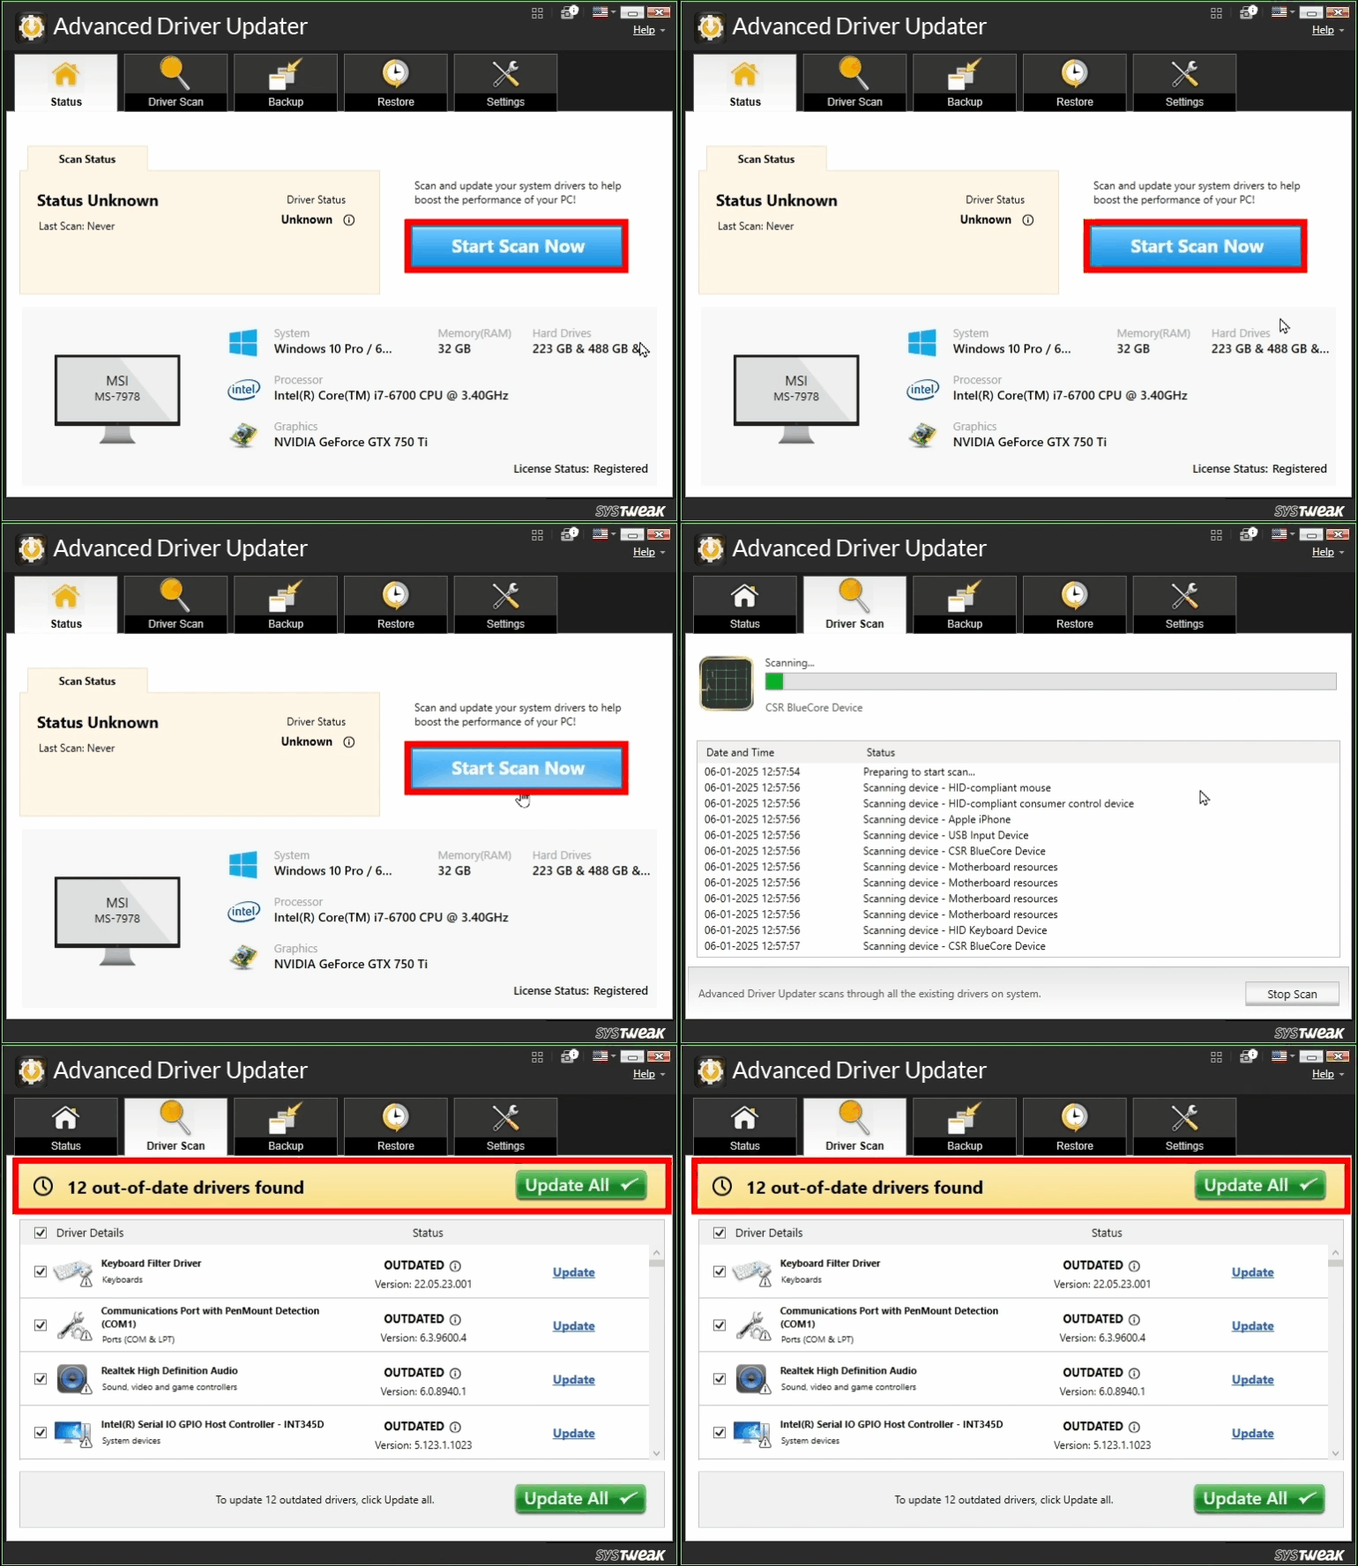
Update Graphics Drivers via Advanced Driver Updater
1. Download and install Advanced Driver Updater.
2. Launch the app and click the Start Scan Now button.

3. A list of driver issues will appear on the screen.
4. Locate the Graphics Driver among the list and click on the update link next to it.
5. The update process will now begin. Restart your computer once the update is completed.
Method 4. Disable USB Selective Suspend Setting
1. Open the Control Panel and go to Power Options.
2. Click Change Plan settings next to your selected power plan.
3. Select Change Advanced Power Settings.
4. In the Power Options dialog, expand USB settings > USB selective suspend setting, and set it to Disabled.

Method 5. Check for Overloading of USB Ports

If you are using a USB hub, try connecting devices directly to the computer’s USB ports to see if the issue is with the hub. Avoid connecting high-power devices to USB 2.0 ports, as they supply less power than USB 3.0 ports.
Method 6. Reset the USB Port’s Power Supply
1. Shut down your computer.
2. Unplug the power cable and any connected USB devices.
3. Hold down the Power button for 30 seconds to drain any residual power.
4. Plug everything back in and restart your computer.
Method 7. Check for Malware
Run a malware scan to ensure that no malicious software is causing the issue. Use Windows Security or another trusted antivirus program.
Method 8. Update Your BIOS/UEFI
Sometimes, USB issues are related to outdated system firmware. Check your motherboard or laptop manufacturer’s website for BIOS/UEFI updates. Follow their instructions carefully to update the BIOS/UEFI.
Method 9. Try a Different USB Cable or Device
A faulty USB cable or device could be causing the error. Test with a different cable or USB device to see if that resolves the problem.
Method 10. Reset the CMOS
In some cases, resetting the CMOS (Complementary Metal-Oxide-Semiconductor) can help. This resets your computer’s hardware settings and may resolve conflicts causing the error. Consult your computer’s manual for instructions on how to reset the CMOS.
Have You Fixed The Error
You might need to invest in a powered USB hub if the error persists. These external hubs enable you to connect high-power devices to your PC’s USB ports safely, as long as the hub is separately powered, helping to protect your USB ports from potential damage. If none of the above steps work, the USB controller on your motherboard could be faulty, and in that case, you may need to consult a technician.


