Imagine this: you’re pumped to fire up your favorite game, fingers hovering over the keyboard, ready to dominate. But then, bam! A jarring error message pops up, throwing a wrench in your plans: “The code execution cannot proceed because X.dll was not found.” Frustrating, right? Whether it’s the infamous ‘vcruntime140.dll, msvcp140.dll, msvcp120.dll, or the less-common “emp.dll,” these cryptic messages can leave even tech-savvy users feeling lost.
Fear not, friend! This comprehensive guide will equip you with the knowledge and tools to conquer these pesky DLL errors and get your software running smoothly again. We’ll dissect the error, expose its nefarious origins, and equip you with an arsenal of fixes to conquer it.
The Code Execution Cannot Proceed: Your Ultimate Guide to Fixing Annoying DLL Error
DLL files, short for Dynamic Link Libraries, are essential components of software applications. They contain code and data that multiple programs can use simultaneously. These libraries hold essential code-shared by various programs, ensuring smooth operation and efficient resource usage. When a program needs a specific function, it “borrows” it from the relevant DLL, eliminating the need to reinvent the wheel every time.
Now, picture a bridge suddenly vanishing, severing the connection between buildings. That’s what happens when you encounter the “code execution cannot proceed” error. A crucial DLL – like vcruntime140.dll, msvcp140.dll, or emp.dll – is missing, leaving the program stranded and unable to function.
The Reasons Behind The Code Execution Cannot Proceed Error
Several factors can contribute to a missing DLL:
- Incomplete or corrupted installations: Sometimes, installation glitches or missing components can leave essential DLLs behind.
- System updates gone rogue: Windows updates can unintentionally overwrite or delete DLLs used by older programs.
- Malware mischief: Malicious software can tamper with or even delete system files, including DLLs.
- Accidental deletion: It’s always a possibility, especially during cleaning sprees.
Fixing the ‘The Code Execution Cannot Proceed’ Error
Fix 1: Reinstall The Problematic App/Program
To troubleshoot the issue you’re encountering with a particular program, consider reinstalling it to determine if that resolves the problem. Follow these steps for a clean reinstallation:
Step 1: Press the Windows key with the key X to open the WinX menu. Click on the Installed Apps option from the top. 
Step 2: Now select the problematic app and click on the three-dot icon from the front of it. 
Step 3: Then tap on Uninstall.

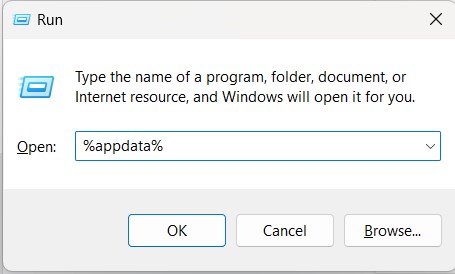
Step 4: Now press the Windows and R keys to open the RUN dialog box.
Step 5: Type %appdata% and hit the Enter key. 
Step 6: Find and delete the related app data folder.
Read Also : Fix – KernelBase.dll crashing error Quickly
Fix 2: Repair System Files
The SFC and DISM command lines are invaluable tools for detecting and fixing your computer’s missing and corrupted system files. Follow the steps below –
Step 1: Press the Windows key, type ‘command,’ and then click on the Run as administrator option to open the Command Prompt window.

Step 2: Type sfc /scannow and press the Enter key.

Step 3: Now type DISM /Online /Cleanup-image /Scanhealth and hit Enter key.

After completing these steps, your system files should be restored. Verify if the problem is fixed.
Fix 3: Install The Missing DLL File
If the above method fix didn’t work, install the missing or corrupted DLL files manually. You can copy the DLL from a system that is not giving the error and paste it onto your PC or can download the DLL file. However, we do not recommend copying it from an external source as there is no guarantee that the file will be infection-free.
Fix 4: Update Device Drivers
For a manual driver update, visit the device manufacturer’s official website and download the latest driver compatible with your operating system.
If manually downloading drivers is too much work, use Advanced Driver Updater. This driver updater tool will automatically detect your PC’s configuration and locate the appropriate drivers for all connected peripherals and your specific version of Windows. Just follow the instructions below to use it –
Step 1: Download and install the Advanced Driver Updater.
Step 2: After the installation, open the Advanced Driver Updater and click on the Start Scan Now button.

Step 3: Let it scan your whole PC for missing/corrupted or outdated drivers.

Step 4: Now, simply click on the “Update All” button, and it will update all your device drivers.
Conclusion: Stay Calm and Fix On
“The code execution cannot proceed” errors might seem daunting, but with the right knowledge and tools, you can overcome them and get your software back in working order. Remember, patience is key! Try the fixes outlined above, one by one, and you’ll be back to enjoying your favorite programs in no time.
Recommended:
Fix ‘No Device Drivers Were Found’ Error During Windows Installation


