

Black and White squares on the computer screen can make it difficult to use your PC. There could be many reasons as to why this error occurs. This guide lists the best troubleshooting methods to resolve the problem. Without further ado, let us begin.
Why Desktop Showing Black & White Squares On The Screen
There are several potential causes for a black screen with white flashing squares. Some of the reasons include:
– An outdated display driver
– A damaged GPU
– Incorrect display resolution settings
– Overheating problems
Try 5 Ways……..
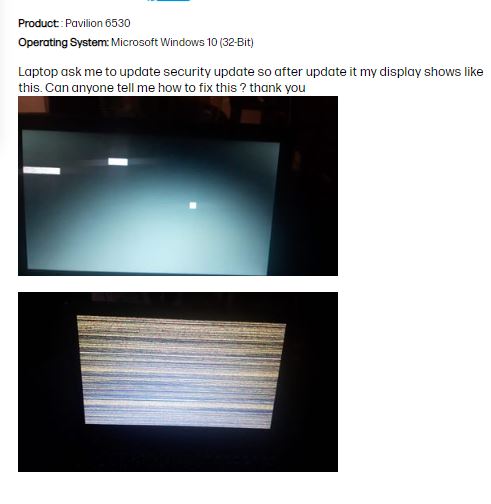
user black-white box problem screenshot
Method 1: Activate The Hardware Troubleshooter
Step 1: Press Win + R to open the RUN box and type “cmd.”
Step 2: Press CTRL + Shift + Enter to open the Command Prompt in Admin Mode.
Step 3: Copy and paste the following command and press Enter.
msdt.exe -id DeviceDiagnostic
Step 4: A new box will open where you must click Advanced.
Step 5: Check the box next to Apply all repairs automatically and click the Next button.
Step 6: Carry out the instructions onscreen to complete the troubleshooting and repair process.
Method 2: Turn Off the Color Filter
Step 1: Press Win + I to open the Settings.
Step 2: Click the Accessibility tab in the left column and click the Color Filters option in the right section.

Step 3: Next, locate the Color Filters option and slide the toggle towards the left to disable it.

Step 4: Scroll down to locate the Keyboard shortcut for the color filters option and disable it as well.
Method 3: Update Graphics Driver
Graphics drivers are very important to maintain a sync of communication between the hardware and software. Hence, experts recommend that you keep the drivers of your PC updated at all times. There are three ways to update drivers:
-
Download updated drivers from the manufacturer’s website.
The Original Equipment Manufacturer or hardware manufacturer maintains an official website to provide resources to their customers. You must identify the hardware name and model number and download the relevant driver from these websites. Once downloaded, execute the file to install it on your PC.
-
Download updated drivers from Device Manager.
To simplify things, Microsoft has provided a built-in driver updater tool called the Deive Manager to help Windows users update the drivers. However, there is a limitation to this tool – it only looks for driver updates on Microsoft Servers. So, if the hardware manufacturer has not sent the updated driver for approval to Microsoft, you will not find the updated version through this method. Here are the steps:
Step 1: Press Win + X to open the Power Menu and choose Device Manager from the options.
Step 2: Click on Sound, Video, And Game Controllers to reveal your headset.
Step 3: Right-click on the HyperX Cloud 2 headset and choose Update Drivers.

Step 4: Click the “Search Automatically for drivers” option and follow the instructions onscreen.
-
Download updated drivers by using Advanced Driver Updater.
The Advanced Driver Updater is a third-party driver updater tool that can update all drivers to their latest version with a few mouse clicks. It is not a too-technical method and does not have the limitation of looking for updated drivers on the Microsoft Servers only. Here are the steps to use this driver updater tool.
Step 1: Download and install Advanced Driver Updater using the link below.

Step 2: launch the app and click the Start Scan Now button.

Step 3: Wait for some time, and a list of driver anomalies will appear on the screen.
Step 4: Locate the Graphic driver and click the Update button next to it.

Step 5: Once the driver updation process is complete, reboot your PC.
Read Also: How to Fix Black Box on Mouse Cursor
Method 4: Alter The Resolution Settings
Step 1: Press Win + I to launch Settings.
Step 2: Click on System in the left panel and then click on Display in the right section.

Step 3: Under the Scale and Layout section, look for the Display Resolution option and click on the dropdown to choose the Recommended setting.
Note: Your screen might flicker for a bit, but it will reflect your chosen resolution.
Method 5: Launch The Memory Diagnostic Tool
Step 1: Restart the computer to close all the unwanted apps and processes that might have started.
Step 2: Press Win + S and type “Windows memory diagnostic” in the search box.
Step 3: Click the relevant result under best match.
Step 4: In the tool window, click “Restart now and check for problems”.

Step 5: Wait for the process to complete and check the results after the PC restarts.

If the test results reveal errors, you should take your PC to the service center and have the RAM checked and replaced if necessary.
If the solutions mentioned above do not work as expected, kindly check the following points –
- Test the GPU on another PC if possible.
- Faulty RAM might also be a problem
- Check and ensure there is no faulty hardware.
And at last, if nothing works you might need to contact the service center.
If you are short on time, you can also quickly check this video out to learn how to fix black and white squares on Windows PC Screen:-
Have You Fixed the Issue?
The above-mentioned expert-recommended method will help remove the black-and-white squares on the computer screen. Do write to us in the comments section about how you fixed this issue. If, by any chance, the issue does not get fixed, then you will have to take your PC to a computer technician who will check for hardware issues.
Read Also :