
Struggling with the AMD High-Definition Audio Device not plugged in error?
Don’t fret; this common error can be solved by updating outdated, corrupt, and missing AMD audio drivers. The easiest way to update the AMD High Definition Audio Drivers is to use Advanced Driver Updater, a tool that helps update outdated corrupt, and missing drivers.
But before moving into details, let’s know about AMD High Definition Audio.
Like Intel High Definition Audio Devices, AMD High Definition Audio is an inbuilt audio mechanism found in different AMD modules.
Reasons for AMD High Definition Audio Device not Plugged in Error in Windows 11/10
- Incompatible or outdated AMD HD audio drivers.
- Incorrect system settings.
- Virus or malware-related issues.
- Corrupt graphics card.
Easiest Way to Solve the Error
If the error is caused by an outdated/missing/corrupt driver, The simplest solution is to use Advanced Driver Updater. This advanced tool helps update outdated drivers in a few clicks. To download it, click the download button given below:

We know the easiest way to fix the AMD High Definition Audio Device error. Here are some other fixes.
If you are in a hurry, We have covered a video on this error plz check below –

Best Ways to Fix AMD High Definition Audio Device Not Plugged In
Here are the alternate ways to resolve the AMD High Definition Audio Device Not Plugged. There’s no need to follow all the solutions. You can just work your way down the list. Once you find the right solution, you can stop.
1. Run DISM command
2. Reinstall AMD audio driver
3. Update driver
Note : The methods explained below will work on all versions of Windows. From Windows 11 to Windows 7.
Solution 1 -Restore Audio Settings To Default Settings.
Some experts have stated that misconfigured settings may result in AMD High Definition Audio Device Not Plugged issue. Here are the steps to reset your PC’s audio settings to default.
- Press Win + R to open the Run dialog box.
- Type “Control” and press the OK button.

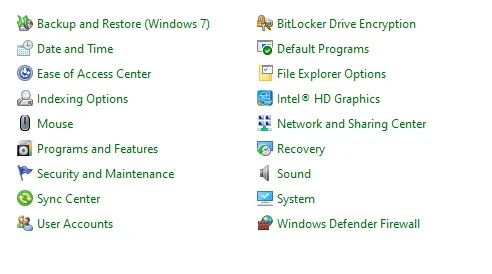
- The Control Panel window will now open. Click on the View By option in the top right corner and choose Small Icons.

- Now, double click on the Sound option to open a new box.
- Right-click on your current Speakers and click on Properties.

- A new box will open up where you have to click on the Advanced Tab.

- Finally, click on the Restore Defaults button.

Solution 2- Activate Audio Troubleshooter.
Windows has a set of built-in troubleshooters that can automatically detect and fix certain operating system issues. Here are the steps to run the Audio troubleshooter.
- Press the Windows key on your keyboard and type “ Troubleshoot Sound”.

- Under the Best match results, click on “Find And Fix Problems With Playing Sound”.
- A new window will open up.

- Click on the Advanced link and ensure that there is a check mark before Automatically Apply Repairs.
- Click on the Next button and follow the onscreen instructions.
- Restart your PC after the process is completed.
Solution 3 – Update BIOS and Chipset Drivers.
- Navigate to the official website of your PC’s motherboard manufacturer.
- Search for the latest drivers using the model number of your motherboard.
- Download the latest chipset drivers and run the file to begin the installation process.
- Follow the onscreen steps and reboot your PC after the process completes.
Solution 4 – Run The SFC Scan.
The Audio issues on PC can also occur due to system files. Here are the steps to run the System File Checker on your PC.
- Press Win + R to launch the RUN dialog box.
- Type “cmd” and press Ctrl + Shift + Enter to open the Command Prompt in admin mode.

- Now copy and paste the following command followed by Enter.
sfc /scannow

- Let the scan complete and reboot your system.
Solution 5: Run the DISM command
Deployment Image Servicing and Management (DISM) is a command that helps fix system bugs. To run it and fix the AMD High Definition audio issue, follow these steps:
1. In the Windows search bar, type Command Prompt > right-click Run as administrator.

2. In the Command Prompt window, enter the following command DISM.exe /Online /Cleanup-image /Restorehealth and press Enter key.

3. Wait for the command to run. Once the process is completed, copy-paste the following command – sfc /scannow and press Enter key.

4. When done, close Command Prompt.
5. Reboot the PC.
This should fix the problem. If the solution doesn’t work, move to the second solution.
Must Read- Fix – No AMD Radeon Graphics Driver is Installed on Windows 10
Solution 6: Reinstall the Audio Driver
The “AMD High Definition Audio Device Not Plugged In” issue can also be fixed by reinstalling the AMD audio device and the driver. Follow these steps to uninstall the driver.
1. Press Windows + X > Device Manager.

2. Double-click Sound, video, and game controllers.

3. Select and right-click AMD High Definition Audio Device > Uninstall device.
4. Check the box next to Delete the driver software for this device > Uninstall.

5. Wait for the process to finish.
6. Reboot the system so that Windows can reinstall the generic device driver for you.
Now try to use the audio device; this should solve the problem.
If things didn’t work this time either, no issues, move to the next step.
Solution 7: Update Available Drivers
When the PCI driver or the AMD audio driver is outdated or missing, you encounter the AMD High Definition Audio Device not plugged in the issue. This means you need to update the outdated and missing drivers. There are two ways to update drivers.
Method 1 – Manually Updating AMD High Definition Audio Device Driver
To manually update AMD audio driver, follow these steps:
1. Press Windows + X > Device Manager.
2. Double click the “Sound, Video, and Game Controllers.”
3. Right-click the AMD High Definition audio device > “Update driver.”

4. You will now get two options

5. Search automatically for drivers.
6. Browse my computer for drivers.
7. Click Search for drivers and wait for Windows to find the AMD High Definition Audio device driver update. Wait for the process to complete; this might take a few minutes.
Method 2 – Automatically Update AMD High-Definition Audio Device Driver
If the above steps aren’t something you like to go with, you can update the driver automatically using Advanced Driver Updater.
Advanced Driver Updater automatically recognizes system details and helps find the compatible and correct driver update. To use this tool, you don’t need to know the exact system details. The tool detects all these details and helps update outdated drivers. To use Advanced Driver Updater, follow these steps.
You can update your drivers automatically with either the FREE or the registered version of Advanced Driver Updater. You can update all outdated drivers using the registered version in just 2 clicks. Also, you get technical support and a 60-day money-back guarantee).
1. Download and install Advanced Driver Updater.
2. Run Advanced Driver Updater > Start Scan Now button. Wait for Advanced Driver Updater to scan the system for outdated drivers.

3. If you are using the Advanced Driver Updater trial version, click the Update Driver next to the AMD audio driver. However, if you are using the registered version by clicking Update All, you can update all outdated drivers.

4. Restart your computer to apply changes.
Solution 8 – Reset Windows.
If none of the above methods work, then resetting Windows is the only option left. We advise that you take a backup of your files before you initiate this method. Here are the steps.
- Press Win + I to open the Settings.
- Type “Reset This PC” in the search box and press Enter.

- In the new window, click on the Get Started button under Reset This PC.

- Follow the onscreen steps and wait for the process to complete.
FAQ-AMD High Definition Audio Device Not Plugged In
Fixed – AMD High Definition Audio Device Not Plugged In Problem
Using these simple steps, you can fix the AMD High Definition Audio Device Not Plugged In issue. Scanning your system regularly using a driver updating tool like Advanced Driver Updater helps minimize the risk of manual errors, BSOD, and other driver-related problems. Undoubtedly, Advanced Driver Updater is the best option to update AMD High Definition Audio Device Driver on Windows 11/10/8.1/8/7.
Read Also: How to Fix ‘Radeon Software and Driver Versions Do Not Match’ Error


One thought on “How To Fix AMD High Definition Audio Device Not Plugged In”