
Encountering the error message “A referral was returned from the server” on your Windows PC can be frustrating, especially when it disrupts your ability to install or launch applications. This guide will walk you through practical solutions to fix this error, ensuring a smoother experience when using your applications. Whether you’re dealing with insufficient permissions or configuration settings, these steps will help you get back on track.
What does “A referral was returned from the server” Mean
The error is a common issue on Windows that can occur when installing or launching a program. While it may seem like a network problem, it is typically related to app permissions. You might encounter this error during app installation or when launching applications like Quick Assist.
This error often arises due to insufficient permissions to install or run the program. You can set it to run with administrative privileges if it affects a specific application. Alternatively, you may need to adjust or disable User Account Control settings to allow installations or app launches without encountering the error.
Why Does The Error Occur
The error occurs for several reasons, primarily related to permissions and configurations. Here are the main causes:
- Insufficient Permissions: The user account attempting to install or run the program may lack the necessary permissions.
- User Account Control (UAC): High UAC settings can block installations or application launches, leading to this error.
- Misconfigured Applications: Certain applications may not be set up correctly to handle referrals, resulting in this error.
- Network Problems: DNS issues or firewall settings could prevent proper communication with other servers, especially in a networked environment.
- Group Policy Restrictions: In managed environments, group policies may restrict the installation or execution of certain applications.
Fix “A Referral Was Returned From The Server” On Windows PC
Method 1: Run The Program As Administrator
1. Right-click on the shortcut of the app you wish to run and choose “Run as administrator” from the context menu.
2. The program will now run in an elevated mode. If this fixes your issue, you can set this app to always run in admin mode by following the steps below. If not, move to the next method.
3. To ensure your app runs in admin mode, right-click on the shortcut and choose Properties from the context menu.

4. Click on the Compatibility tab and place a checkmark in the box before the “Run This Program As An Administrator” option.

5. Click on Apply and then on OK.
6. This will make sure that your program always runs in administrator mode.
Method 2: Decrease The Security Level Of User Account Control
1. Press the Windows key and type “UAC”.

2. Click on Change User Account Control Settings under Best Match.

3. A new box will open where you have to slide the slider on the left down next to Never Notify.
4. Click on Ok to exit the box and run the app that presented the “A referral was returned from the server” error.
Method 3: Turn Off PKI Signature
1. Press the Windows key and type “Edit Group Policy”.
2. Click on the relevant result under best match.
3. A new box will open where you have to click on Computer Configuration in the left panel to reveal more options.
4. Next, click on Windows Settings followed by Security Settings -> Local Policies -> Security Options.
 5. In the right panel, look for the User Account Control: Only elevate executable files that are signed and validated option and double-click on it.
6. Click the circular button before Disabled and then click on Apply and OK.
7. Restart your PC for the changes to take effect.
Method 4: Makes Changes In Windows Registry
1. Press Win + R to open the RUN box and type “Regedit”.
2. The Windows Registry Editor will open. Copy and paste the following path in the address bar of the Windows Registry.
HKEY_LOCAL_MACHINE\SOFTWARE\Microsoft\Windows\CurrentVersion\Policies\System
3. Locate the ValidateAdminCodeSignatures entry in the right panel of the Registry Editor and double-click on it.
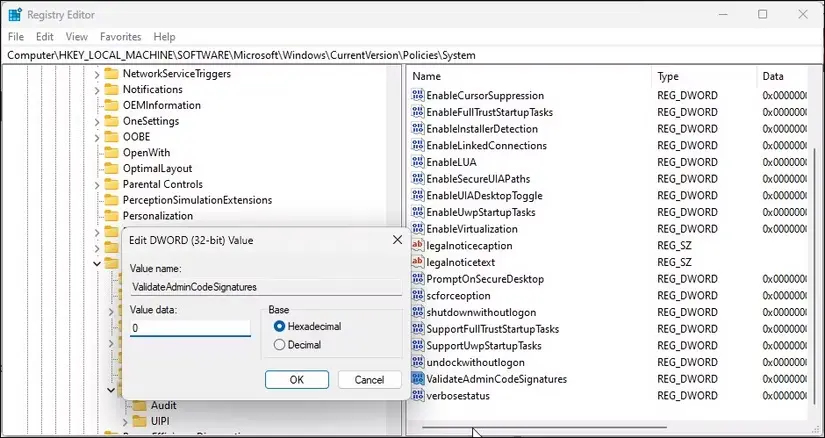
4. A small box will open where you must change the value data to “0”.
5. Click on OK and exit the Windows Registry editor.
Method 5: Verify The Program Ownership
1. Right-click on the program shortcut and choose Properties from the context menu.
2. A new box will open. Navigate to the Security tab.
3. Click on your User account name and check below to see if there is a checkmark next to Full Control.

4. If not, you need to click the Edit button and check the box under Allow next to Full Control.
Method 6: Utilize the Compatibility Troubleshooter
1. Right-click on the program shortcut and select Show More Options.
2. Next, click on Troubleshoot Compatibility.
3. Click on Try recommended settings and follow the steps to fix the issue.
4. If the issue is not fixed, run the first two steps again, this time choosing the Troubleshoot program option.
5. Check the box before the program requires additional permissions option and click the Next button.
Method 7: Turn off Driver Signature Enforcement
1. Press Win + R to open the RUN box and type “CMD”.
2. Press Ctrl + Shift + Enter to open the Command Prompt In Admin mode.
3. Copy and Paste The Following command followed by Enter.
bcdedit /set nointegritychecks on

4. After you have installed the driver, use the following command to re-enable Driver Signature Enforcement.
bcdedit /set nointegritychecks off
Method 8: Turn Off Antivirus
1. Press the Win key and type Windows Security.

2. Click on the relevant result under Best Match.
3. Next, click on Virus & Threat Protection.
4. Click on Manage Settings.
5. Slide the toggle button under Real-Time Protection towards the left to disable it.
Editor’s Tip: Use T9 Antivirus For Windows SecurityT9 Antivirus is a real-time antivirus application that can protect your PC from all types of malware like Viruses, Trojans, Spyware, etc. This amazing software guards your PC 24/7 and ensures no malware can cause damage to your system. T9 Antivirus offers a valuable yet often neglected feature that safeguards systems against malware that exploits vulnerabilities to infect devices. It secures both inbound and outbound traffic, creating a safe environment and protecting against potential phishing websites. Besides malware protection, this app includes an ad-blocker, File shredder, PC optimizer, and Start Manager modules, making it multi-functional software. |

Method 9: Run System File Checker
1. Press Win + S to open the search box, type “cmd,” right-click on “Command Prompt” from the search results, and select “Run as administrator.”
2. If the prompt box for administrative privileges appears, click “Yes” to proceed.
3. Type “sfc /scannow” in the Command Prompt window and press the Enter key.
4. After completing the scan, exit the Command Prompt window and reboot your computer.
Method 10: Run Deployment Imaging And Services Management
5. Press Windows + S, type cmd, right-click Command Prompt, and select Run as administrator.
6. In the Command Prompt window, type the following command and press Enter.
DISM /Online /Cleanup-Image /RestoreHealth
7. Allow the process to complete and reboot your PC.
Fixed “A Referral Was Returned From The Server” on Windows PC
Resolving the error on your Windows PC may require a combination of adjustments and troubleshooting steps. By following the methods outlined in this guide, such as running applications with administrative privileges, adjusting User Account Control settings, and checking permissions, you can effectively address the underlying issues causing this error. Write to us about which method fixed the issue for you in the comments section.


