 Advanced System Optimizer
Beware Of Fraud Calls & Emails
It has come to our notice that certain people/companies may be impersonating Systweak Software and/or other reputed companies, and are contacting users to promote their services in our name via fake emails and calls.
Please note Systweak Software does not make any unsolicited calls nor sends emails to anyone regarding errors on devices or internet browsing or any such other device issues.
We urge you to beware of any such scammers and request you to NOT call back any number provided in the email or via caller ID in case you receive any unsolicited calls or emails.
Please reach out to us at report@systweak.com in case you come across any such scammers and fraudsters impersonating Systweak Software.
- Getting Started
- Why Should You Use A PC Cleaning Software?
- What is Advanced System Optimizer?
- What is Smart PC Care?
- What makes Advanced System Optimizer the best PC Optimization tool?
- How to Install Advanced System Optimizer
-
 Registry Optimizers
- What is Registry Optimizer
- Disk Cleaners and Optimizers
-
 PC Optimizers
-
 Security & Privacy
- Backup & Recovery
-
 Common Issues Fixers
- Driver Updater
- Regular Maintenance
- General Settings
Advanced System Optimizer / Security & Privacy
Security & Privacy
How does Advanced System Optimizer help to stay protected?
With the increase in electronic devices, our dependency on them is increasing. This makes working on a slow device very difficult. However, the decrease in the system’s performance over time is inevitable, which is why we encounter the following issues:
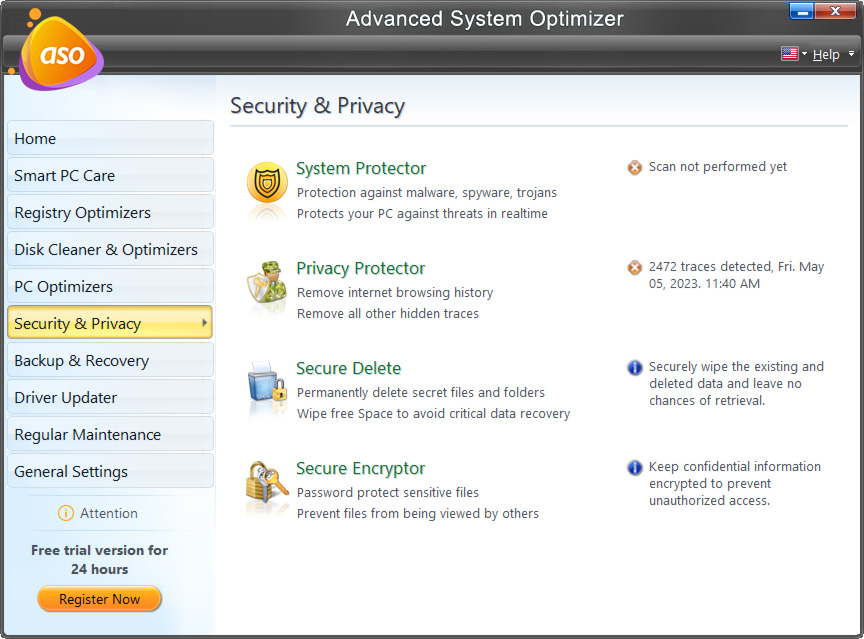
- System Protector - Keep the PC clean from viruses, malware, and other malicious threats.
- Privacy Protector - It erases all traces of Internet activities from the PC and helps maintain privacy.
- Secure Delete - It helps safely delete the data permanently, making data recovery impossible.
- Secure Encryptor - A simple utility that protects confidential and valuable data via password.
What is System Protector?
Malware (short for malicious software) is an umbrella term that refers to various malicious programs like viruses, spyware, Trojans, etc., meant to disrupt systems functioning and spy on users’ activities. These intrusive programs get installed on the system without the user's knowledge, reside in disguise, steal the user's personal information and track both online & system activities.
Generally, these malicious codes perform activities by hiding in plain sight, making detection impossible. But, if you have an advanced tool with updated definitions running on the system, these malicious threats can be taken care of. Keeping this in mind, the System Protector module has been added to Advanced System Optimizer.
How Malware, Spyware, and Virus Spread on the System?
Malware is a catch-all term for malicious software designed to harm the system. Once installed on the PC, these programs affect the system's speed, privacy, and security. Furthermore, they lead to frequent system crashes, unexpected system behavior, decreased performance, and excessive pop-ups.
But how do they infect the system?
Common Approaches Followed by Hackers to Attack System:
- Attach infected files to the email or share corrupt files.
- Share malicious links via email, messaging apps, or social networks.
- Redirects users to compromised sites, aka drive-by download, hiding virus in HTML and thus downloading it when the webpage loads.
- Through infected external hard drives or network drives.
- Exploiting loopholes found in the outdated application and operating systems.
- Social engineering attacks like phishing, spamming, and more.
- Connected peripherals, smart devices, and Internet-of-Things (IoT).
How does System Protector help?
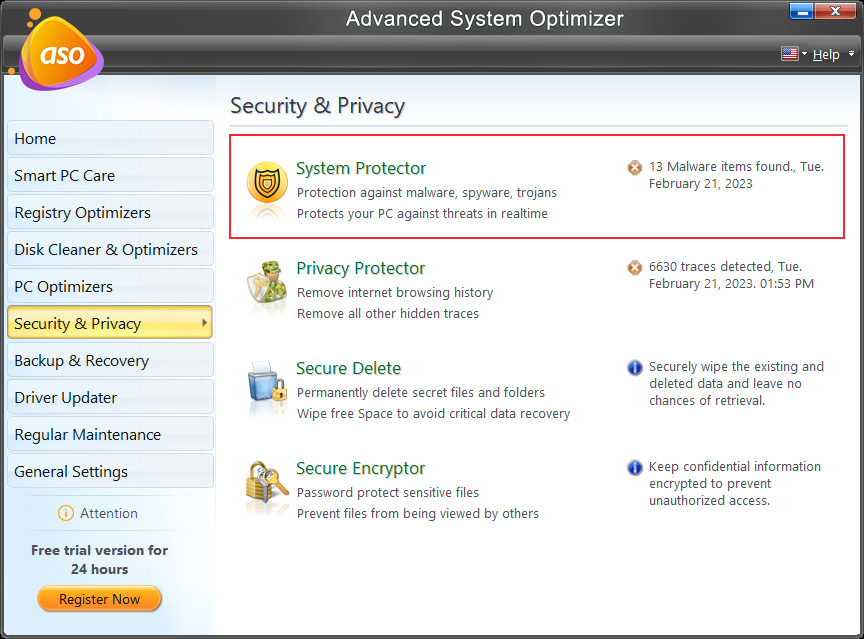
Built with an excellent scan engine, System Protector efficiently fights cyber threats and defends the system from adware, malware, worm & spyware attacks. It has a huge database of malware definitions that is regularly updated, thus helping detect the latest and old threats. Moreover, System Protector scans the system for spyware threats and quarantines them easily.
Using System Protector regularly is recommended to stay protected against spyware, malware, adware, virus, etc. This will not only help clean the infections but will also boost systems performance.
How to use System Protector?

Malware, viruses, worm, spyware, and other infections intrude into the PC without the user's knowledge and infect the stored data. Moreover, they can corrupt any part of the system and completely take it over. This puts critical and substantial data under threat. Hence, updated antivirus and antimalware utilities are recommended to stay protected.
System Protector helps identify and quarantine these threats instantly. The tool detects these threats in a few simple steps. As you launch it, you see a window with different tabs on the left. They are
1). Status
2). Infection Scan
3). Quarantine
4). Protection
5). Settings
6). Action Center
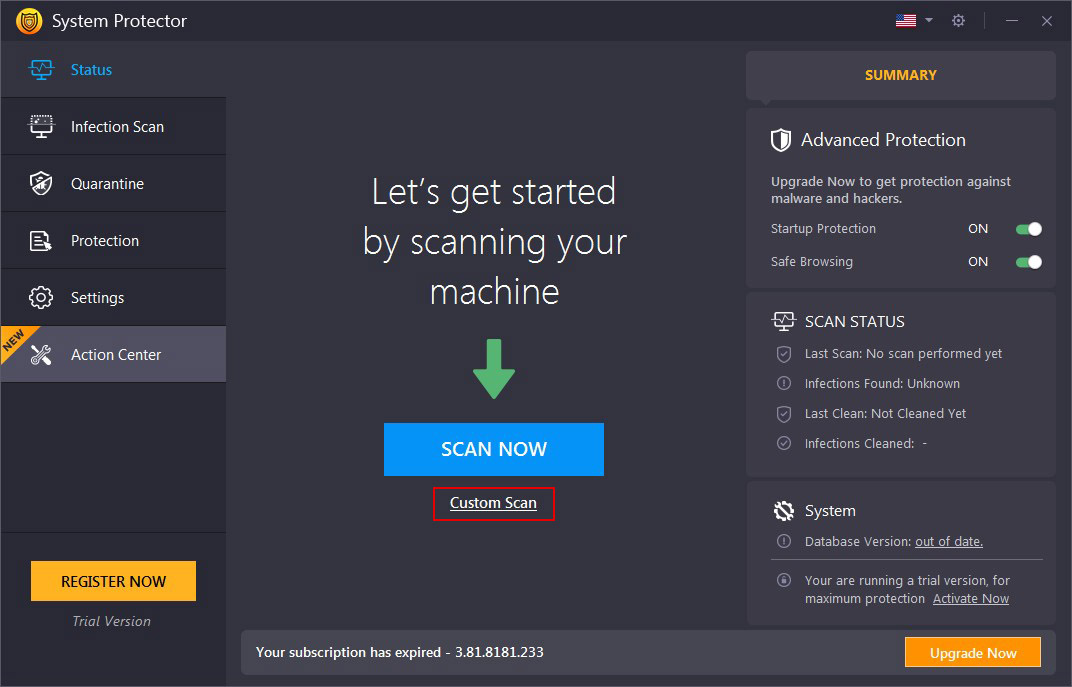
Step1: Scan Now
The Welcome screen shows a summary of Startup Protection and Safe Browsing shield, Scan Status, including Last Scan Date, Infections Found, Last Clean Date, Number of Infections Cleaner, and Database Version.
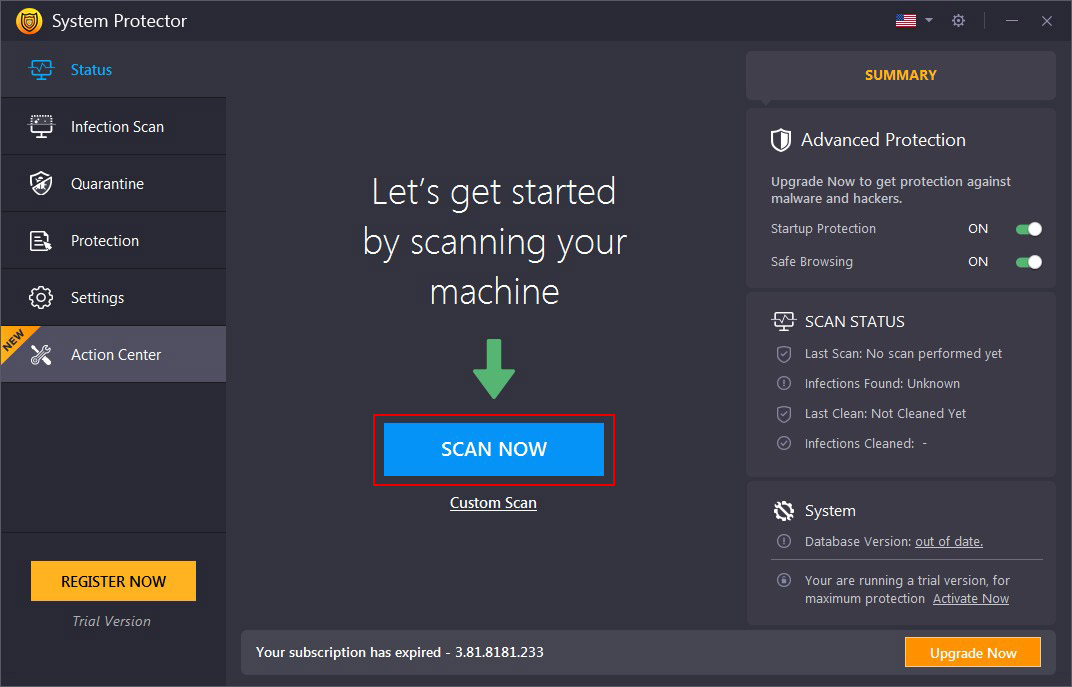
Click the "Scan Now" to initiate the scan. System Protector will now scan through all the areas of the system & will identify all types of infections.
Alongside this, by clicking the "Custom Scan" link below the Scan Now button you can select the type of scan you wish to run Quick, Deep, or Custom Scan.
The three scan types:
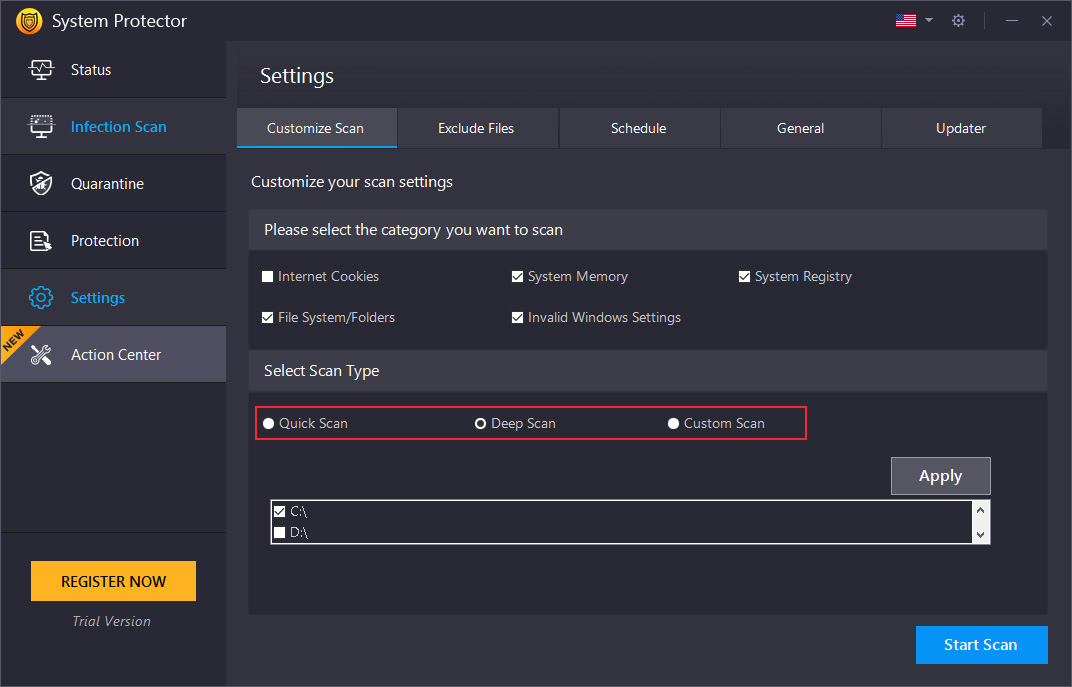
Quick Scan - performs a quick scan to detect infections.
Deep Scan - thoroughly scans all folders and subfolders for malware, spyware, adware, and other infections.
Custom Scan - specify the areas you wish to scan and keep them free from all malicious threats.
Note: Keeping the database up-to-date is recommended to stay protected from threats. This helps detect real threats and false positives (genuine entries detected as spyware). You may click on the link "Check For Updates" in the right panel to install all the updates.
Step2: Scan
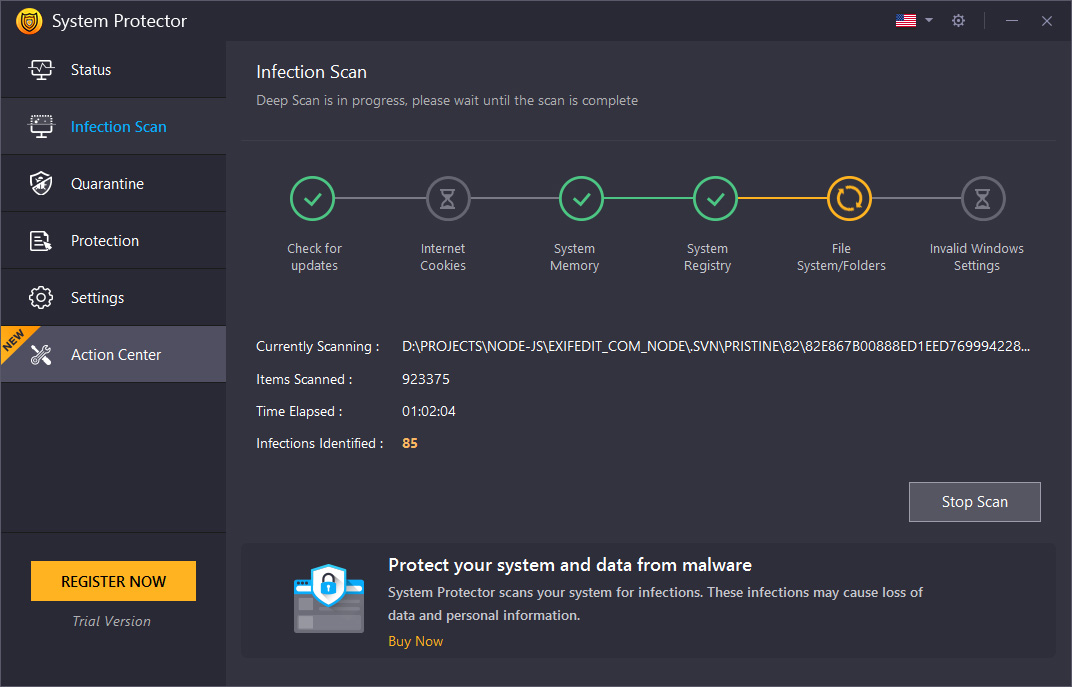
Scanning
While scanning the system for infections, System Protector logically scans each area against the rich database of the latest spyware definitions. This helps pin down the nasty infections capable of performing unwanted and harmful activities on the system.
When a malicious threat is detected, the tool displays its details on the consecutive screen. In addition to this, it also shows the level of threat.
To abort scanning, hit the "Stop Scan" button.
Step3: Results
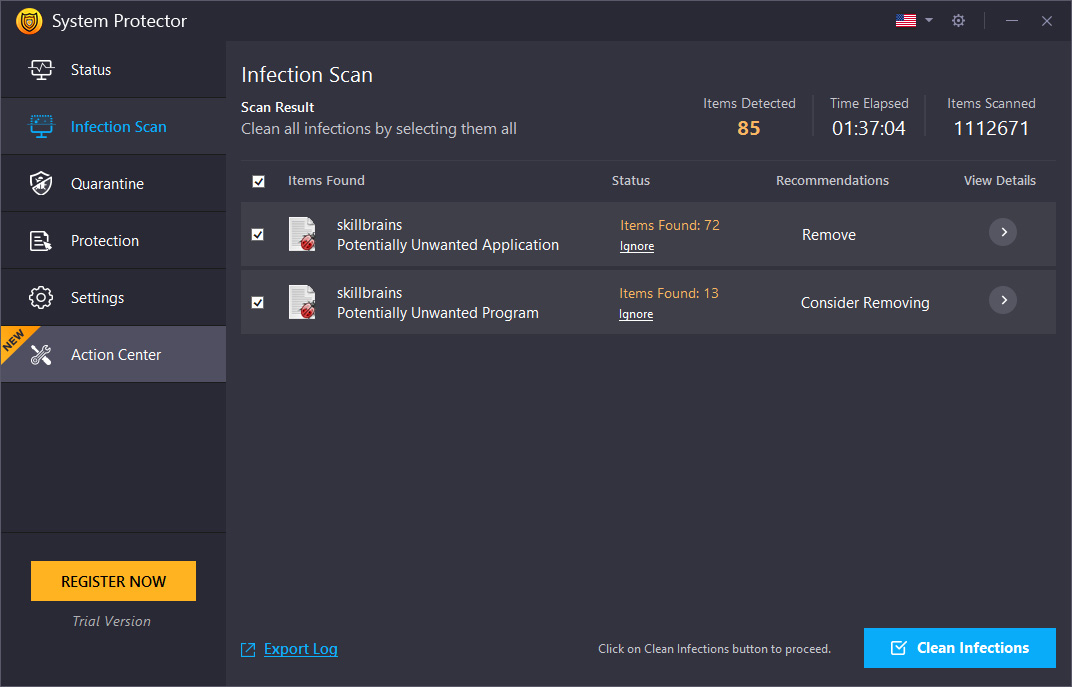
Scan Results
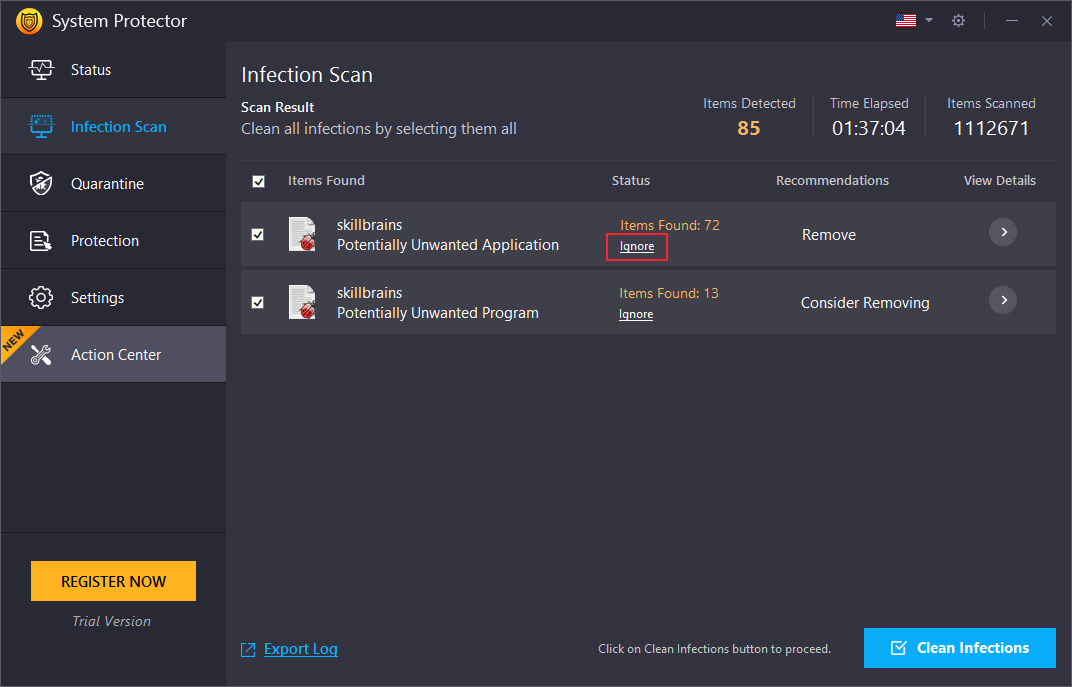
After finishing the scan, System Protector shows a list of detected infections with their names. You can get more information about each file by clicking the arrow under View Details.
Next, to clean threats, check the box next to them and click the "Clean Infections" button in the lower right corner of the screen. This will take you to the next step, quarantine.
Menu Option
- Ignore– For files that are false positive, you can add them to the Exclusion list by clicking the Ignore link.
Step4: Clean
You can permanently remove the selected infections from the PC using this step.
Step5: Finish
This last step cleans the detected threats.
Quarantine Tab
Last Scan Result
Under this section, you can view the quarantined infection detected in the last scan. To clean them, select the infection and click the "Delete" button in the lower right corner of the screen.
Quarantine List
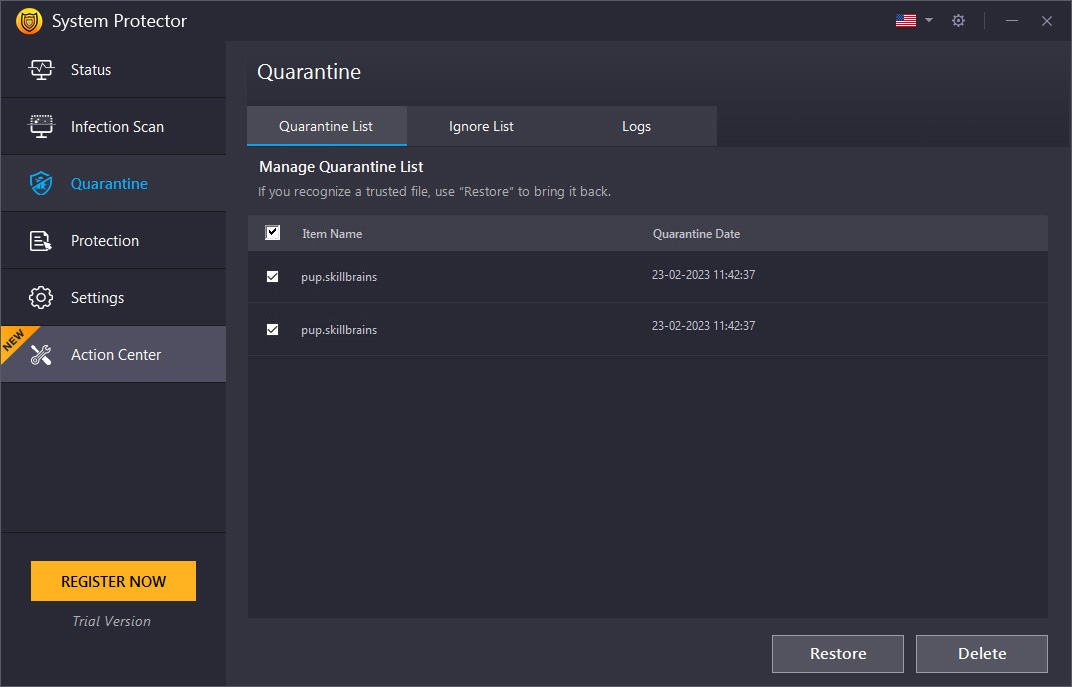
After cleaning the detected infections, System Protector moves them to a safe location called Quarantine. This makes them ineffective and stops them from interfering with the smooth functioning of the system.
Note: You cannot find these infections on the system in any format. However, if you think any file is detected and cleaned incorrectly, you can restore it by selecting the infection and clicking on the "Restore" button. This will put back the deleted file to its original location.

Ignore List
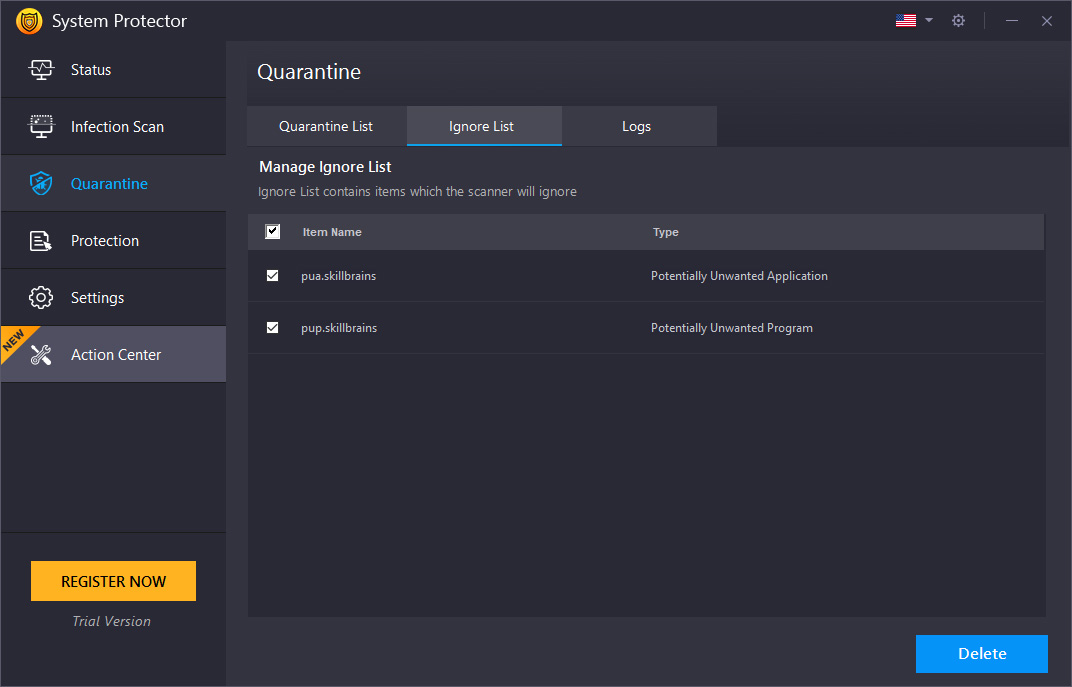
If you consider certain files genuine and do not want them to be scanned in the future, you can put them in the Ignore List. This will skip the files from being scanned and removed. For this purpose, select the desired item from the scan results page and click the Ignore link.
To remove individual infections from the list, click the "Delete" button.
Logs

System Protector maintains scan logs of the scans performed on the system. This helps keep track of scan results and deleted infections. To view the details of each scan, you can click the "View Log" button.
To clear logs, select them and click the "Delete" button.
Using the "Export Log" button, you can export the scan log and analyze them in HTML format or send them for analysis (if you face any problems).
Protection Tab

System Protector offers Protection Shields (only in the registered version) that restrict malware, spyware, virus, and other attacks.
Alerts are triggered when the tool encounters spyware trying to install or execute. It is up to the user to allow or block/discard it completely.
To protect the system from threats around the clock, you get different options.
Startup Manager
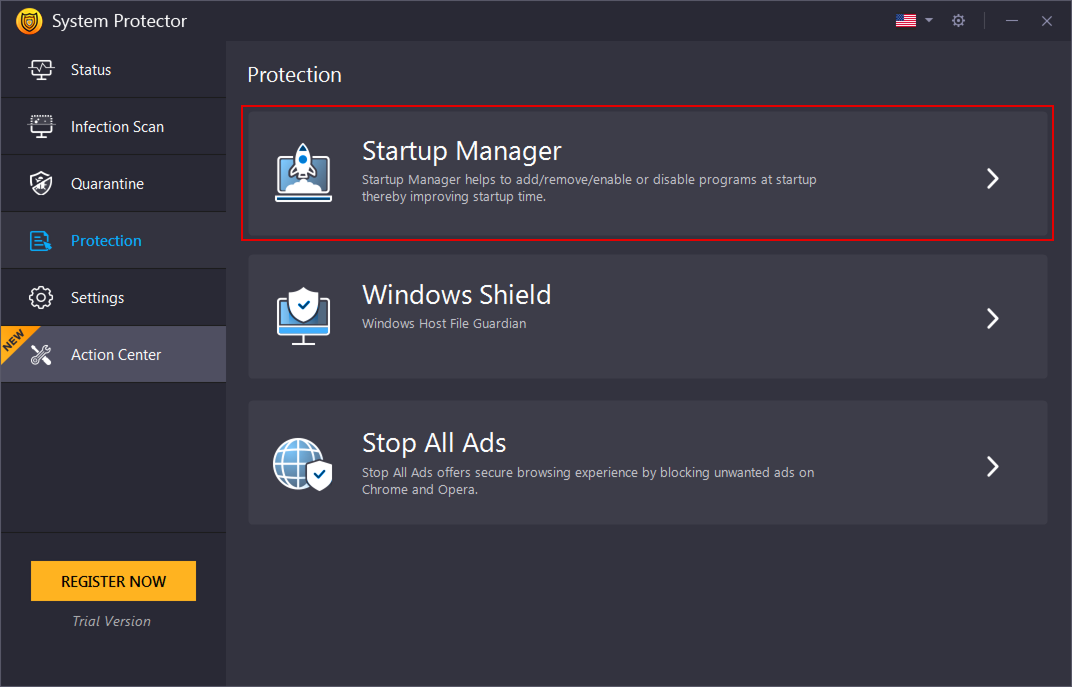
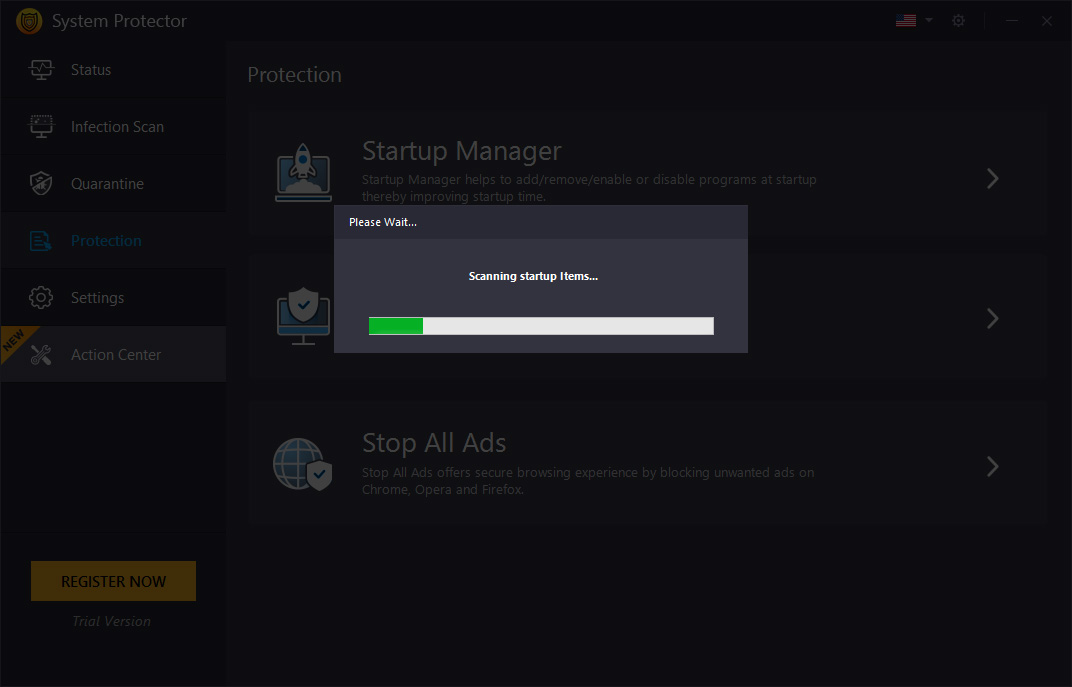
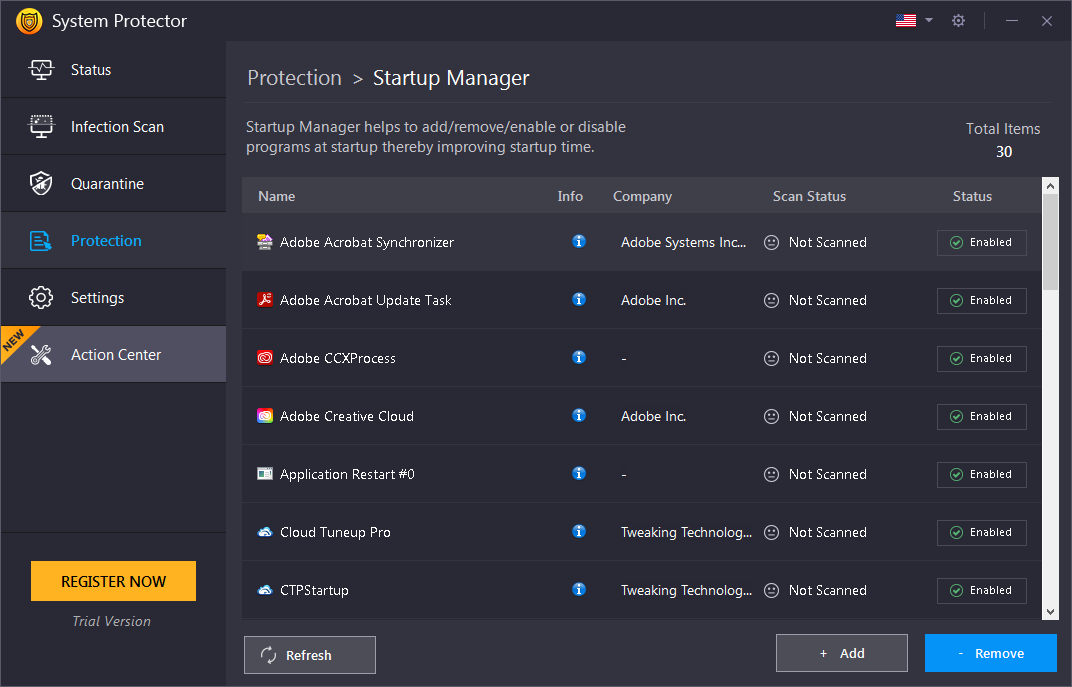
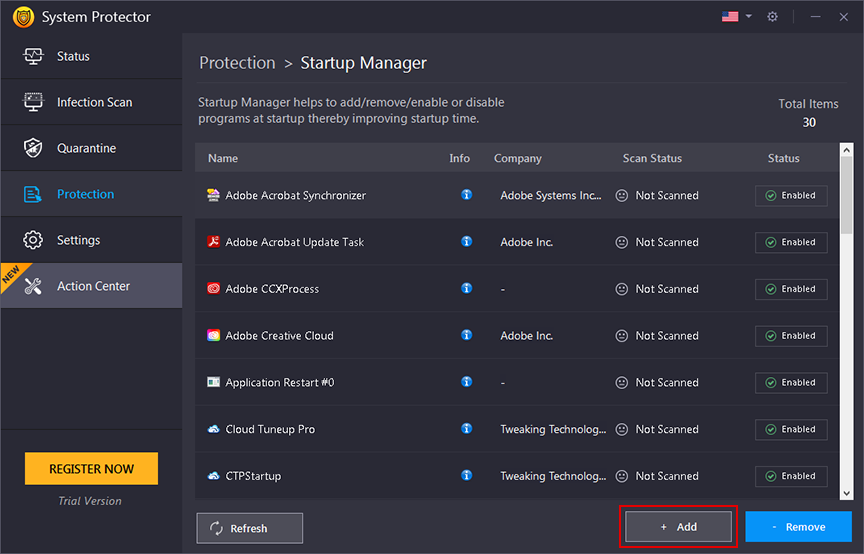
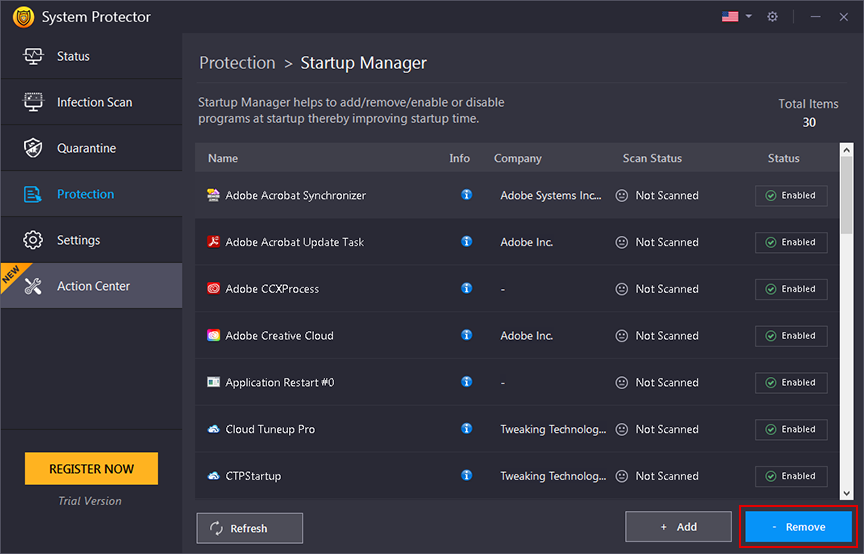
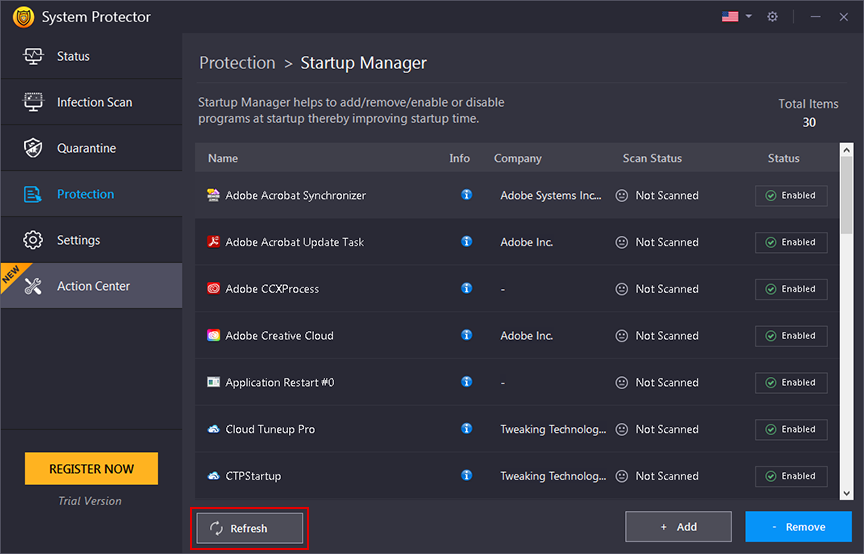
Unwanted startup items are the reason for the slow bootup. With the help of Startup Manager, add/remove programs you want to run or remove from the startup. To use it follow these steps:
- Launch System Protector.
- Click Protection from the left pane and click Startup Manager.
- Wait for Startup Manager to list down apps running at startup.
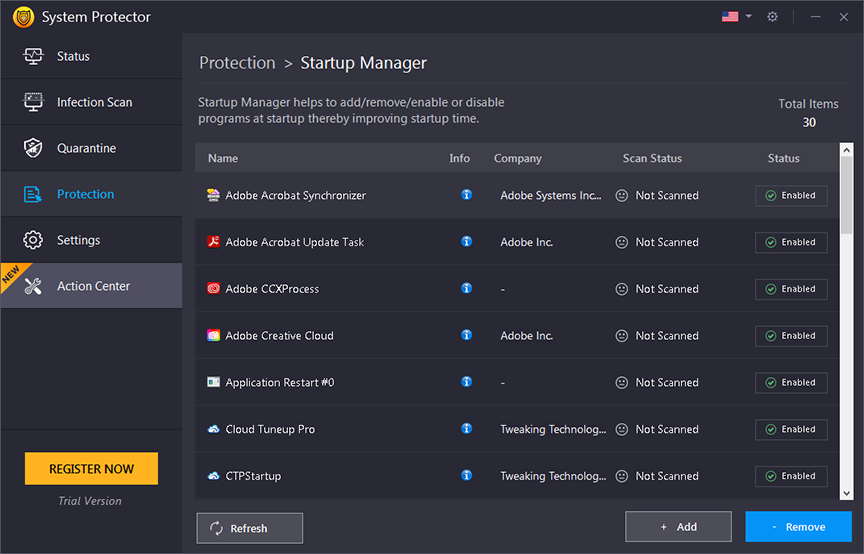
- Review the list.
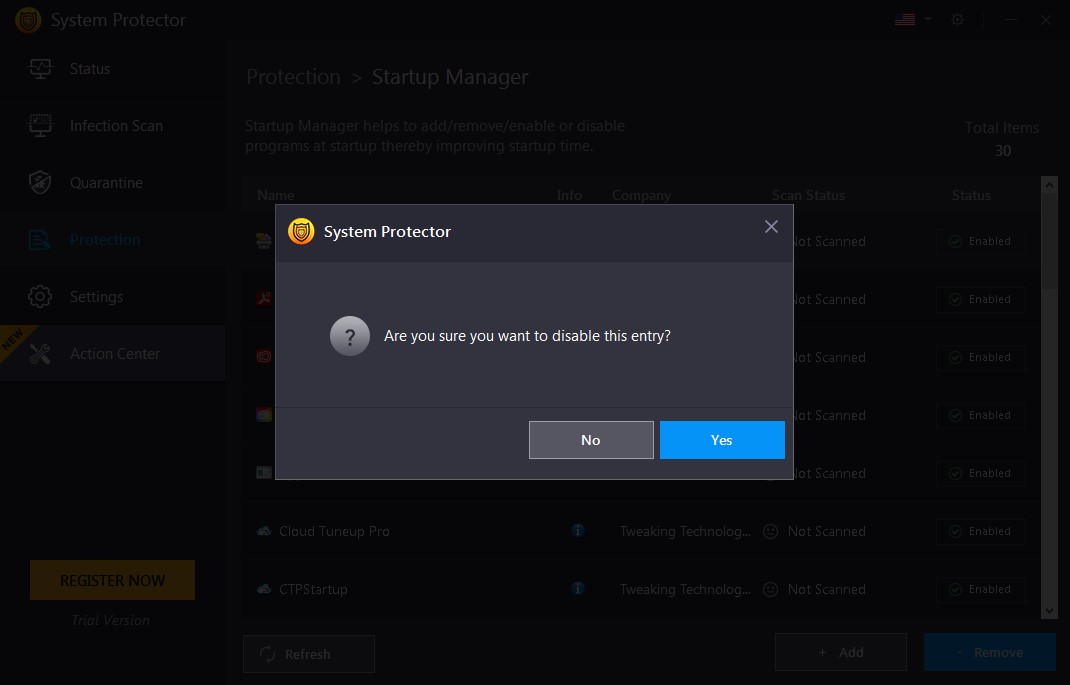
- To disable any product from running at startup click the Enabled button and click Yes when prompted.
- This will disable the product and you will see a refreshed list with the product status as disabled.
- To add a product, click the Add button > browse the location > and give a name to the product.
- After that, select from settings how and when you want it to run.
- In addition, if you are sure you won't want to run the product at startup anytime use the Remove button to delete the entry from Startup Manager.
- Using the Refresh button, you can see the changes.

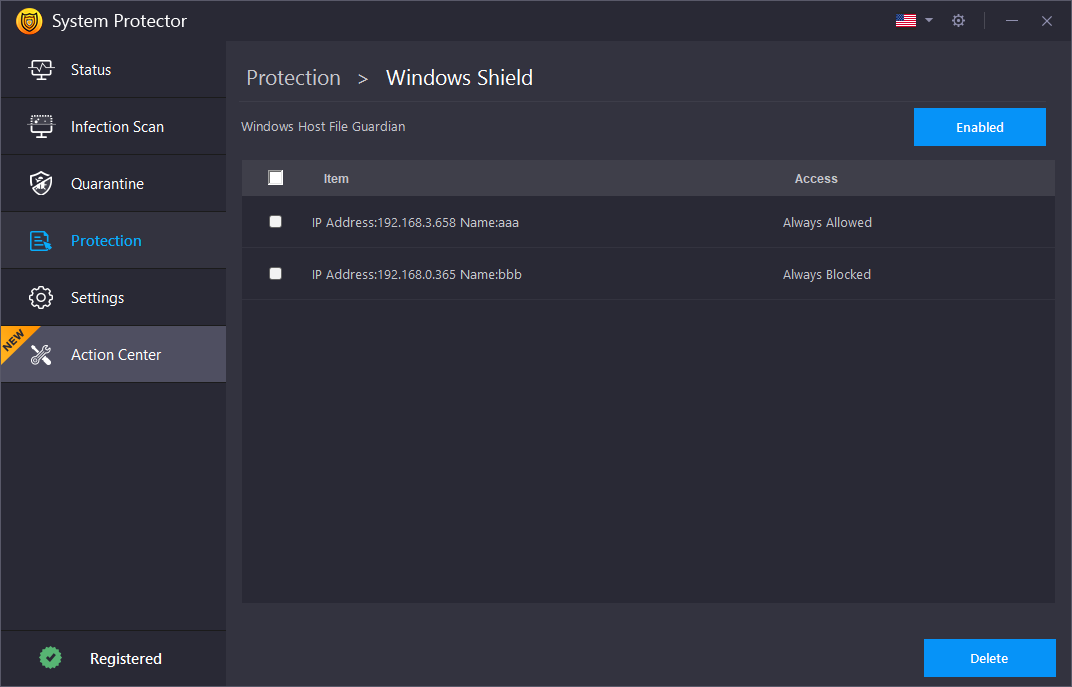
Windows Shield
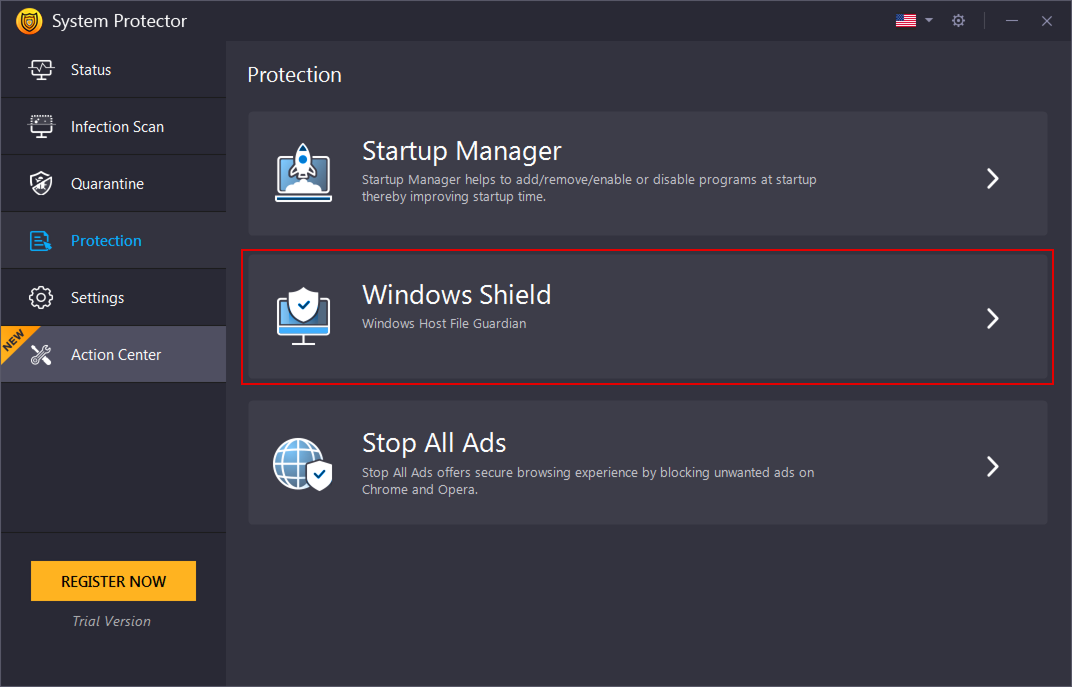
Windows Shield – A host File in Windows is a file to maintain the hostnames mapped against their IP addresses. Host Files are used to find the associated IP addresses for any hostnames. If the desired IP addresses are not found, the operating system asks the Domain Name System (DNS server) for the information. These files can be used to block sites locally instead of blocking the servers. Some spyware is crafted to make changes to Windows Host Files. This shield alerts the user if such malicious activities are attempted in Windows Host Files.
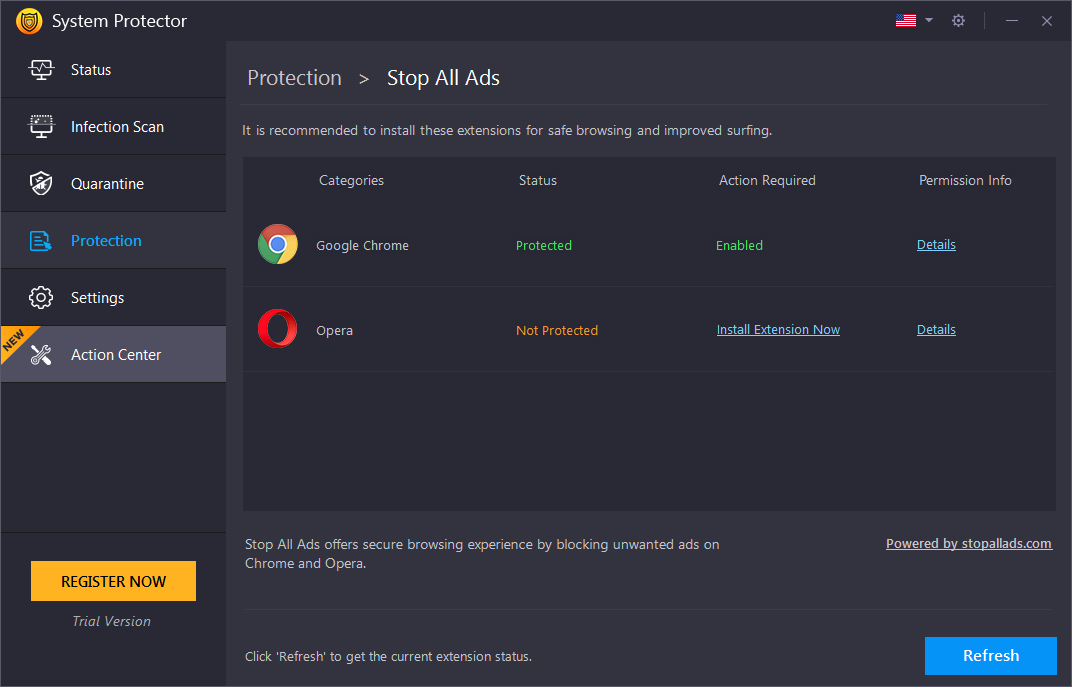
Stop All Ads
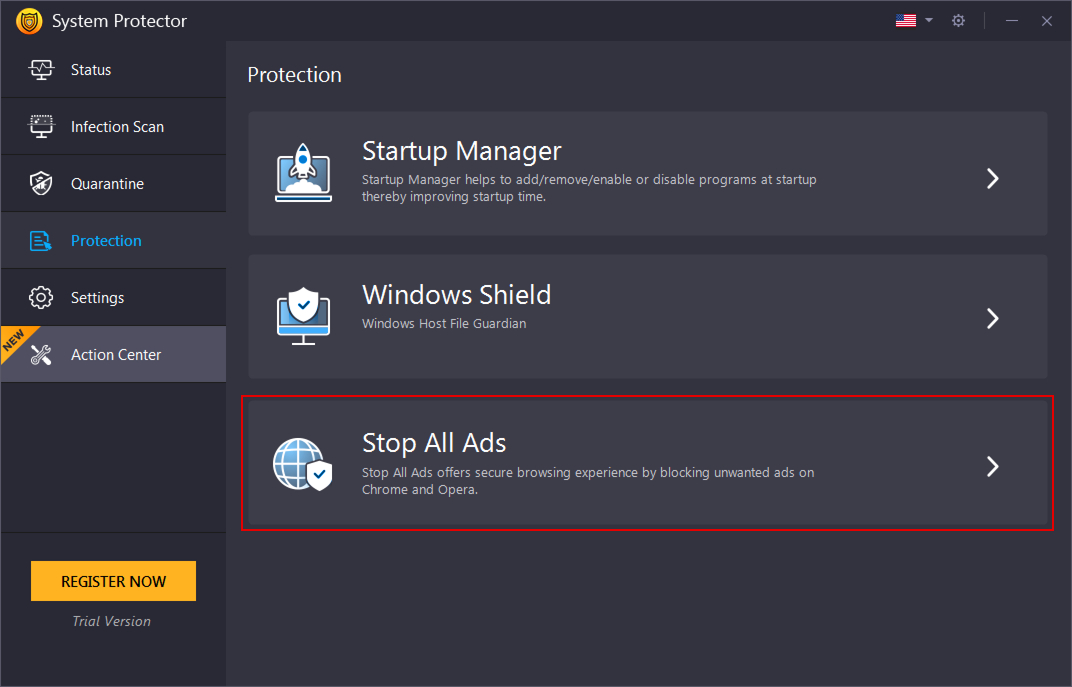
Stop All Ads - Secure your browsing experience and avoid seeing unwanted ads by enabling the Stop All Ads extension on your Chrome, Opera, and Firefox browsers. Click the Stop All Ads option to get the extension. keep your browser safe from unwanted ads.
Settings Tab
Customize Scan
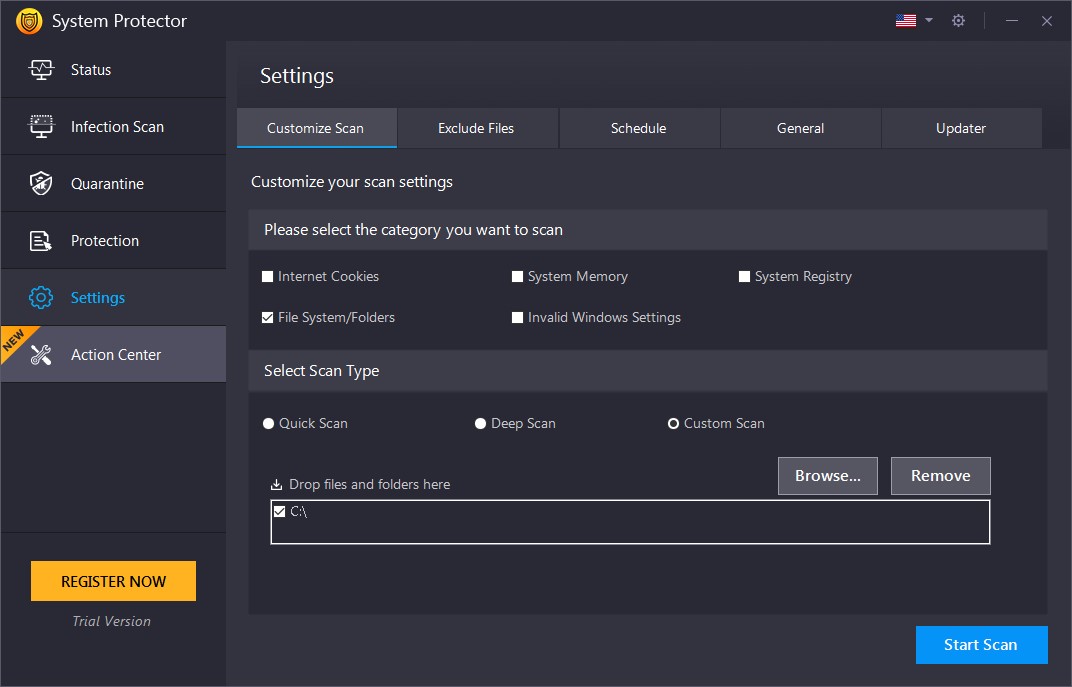
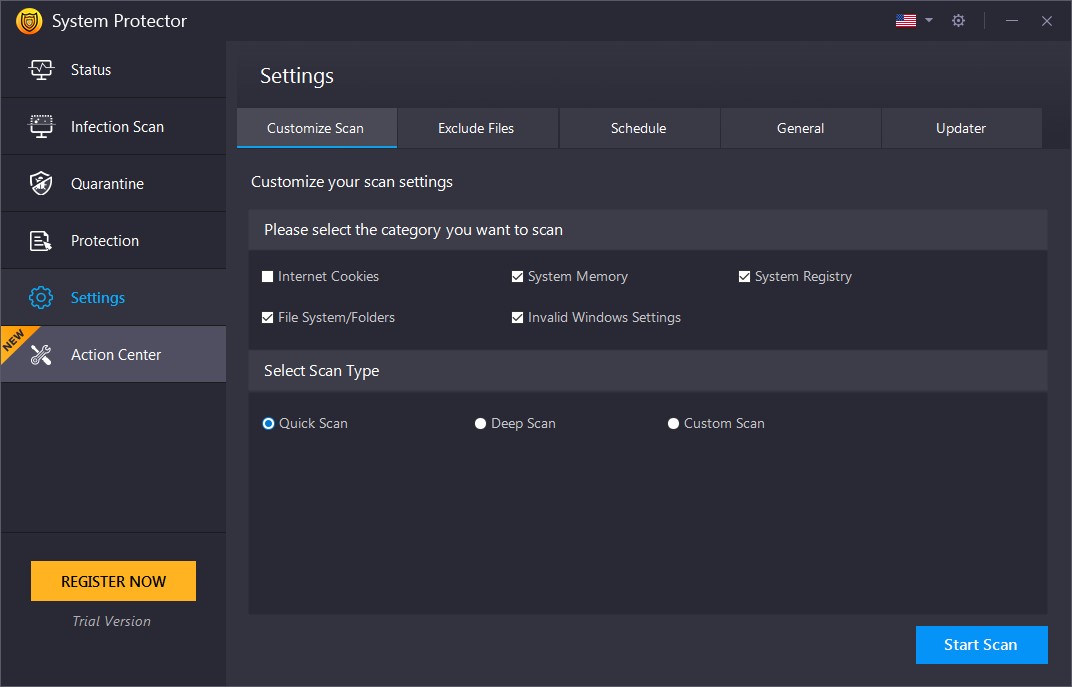
You may customize scan settings using the various options under Settings. Every time a change is made, you need to click on the "Apply" button to save changes and click the "Start Scan" button.
Check the categories/areas to be thoroughly scanned:
- Internet Cookies – Cookies are traces of internet activities stored on the system. Some cookies may perform harmful actions on the system. Check this option to scan it for spyware infections extensively.
- System Memory – Memory is a vital and critical part of the system. Check this area to scan it thoroughly for spyware infections.
- System Registry – Check this option to scan the Registry for infections.
- File System/Folders – Check this option to scan all the existing files and folders on the system for spyware infections.
- Invalid Windows Settings - An infected windows setting can harm the system's functioning; by enabling this option, you can check Windows Settings.
Select Scan Type:
- Quick Scan – Quick Scan is a faster mode of scanning but is less extensive. System Protector will scan for the spyware in the only specific locations prone to infections.
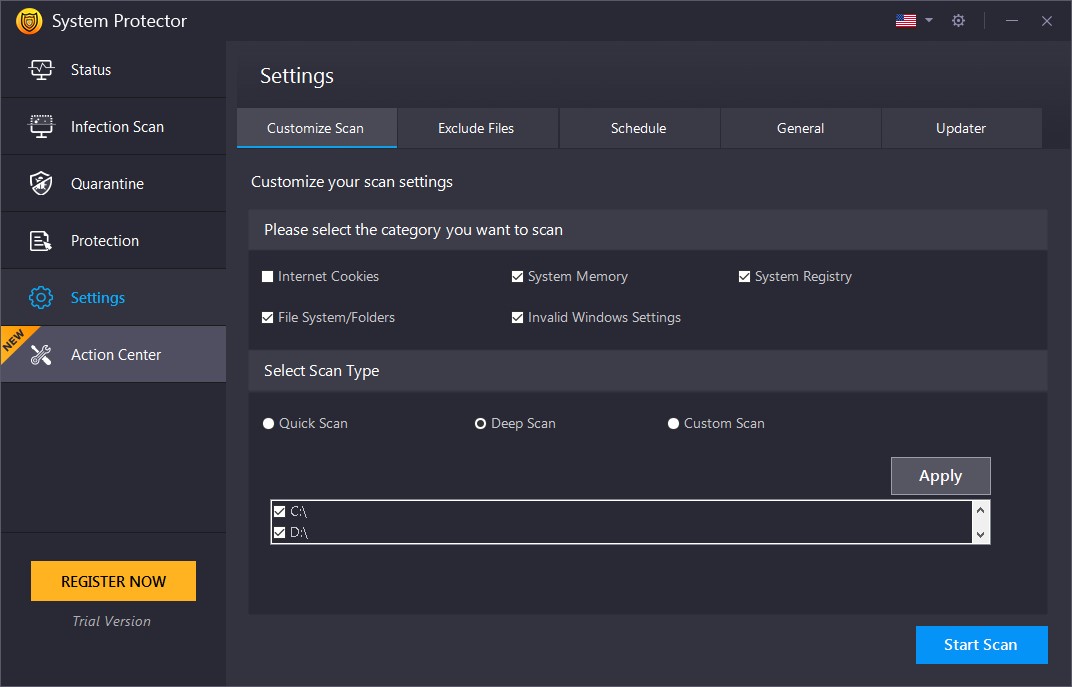
- Deep Scan – During Deep Scan, scans the entire system thoroughly and detects the spyware infections based on signatures (MD5).
- Custom Scan – You may scan the requisite files and folders that you consider infected or prone to infections. When this option is selected, you can “Browse” the areas you wish to scan and add them to the list.
Exclude Files
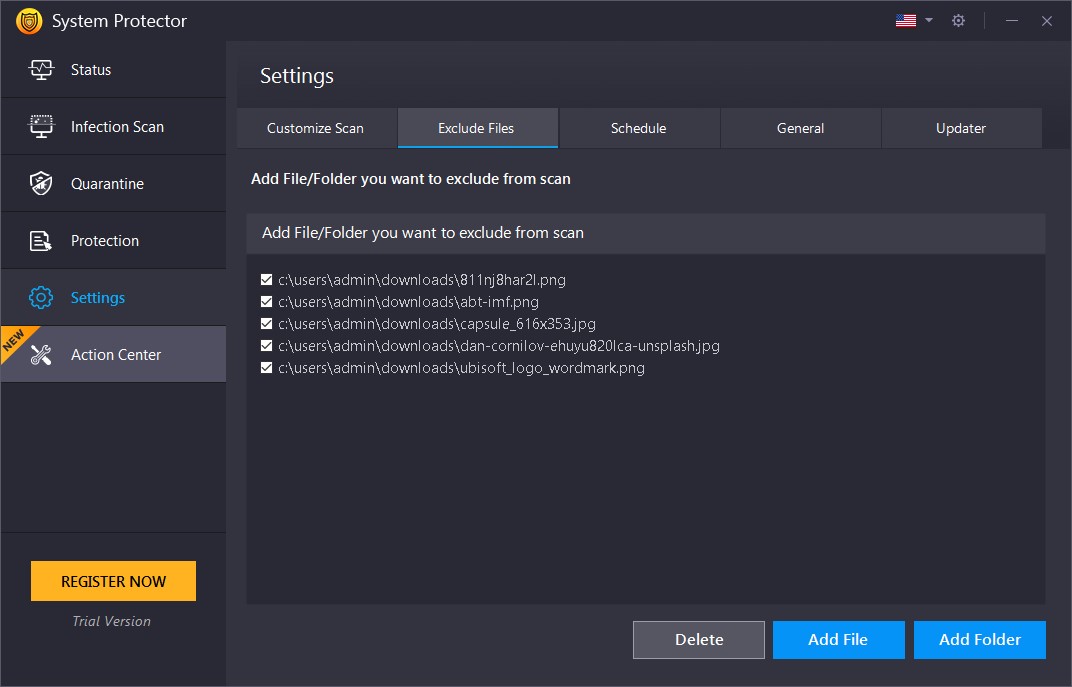
Files and folders you do not wish to include in scanning may be added to the Exclude File List. You may click "Add File" and "Add Folder" to add files and folders to the Exclusion List. You can also click "Delete" to remove individual/multiple selected items from the list.
Schedule
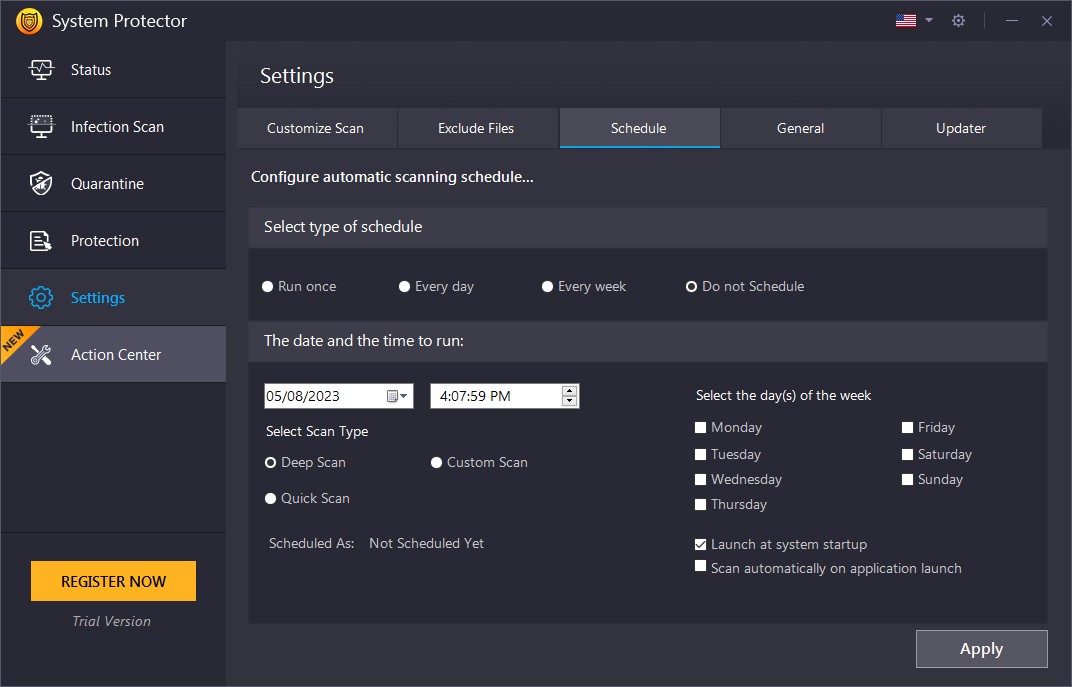
If you are short on time and don't want to run the scan manually, you can select the type of schedule and decide the date and time to run it. Also, you can determine if you want to Launch at system startup or Scan automatically on application launch.
General
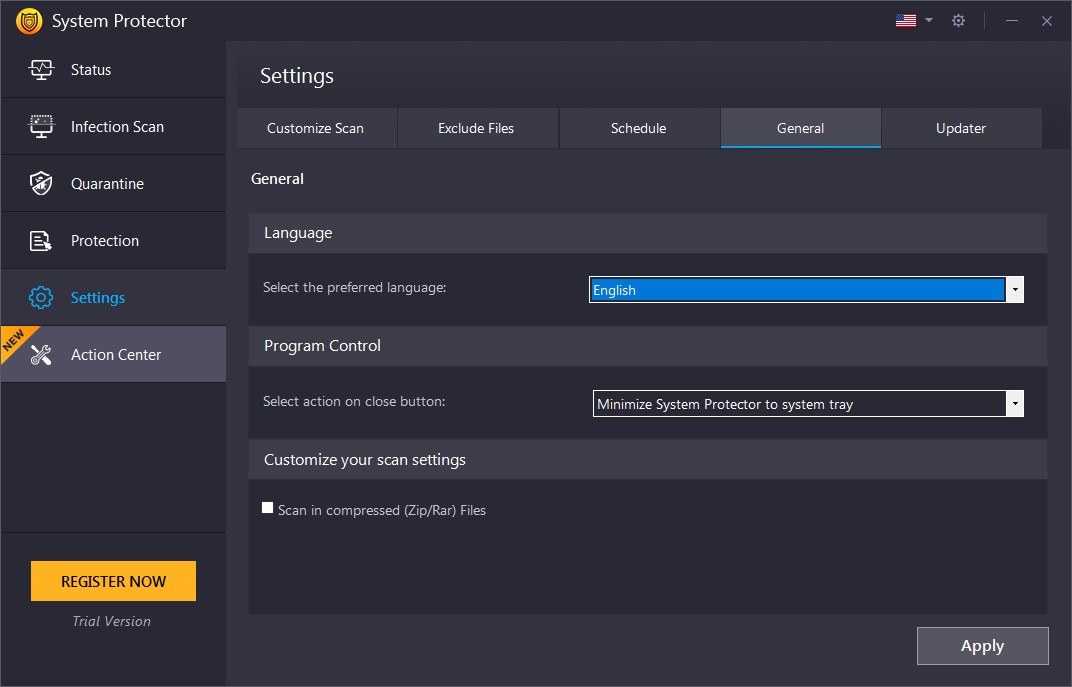
From this tab, you can change the language, select the action on close settings, and decide whether to scan Zip/RAR files.
Update
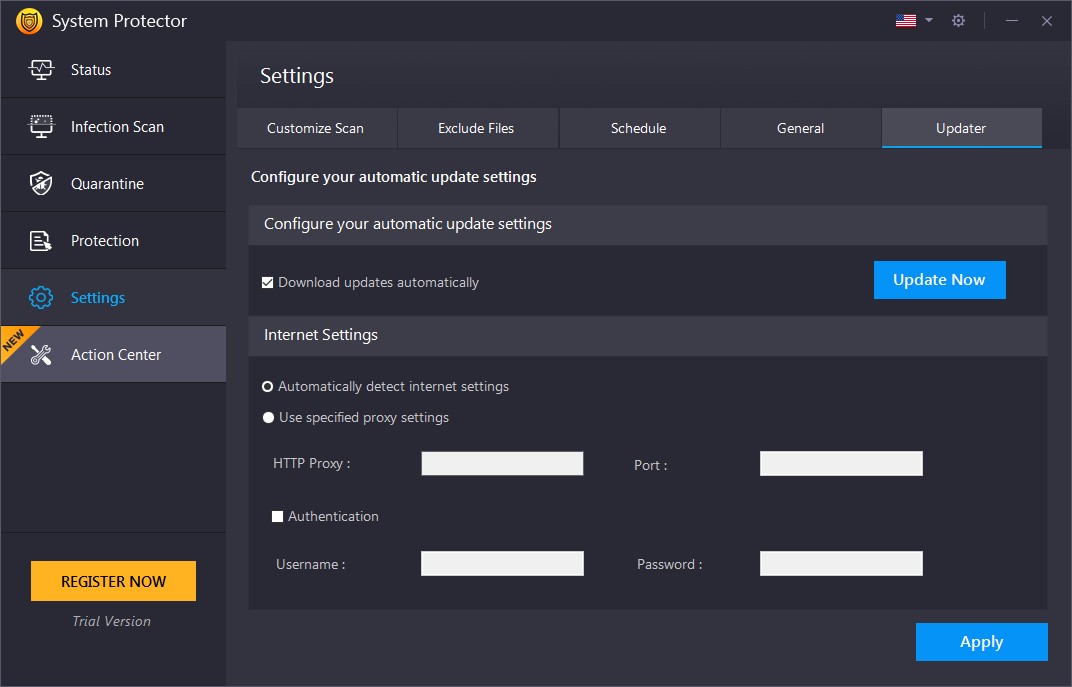
Configure automatic update settings through this tab. Decide how you want to download updates via proxy or auto-detecting internet settings. To save the settings, click the Apply button.
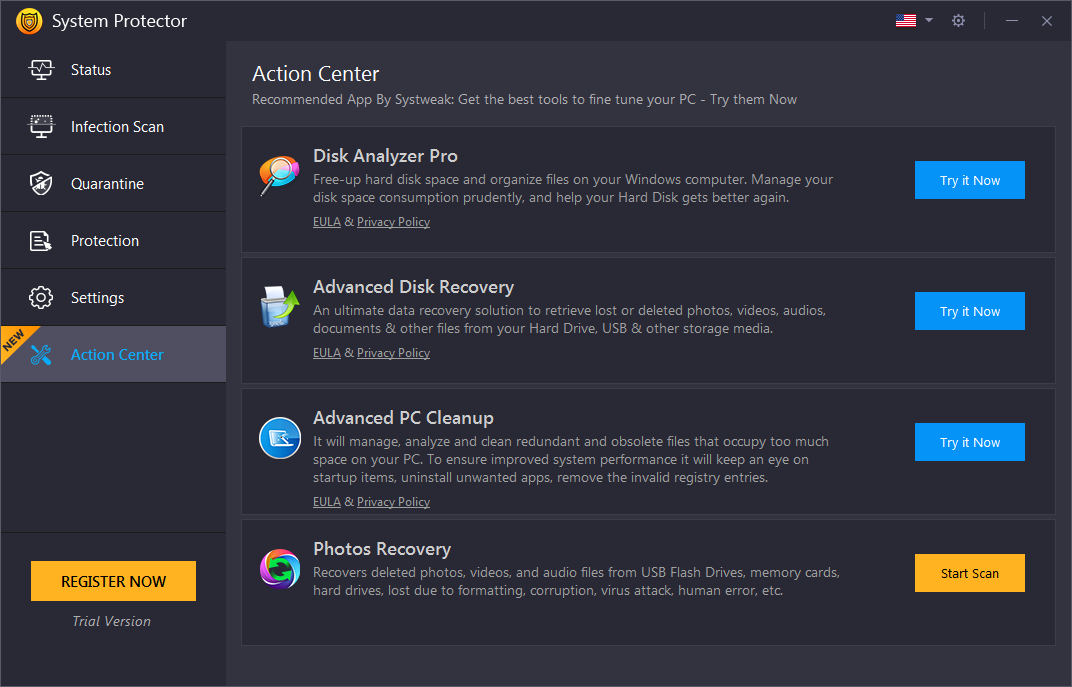
Action Center
The tool even gives suggestions for the best tools you can install on your PC to keep it clean and optimized.
What is Privacy Protector?
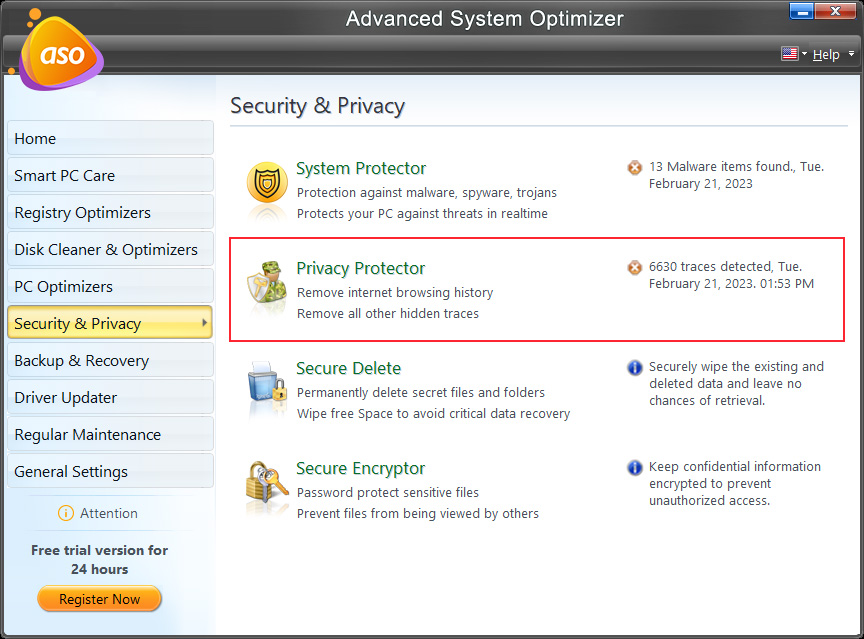
Windows store the traces of actions performed on the system. These traces include the history of programs used, files accessed, recently opened documents, and data related to internet history like websites visited, images viewed, data downloaded, etc.
Privacy Protector is an easy-to-use tool that helps remove these traces from the system, stopping unwanted people from accessing personal information. To regularly eliminate these traces from the system and keep personal information private, using Privacy Protector is recommended.
How does Privacy Protector help?
Privacy Protector helps erase all the shreds of personal information and internet-related activities on the system. It quickly detects internet history, the history of applications and documents used, the recent data accessed, URLs in the address toolbars, deleted files in Recycle Bin, and more. As a result, disk space is also saved (storing such information consumes some hard disk space).
Privacy Protector does a dual job; firstly, it maintains the system and user privacy, and, secondly, it helps free up space on the hard disk. It is easy to use, and with simple clicks, you can regularly delete the privacy-exposing traces from the system and keep the privacy intact.
How to use Privacy Protector?
Privacy Protector scans through the system to find the traces lying on the system that can endanger privacy. The scan is divided into 5 simple steps:
Scan Tab
1). Welcome
2). Scan
3). Results
4). Clean
5). Finish
Step1: Welcome
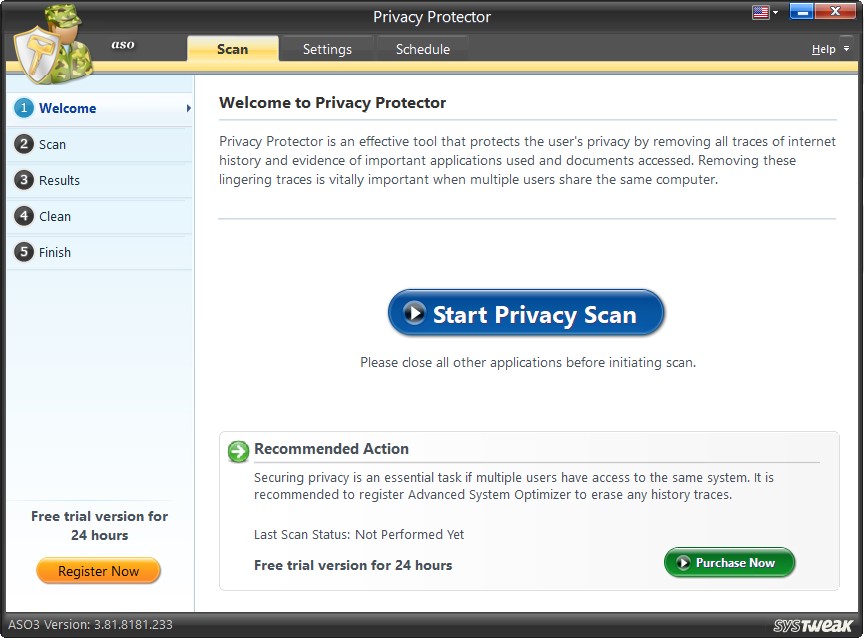
The Welcome screen of Privacy Protector allows you to initiate the Privacy Scan & detect traces of internet history, evidence of significant applications used, and documents accessed. It comprehensively scans all the system sections and identifies the traces that can expose users' privacy.
The Welcome screen also displays the system summary showing the last scan details.
To start the process of scanning, you may click on "Start Privacy Scan".
Note: All applications currently in use should be closed before initiating the scan.
Step2: Scan
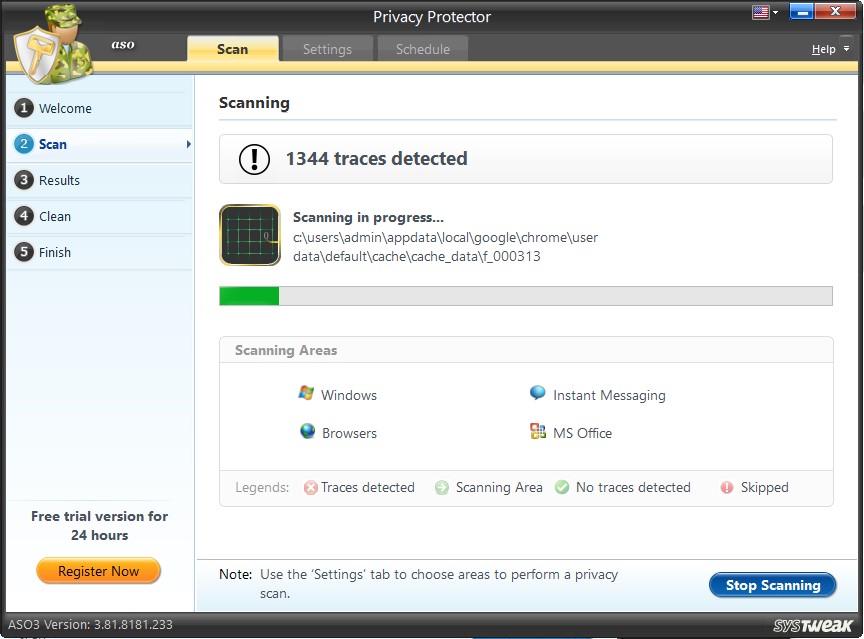
On initiating the scan, we navigate to the next step, and Privacy Protector analyzes the system in its entirety to detect the traces. To stop the scanning process at any point, you may simply click on the "Stop Scanning" button.
The system has been broadly divided into four categories for your convenience: Windows, Browsers, Instant Messaging, and MS Office.
Step3: Results
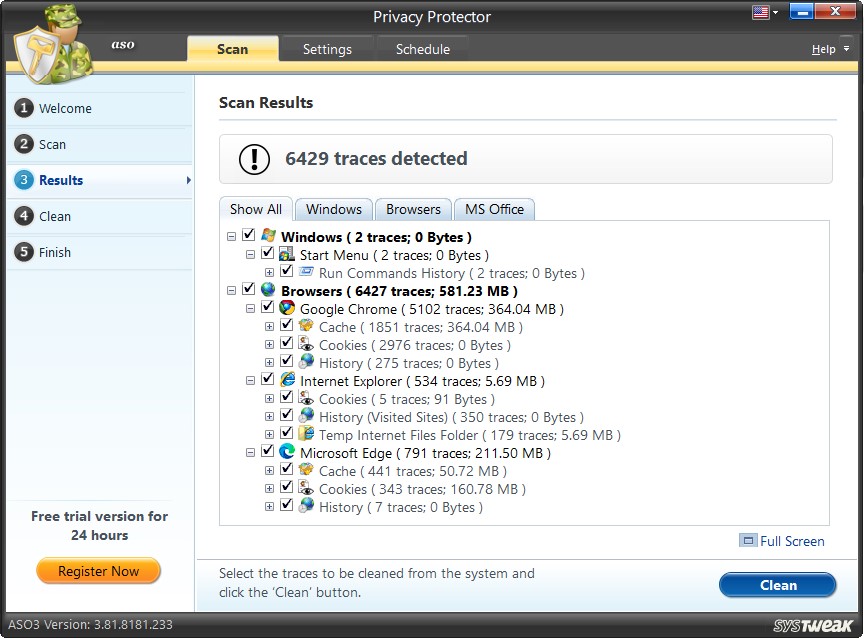
Scan Results
Once the scan is through, the results are displayed in tabular format and segregated into different sections. Click on the "Full Screen" link to view the scan results in full-screen mode.
You may check the items removed from the list and click on the "Clean" button.
Step4: Clean
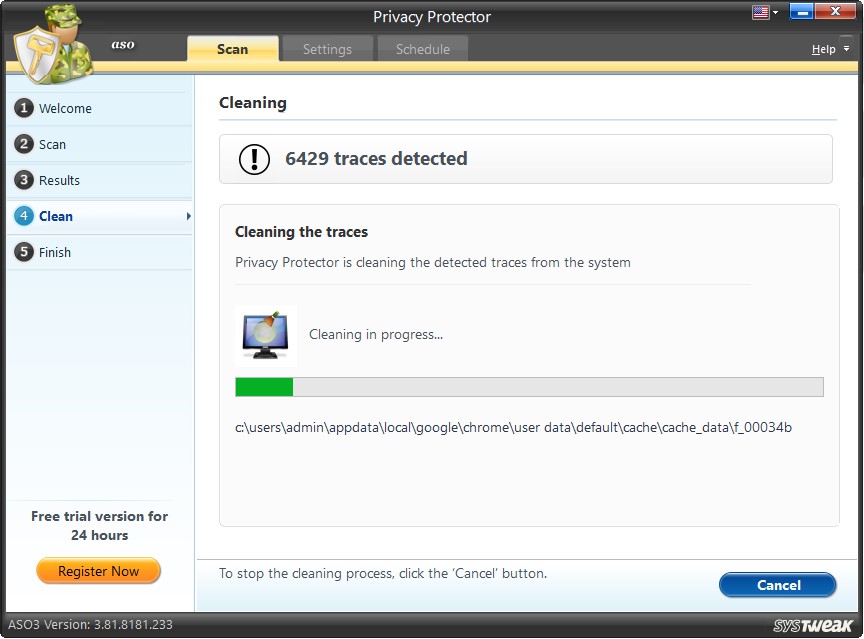
Under this step, the selected traces are permanently removed from the system. The progress bar shows the progress. If you want to stop the cleaning in between, you may click on the "Cancel" button.
Step5: Finish
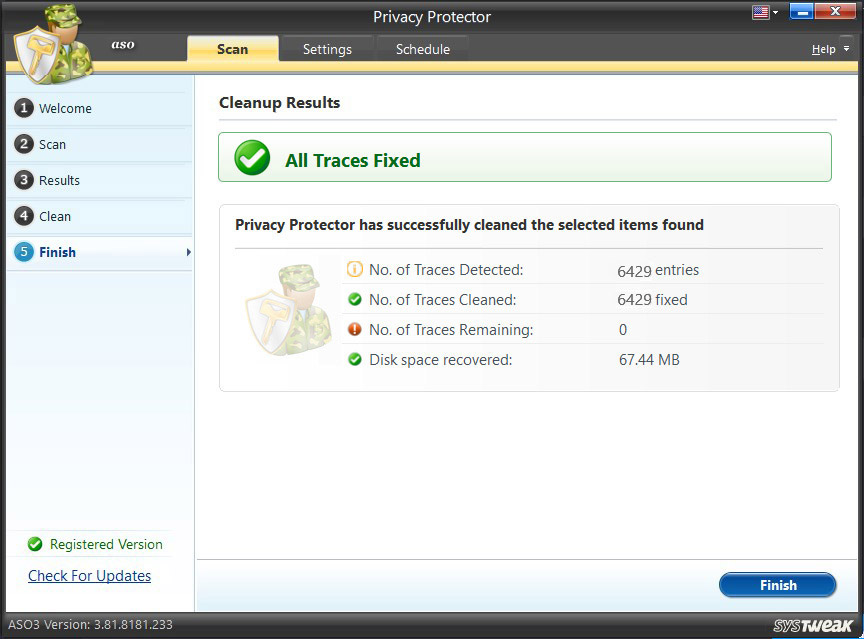
Cleanup Results
In the end, you see the cleanup summary with details like:-
• No. of Traces Detected
• No. of Traces Cleaned
• No. of Traces Remaining
Disk Space Recovered after removing the selected traces.
Settings Tab
The scan can be customized using various settings provided under the "Settings" tab.
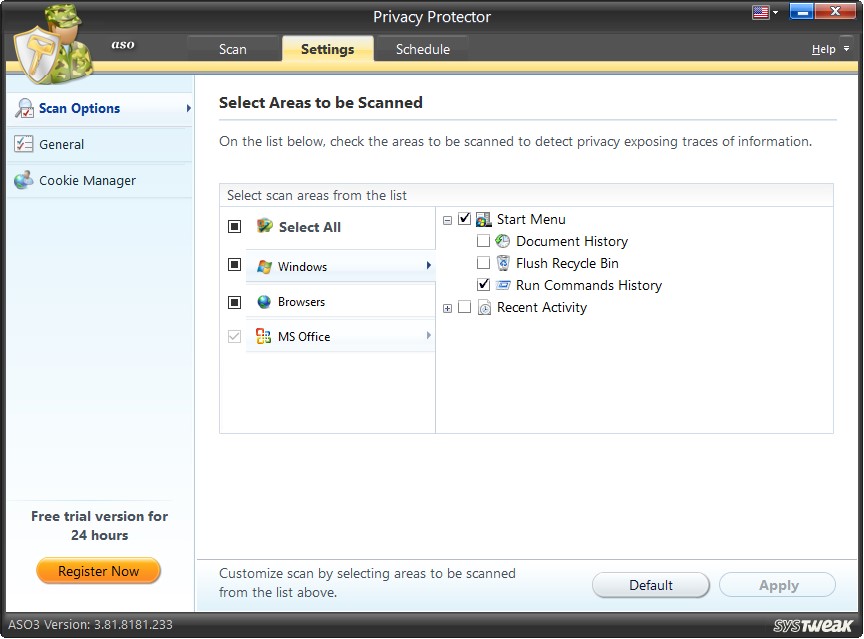
Scan Options
Select Areas to be Scanned
The system has been divided into 3 broad categories: Windows, Browsers and MS Office. Each category covers various subcategories. You can select the areas to be scanned per your needs and preferences.
Windows - Under this category, the following areas are thoroughly scanned to detect privacy exposing any traces.
- Start Menu
- Recent Activities
Browsers – This category covers the following areas during the scan.
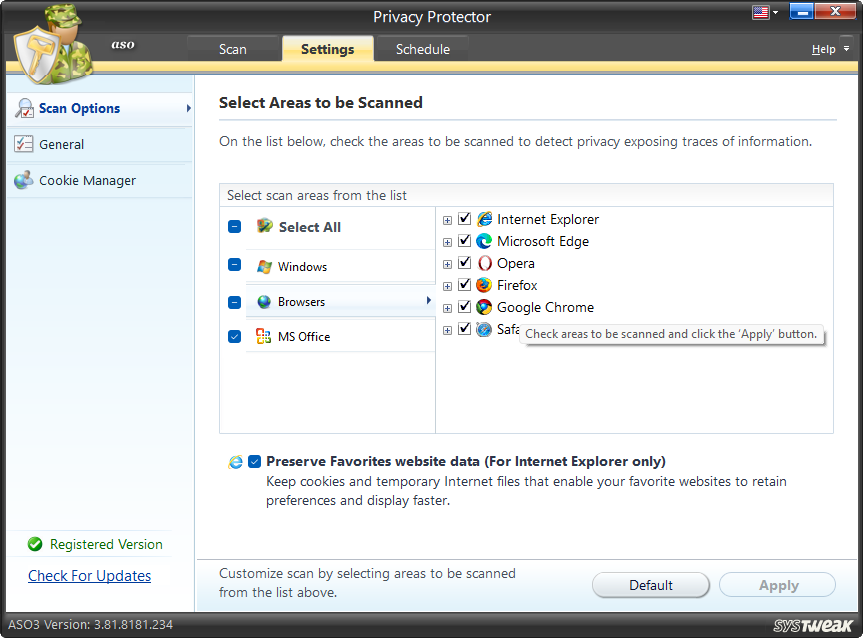
- Internet Explorer
- Microsoft Edge
- Opera
- Firefox
- Google Chrome
- Safari
MS Office – Under this category, the following areas are logically scanned.
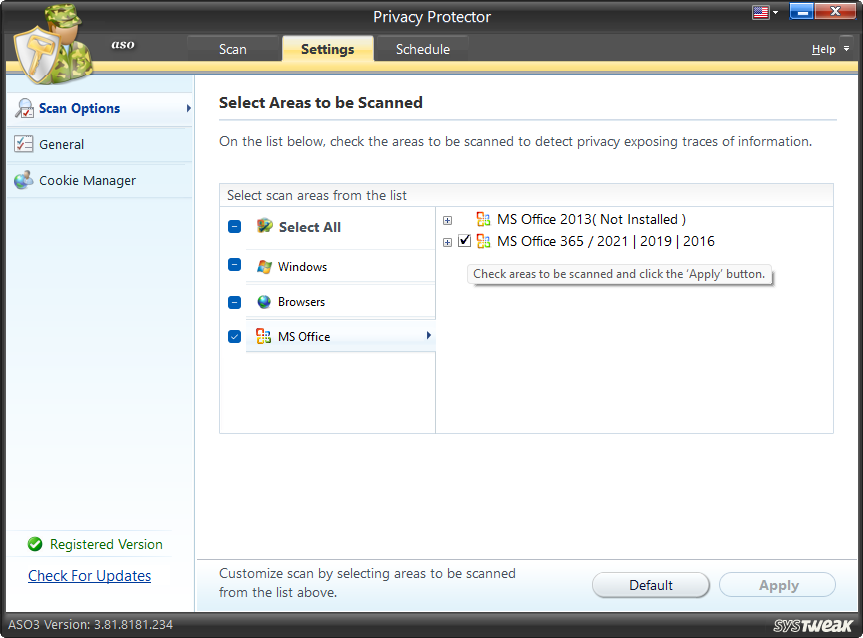
- MS Office 2013
- MS Office 365 / 2021 | 2019 | 2016
General
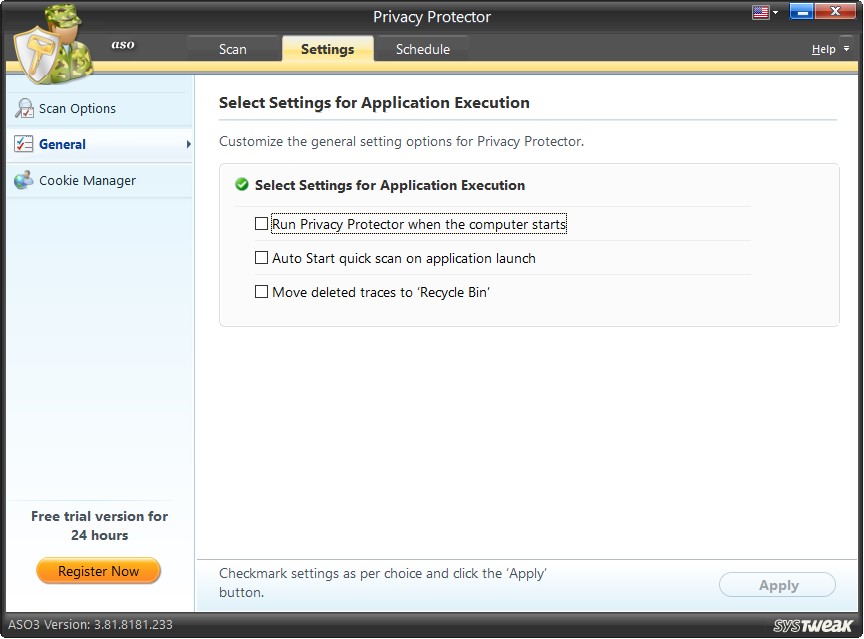
Under General Settings, there are three options. Check the desired options and click the "Apply" button to save the changes.
- Run Privacy Protector when the computer starts – Check this option to run Privacy Protector at Windows startup.
- Auto Start Quick Scan on application launch – Check this option to automatically start the Quick Scan as soon as the application is launched.
- Move deleted traces to ‘Recycle Bin’ – Check this option to move the deleted traces to Recycle Bin.
Cookie Manager
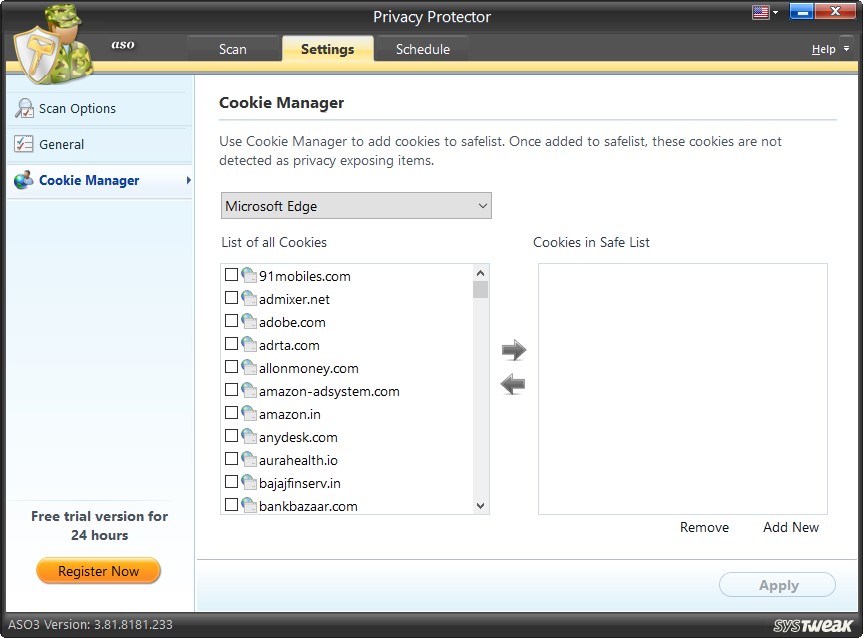
Manage cookies from different browsers like Firefox, Google Chrome, Microsoft Edge, Netscape, Opera, and Safari. From here you can remove them, and add to safe list.
Schedule Tab
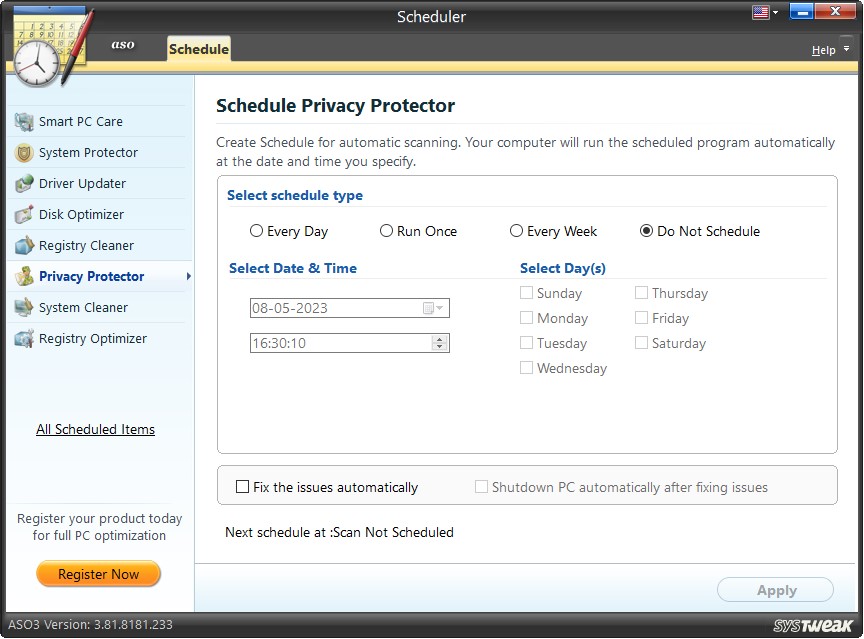
To stay protected cleaning privacy and exposing traces is recommended. The scheduler facilitates scheduling the process of wiping digital footprints. The scan starts automatically on the predefined day, date, and time. This is a helpful mechanism as we might skip this important task quite often.
You may set the scan time by using the various options given.
Options to schedule scan:
“Every Day” at a specified time.
OR “Run Once” on a specified date (can be set using the calendar dropdown) and time.
OR “Every Week” on specified days at a particular time (checkmark the days of the week for the automatic scan).
OR “Do Not Schedule” scan (undo the scheduled scans).
Every time you schedule a scan, it is necessary to click on the “Apply” button to save the changes you have done.
The next scheduled scan is displayed at the bottom of the screen. You may also view all scheduled scans by clicking on the link “All Scheduled Scans” in the left panel.
What is Secure Delete?
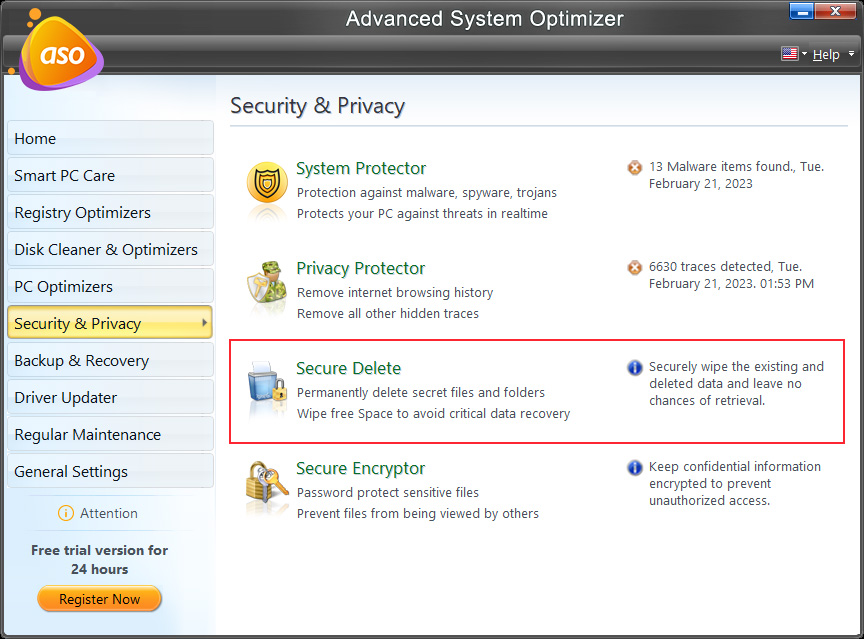
Secure Delete is the most stable and reliable way to remove deleted files permanently from a PC. It permanently wipes the data from selected files, folders, directories, and drives and overwrites the disk space with random patterns, thus cutting down the chances of data recovery.
Why is it important to permanently delete files from the PC?
Many of us would not know when we delete a file; it is not deleted from the system, only its reference is deleted. This infers that the files with their contents are still written on the disk but are invisible to us through Windows Explorer. The space from which the file has been removed is called the free space, and the file's content, if not overwritten, can be recovered from this free space. Also, if the exact file size doesn’t overwrite the whole of the free space, a major or a minor chunk of data will still be readable. Hence, it is necessary to protect our personal information from unauthorized hands using some technique that expertise in deleting the data permanently makes you feel safe.
How Secure Delete, permanently deletes files?
It is a fact that data deleted from the system is not permanently removed; it remains there on the system. Using various recovery tools available in the market, this deleted data can be recovered. But a tool like Secure Delete is needed if you don’t want this deleted data to be restored.
recoverable. It identifies the free spaces on the disk where the previously deleted data cluster still exists and overwrites these spaces with random digits or patterns, thus permanently wiping out the data. Data can be overwritten several times to ensure the most negligible chances of recovery.
How to use Secure Delete?
Designed with a user-friendly and comprehensible interface, Secure Delete keeps novice users in mind. The tool helps permanently wipe out the previously deleted files and folders, contents of the Recycle Bin, or some of a specific drive, leaving no possible chance for retrieval.
Note: Secure Delete should be used with full caution as files and folders deleted once cannot be retrieved using the finest recovery utilities.
Secure Delete - Interface
The module permanently deletes files from the PC and has a straightforward interface. Here we will explain each tab and the functionality of each button.
Files and Folders Tab
The whole process of securely deleting items from the system can be summarized in 4 steps:
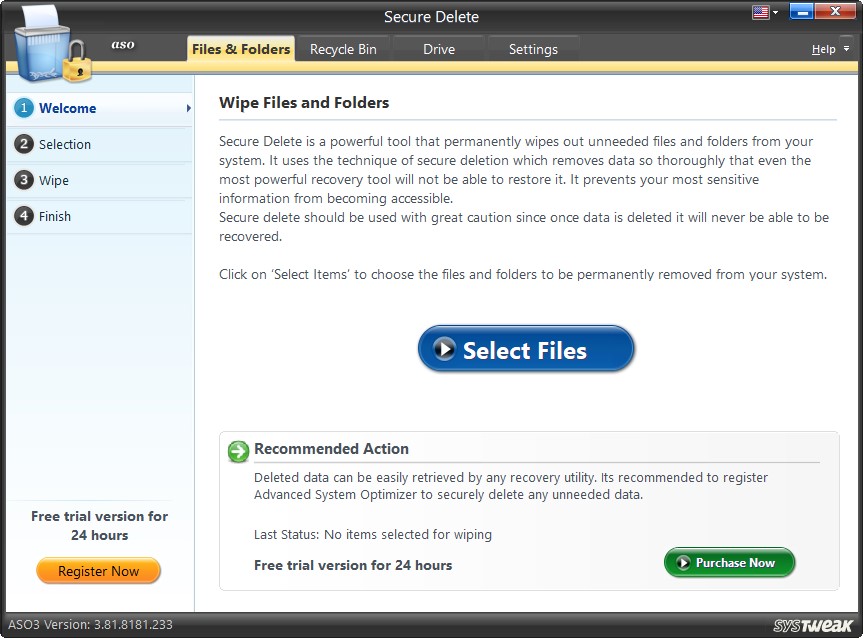
1). Welcome
2). Selection
3). Wipe
4). Finish
Step1: Welcome
The Welcome screen guides walk us in a self-explanatory manner. Firstly, you must select the files you want to wipe completely. For this you can use Windows Explorer.
On clicking the “Select Files” button in the middle of the screen, you move to the next step, wherein you may select items to be permanently deleted from the system.
The System Summary is displayed in the screen's lower half, giving you the details via Last Wiped, Items Wiped, Space Recovered, and Items Wiped to Date.
Step2: Selection
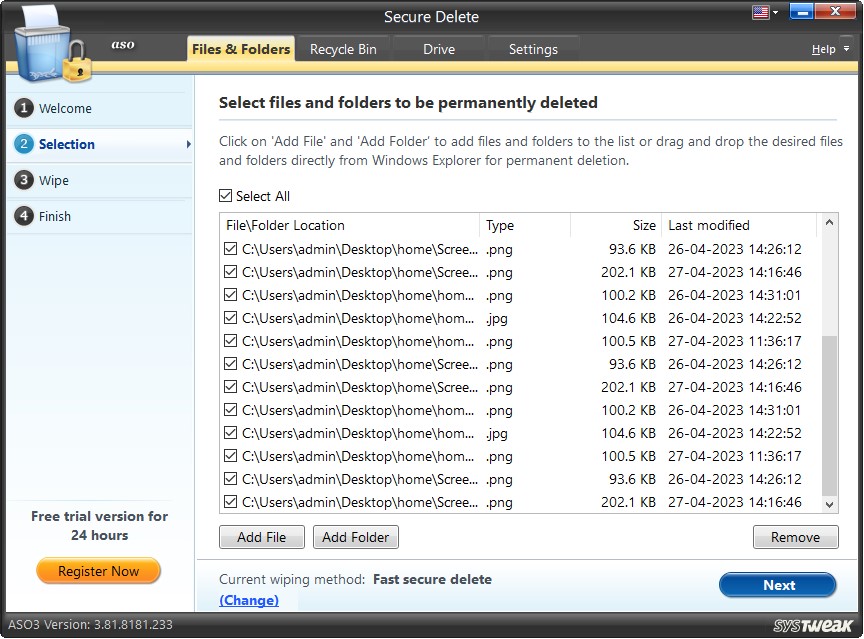
Select Files and Folders to be Permanently Deleted.
Select the files and folders to be securely deleted. You may click the "Add File" and "Add Folder". The "Remove" button allows removing added files and folders from the list.
Each item in the list has a corresponding checkbox placed against it. You may securely check the items you wish to delete and click the "Next" button.
To wipe out selected files and folders, enter the confirmation code in the box and hit Next.
Change Wipe Method
There are three types of wipe methods; Secure Delete is used to wipe out the data permanently.
The Wipe Method used as a default method can be changed by clicking on the "Change" link. This opens a new window showing the three Wipe Methods. You may keep the default Wipe Method or change it to another, depending on your choice. If changed, you may return to the default method by clicking on the "Default" button.
Note: We will explain the three types under Settings.
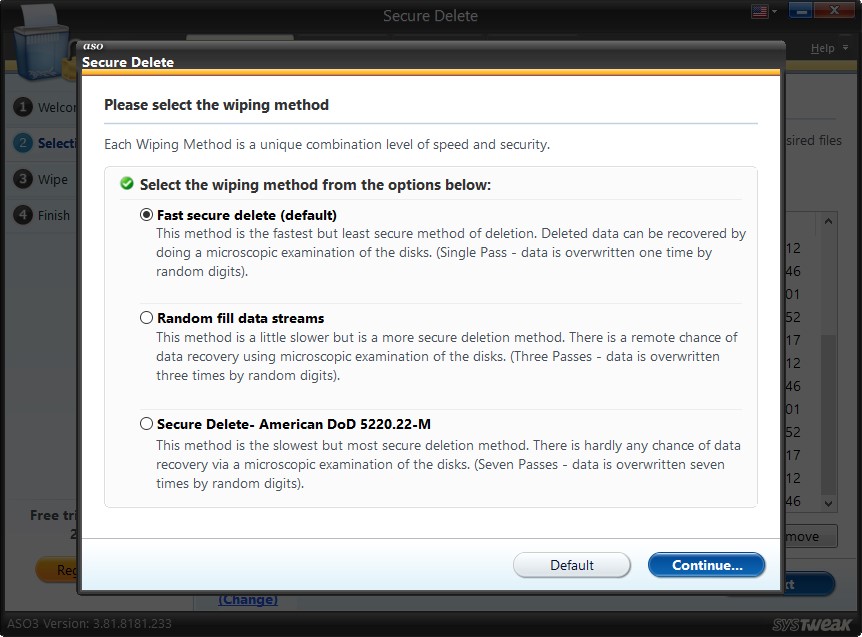
Once the choice is made, you may click on the “Continue” button to continue the secure deletion process.
Step3: Wipe
Before permanently wiping out the selected files and folders, Secure Delete asks for the user’s confirmation to do so. The removal process starts if the user types “the displayed number” in the confirmation box. (Note: Data deleted by Secure Delete is unrecoverable)
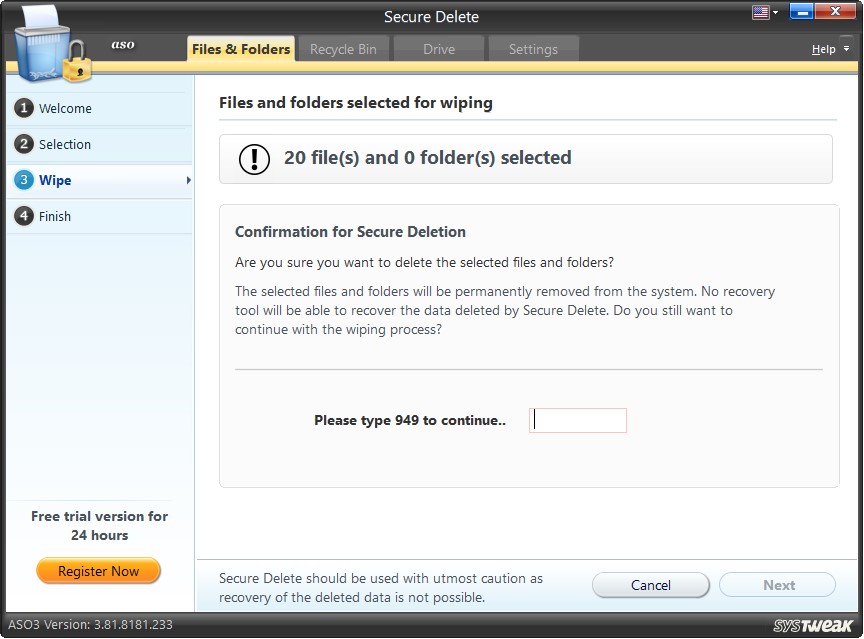
The “Cancel” button takes you to the previous screen, and the “Next” button permanently wipes the selected files and folders.

You may click on the “Stop” button anytime to stop the secure deletion process.
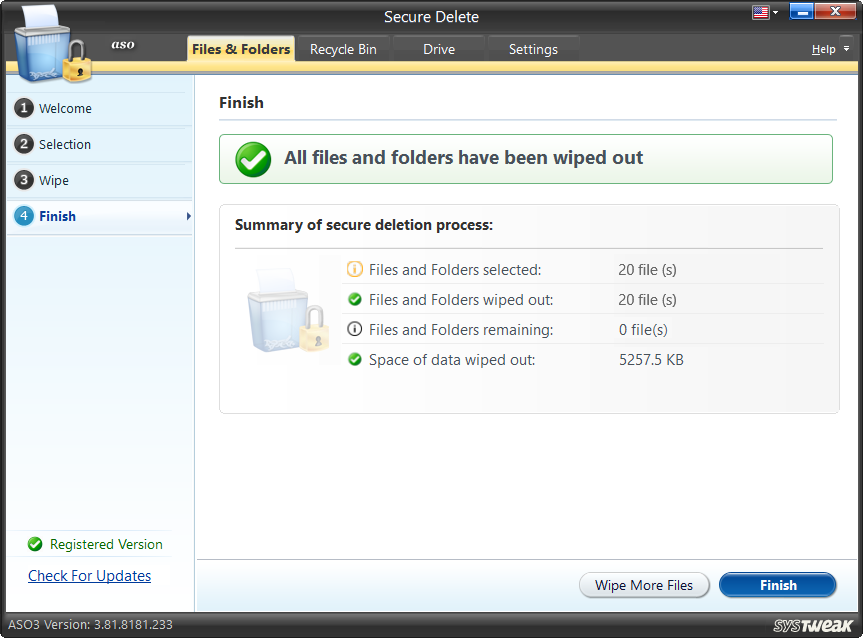
Step4: Finish
The last step shows the summary of the secure deletion process. It shows the total number and volume of files and folders wiped out from the system. To add some more files for removal, you may click on the button “Wipe More Files.” By clicking on the “Finish” button, you may go back to the main/welcome screen.
Recycle Bin Tab
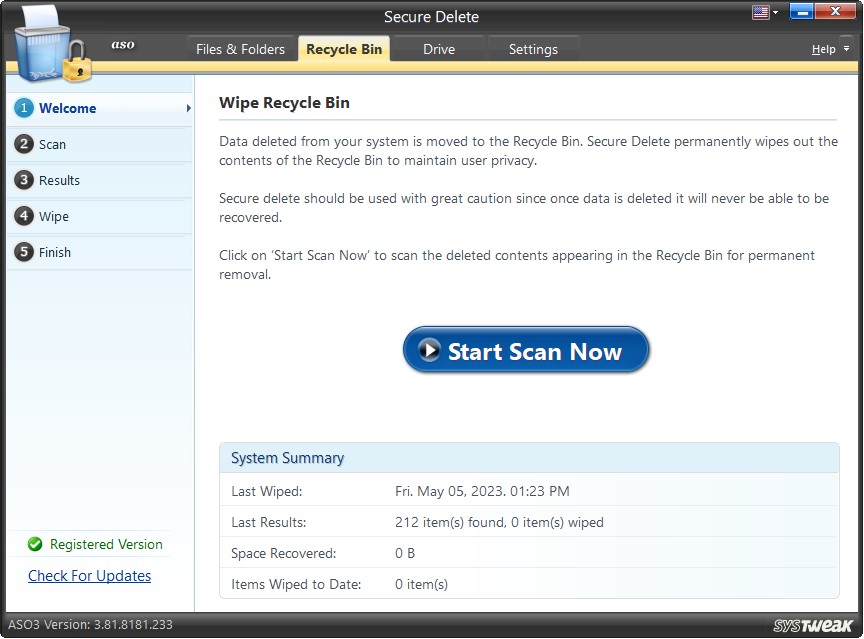
It is important to remove items from the Recycle Bin that are in it. These items may hold critical personal information and can be easily recovered if not securely deleted.
Secure Delete destroys the already deleted data of the Recycle Bin in 5 simple steps (see left panel):
1). Welcome
2). Selection
3). Results
4). Wipe
5). Finish
Step1: Welcome
The items in the Recycle Bin or deleted items from Recycle Bin should not be accessible to others. To securely delete the items from the Recycle Bin, click the “Start Scan Now” button to initiate the scan process.
Step2: Scan

Scanning - Recycle Bin
Secure Delete will thoroughly analyze the Recycle Bin and detect files and folders that should be permanently wiped out of the system to keep the user’s privacy intact.
The process may be aborted by clicking on the “Cancel” button.
Step3: Results
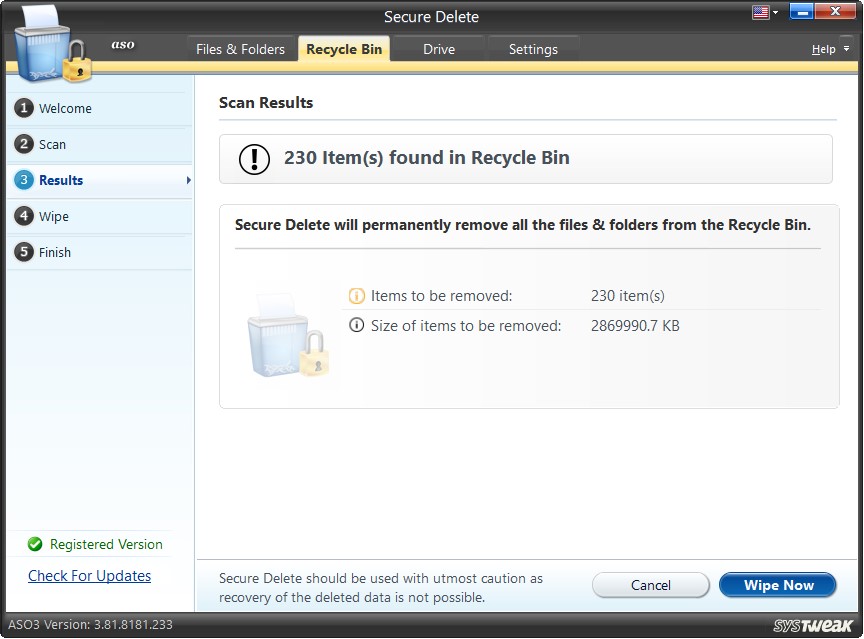
Scan Results
The scan results show the number and volume of items found in the Recycle Bin which need secure deletion.
Clicking on the “Cancel” button stops the scan, and clicking on the “Wipe Now” button initiates the removal process.
Step4: Wipe
Wiping – Recycle Bin
Before removing the items, Secure Delete takes the user’s confirmation and waits for the user to enter the displayed security code in the confirmation box. The “Cancel” button will take you to the main/welcome screen.

Once done, clicking the “Wipe” button starts the removal procedure for the items from the Recycle Bin.
Change Wipe Method

Click on the link “Change” to change the default Wipe Method. A new window opens, showing the three different methods. You may keep the default Wipe Method or change it to another, depending on your choice.
If changed, you may return to the default method by clicking on the “Default” button. Once the choice is made, you may click on the “Continue” button to continue the secure deletion process.
You may click on the “Stop” button at any time during the process to terminate the wiping process.
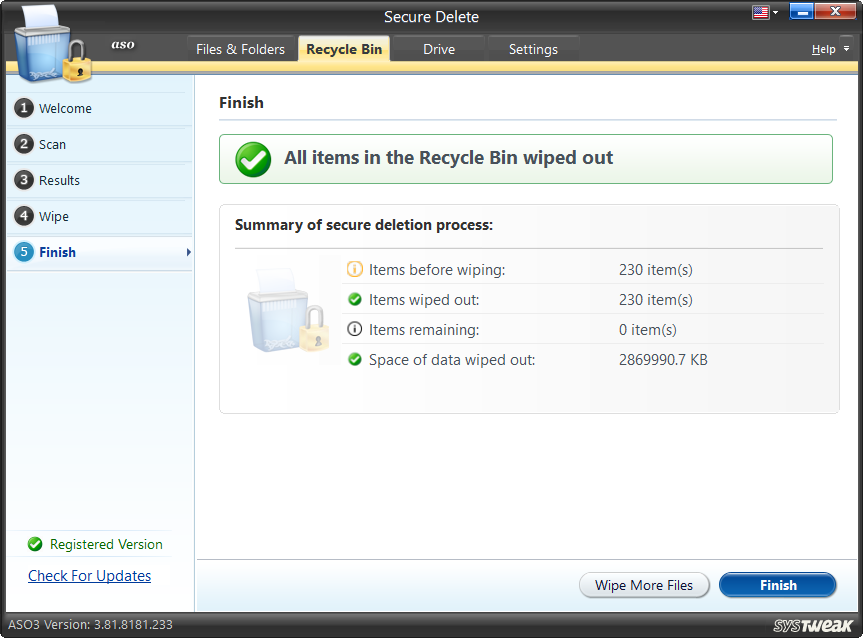
Step5: Finish
The last step shows the summary of removal. It shows the number and volume of items wiped out from the Recycle Bin.
To rescan the Recycle Bin for more files and folders, click on “Wipe More Files.” Also, by clicking on the “Finish” button, you may go back to the main/welcome screen and perform the same action mentioned above.
Drive Tab
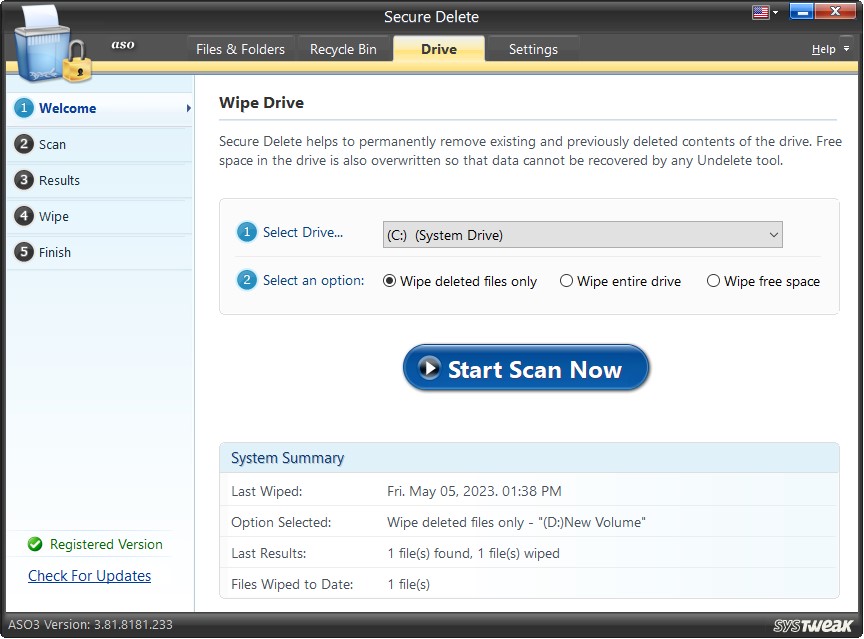
Secure Delete assists in removing the previously deleted items of the drives permanently or helps in wiping out the entire drive with all its contents or securely deletes the free space of the selected drive.
The action is simplified into 5 steps (see left panel):
1). Welcome
2). Selection
3). Results
4). Wipe
5). Finish
Step1: Welcome
Three actions have to be performed on this screen. The first two are numbered.
You may select the hard drive you wish to scan from the drop-down list for deleted files and folders. This is important because the deleted files are not removed from the drive and can be retrieved easily.
2). Select an option:
The three options are provided hereunder.
- Wipe deleted files only – Choose this option to permanently wipe out the files which have been previously deleted from the selected hard drive.
- Wipe the entire drive – Choose this option to securely delete all the contents (existing and previously deleted) of the selected drive so that nothing is recoverable.
- Wipe free space – Choose this option to identify the free space and overwrite data on it so that no chances of data retrieval are left.
Note: These settings can also be changed using the “Settings” tab.
Once you choose the hard drive and the kind of wipe, you can continue with the process by clicking on “Start Scan Now”.
Step2: Scan
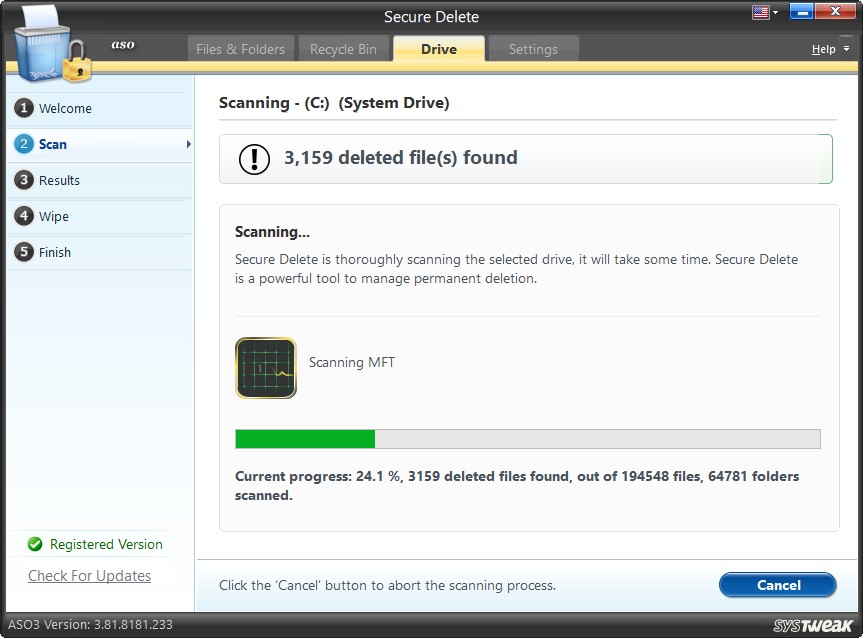
Scanning
Secure Delete performs an extensive scan on the selected hard disk. The progress bar in the screen's lower half shows the scan's progress.
If you want to discontinue the process, you may click on the “Cancel” button.
Step3: Results

Scan Results
Once the scan is through, the scan results are put forth.
On clicking the “Wipe Now” button, securely delete the files and folders found in the scan.
The “Cancel” button takes you back to the Welcome screen. You may then select another drive on the hard disk to conduct a scan on it.
Step4: Wipe
Before removing the items, Secure Delete takes the user’s confirmation and enters the code to proceed. The “Cancel” button will take you to the main/welcome screen.
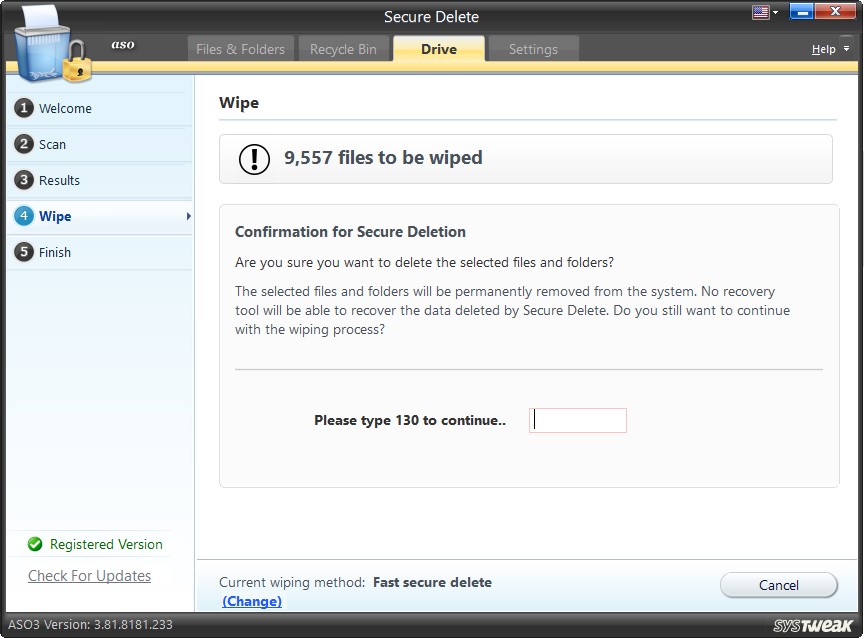
Clicking on “Wipe” starts the wiping process.
Step5: Finish
The last step shows the summary of the wiping process.
Clicking on “Wipe More Files” will take you to the Welcome screen to begin the wiping process for the next drive.
The “Finish” button also does the same job. It takes you back to the Welcome screen to initiate a scan for the remaining drives.
Settings Tab
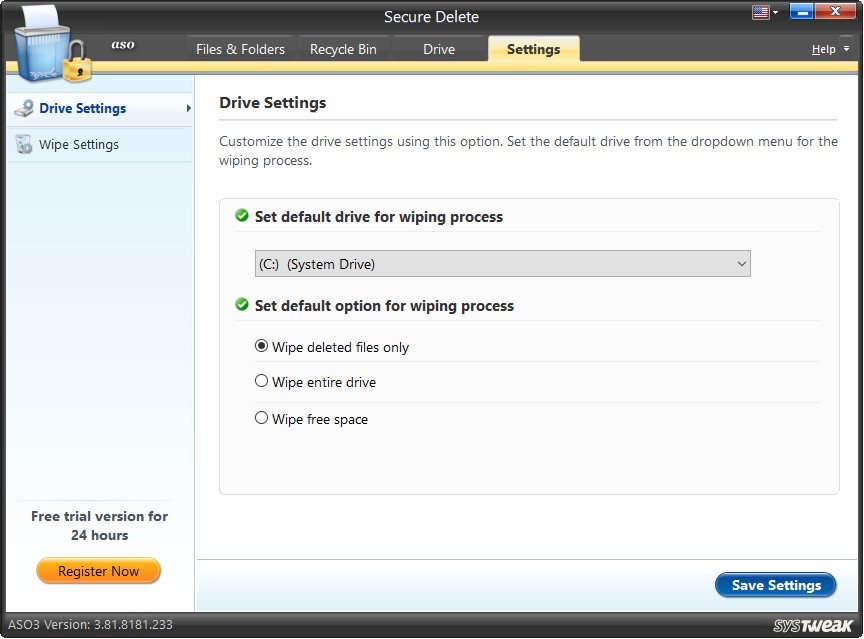
Some settings can be changed using the option given in this section.
Drive Settings
Under this setting type, you may:
Set the default drive for the wiping process.
Select the drive from the dropdown menu to set a drive for default scanning. This infers as you hit the button “Start Scan Now,” the default drive will be scanned.
Set default option for wiping process.
There are three options given for the wiping process.
- Wipe deleted files only – Choose this option to permanently wipe out the files previously deleted from the selected hard drive.
- Wipe the entire drive – Choose this option to securely delete all the contents (existing and previously deleted) of the selected drive so that nothing is recoverable.
- Wipe free space – Choose this option to identify the free space and overwrite data reducing the chances of data retrieval.
Wipe Settings

There are three Wipe Methods provided in Secure Delete. Each method is a combination of different levels of speed and security.
You may choose either of the three according to your choice. But one thing should be kept in mind: the faster the removal process, the less secure it is. This is because the data is often overwritten, consumes more time, and becomes more difficult to recover.
- Fast Secure Delete
- Random fill data streams
- Secure Delete
This method is the fastest but less secure way of deletion. Deleted data can be recovered using microscopic examination of disks. (Single Pass - data is overwritten once by random digits).
This method is a little slower but more secure. There are remote chances of data recovery using microscopic examination of disks. (Three Passes - data is overwritten thrice by random digits).
American DoD 5220.22-M - This method is the most secure but the slowest. There are hardly any chances of retrieving the data using the microscopic examination of disks. (Seven Passes - data is overwritten seven times by random digits). It is the safest mode and, therefore, is recommended.
Secure Encryptor
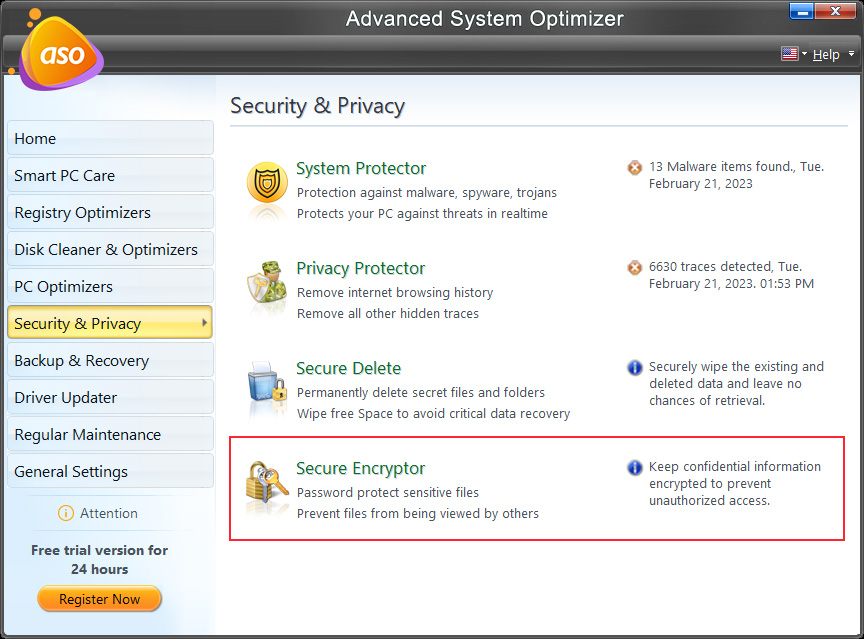

Secure Encryptor comes in handy when you want only authorized personnel to access the information. Using this module, you can encrypt any file or folder and prevent it from having illegal access. To use it, follow these steps:
1. Click Select Files.

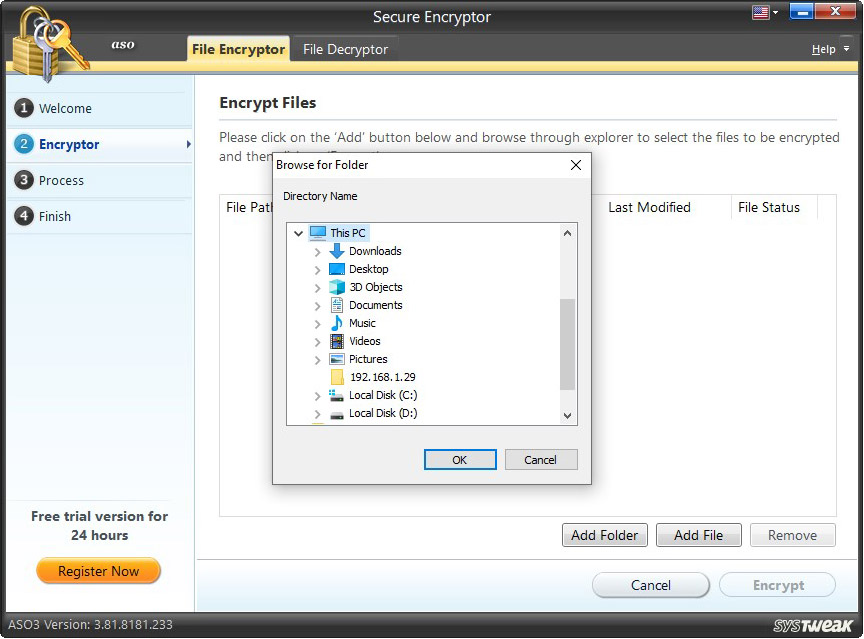
2. Use Add Folder or Add File to browse the location where the file or folder is saved and proceed with encryption.
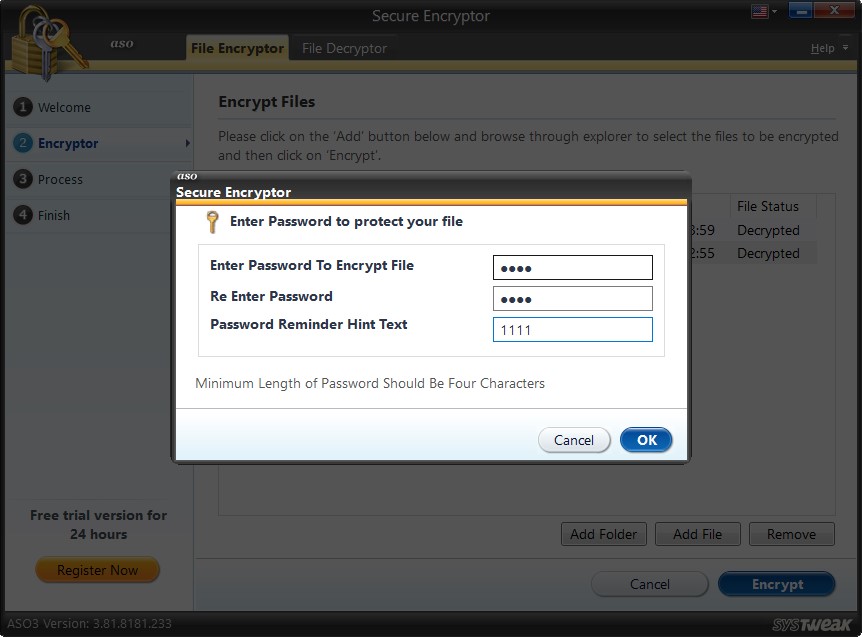
3. Click Encrypt > enter the password to encrypt the file > confirm it > add a hint to remember the password and click OK.
The password must be a minimum of 4 characters long.
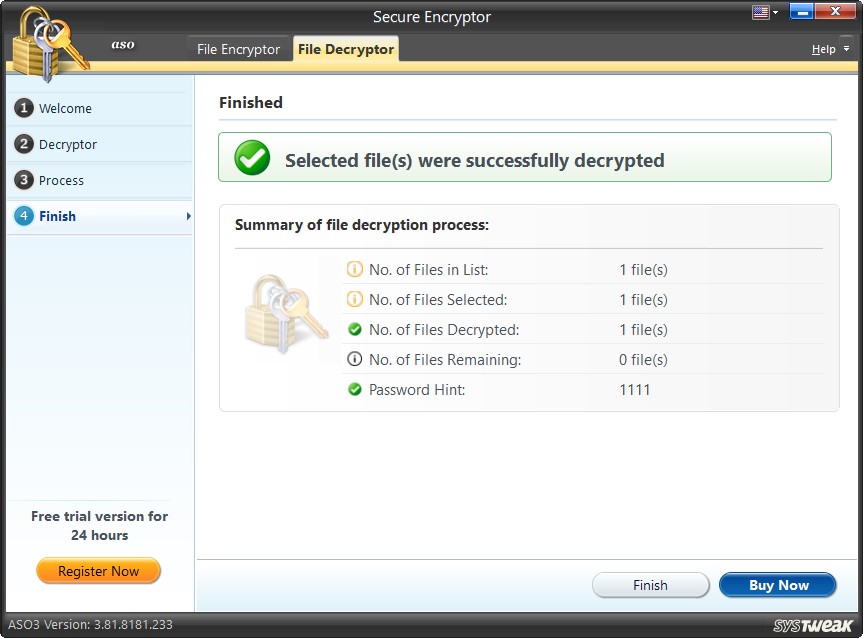
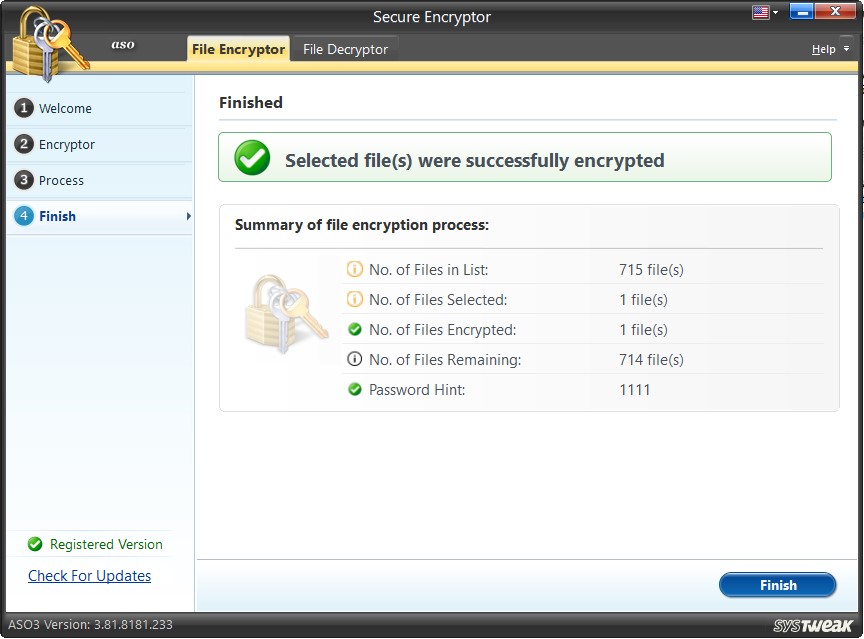
4. Once the selected file is encrypted you will get a summary.
How to Decrypt File?
Secure Encryptor helps both encrypt and decrypt files and folders.
Note - The Secure Encryptor module can only decrypt a file encrypted using it.
To use it follow these steps:
1. Open Secure Encryptor.
2. Click the File Decryptor tab > click Select File.

3. The encrypted file will already be listed. However, if you cannot find it click Add browse and open the file.
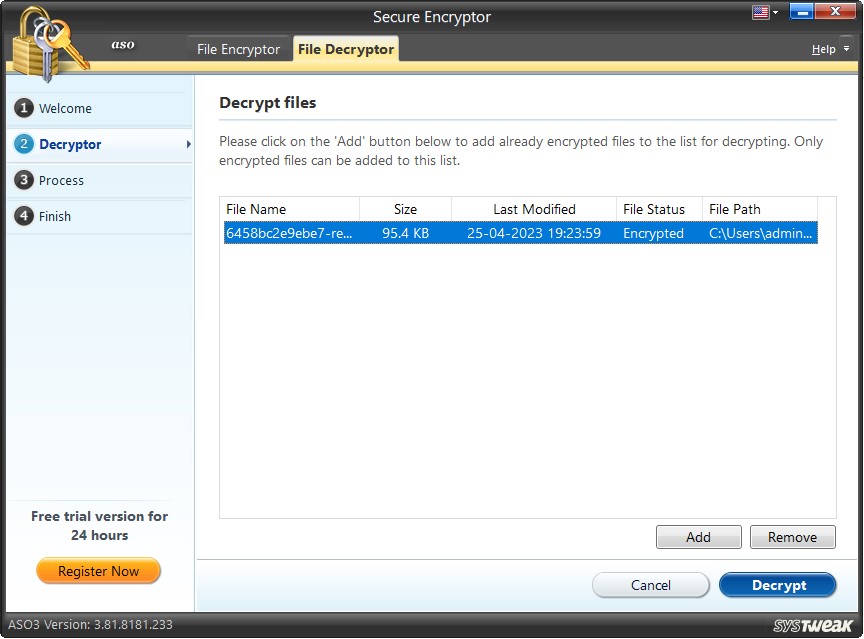
4. Select the file and click Decrypt. You will now be prompted to enter the password you used to encrypt the file. Enter it and click Ok.
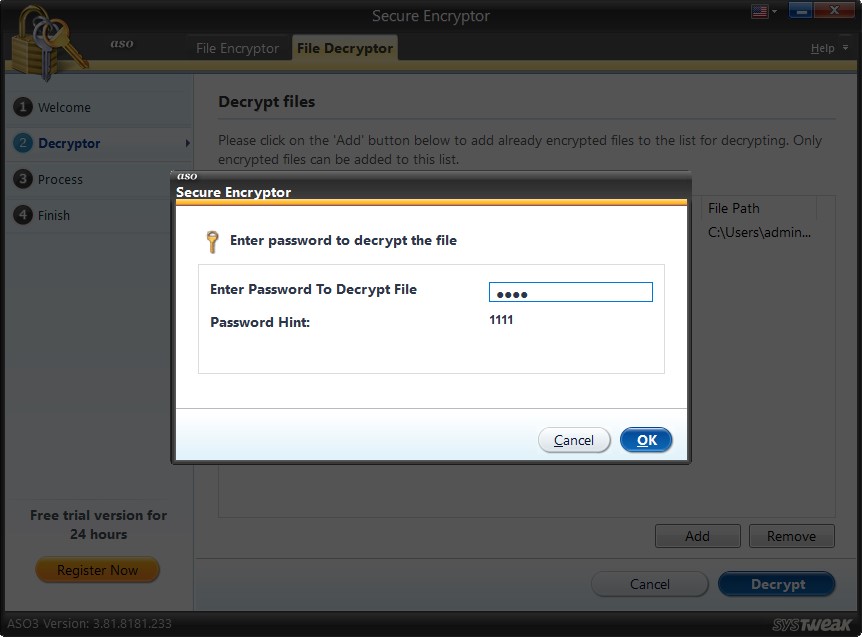
5. The file be now be decrypted and you will see a summary of it.
