 Advanced System Optimizer
Beware Of Fraud Calls & Emails
It has come to our notice that certain people/companies may be impersonating Systweak Software and/or other reputed companies, and are contacting users to promote their services in our name via fake emails and calls.
Please note Systweak Software does not make any unsolicited calls nor sends emails to anyone regarding errors on devices or internet browsing or any such other device issues.
We urge you to beware of any such scammers and request you to NOT call back any number provided in the email or via caller ID in case you receive any unsolicited calls or emails.
Please reach out to us at report@systweak.com in case you come across any such scammers and fraudsters impersonating Systweak Software.
- Getting Started
- Why Should You Use A PC Cleaning Software?
- What is Advanced System Optimizer?
- What is Smart PC Care?
- What makes Advanced System Optimizer the best PC Optimization tool?
- How to Install Advanced System Optimizer
-
 Registry Optimizers
- What is Registry Optimizer
- Disk Cleaners and Optimizers
-
 PC Optimizers
-
 Security & Privacy
- Backup & Recovery
-
 Common Issues Fixers
- Driver Updater
- Regular Maintenance
- General Settings
Advanced System Optimizer / PC Optimizers
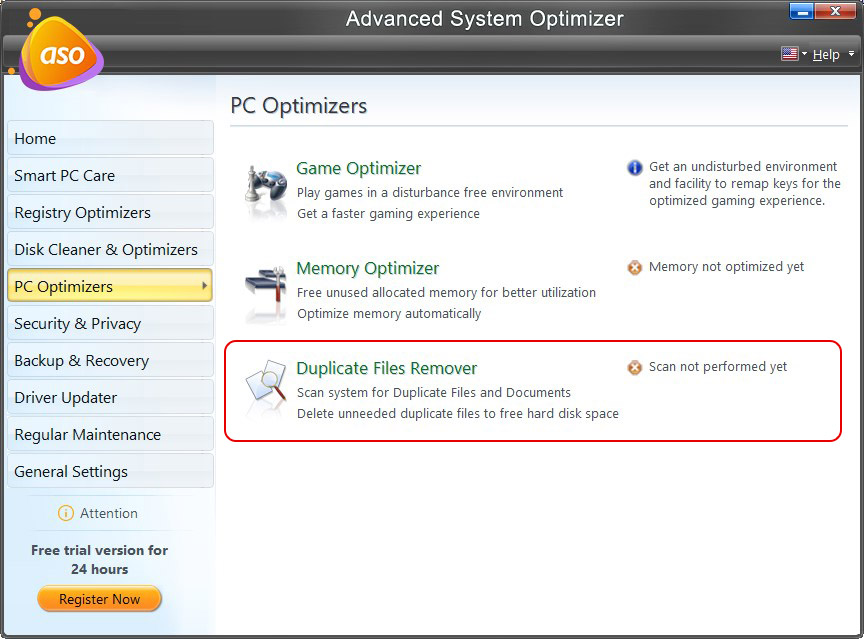
PC Optimizers
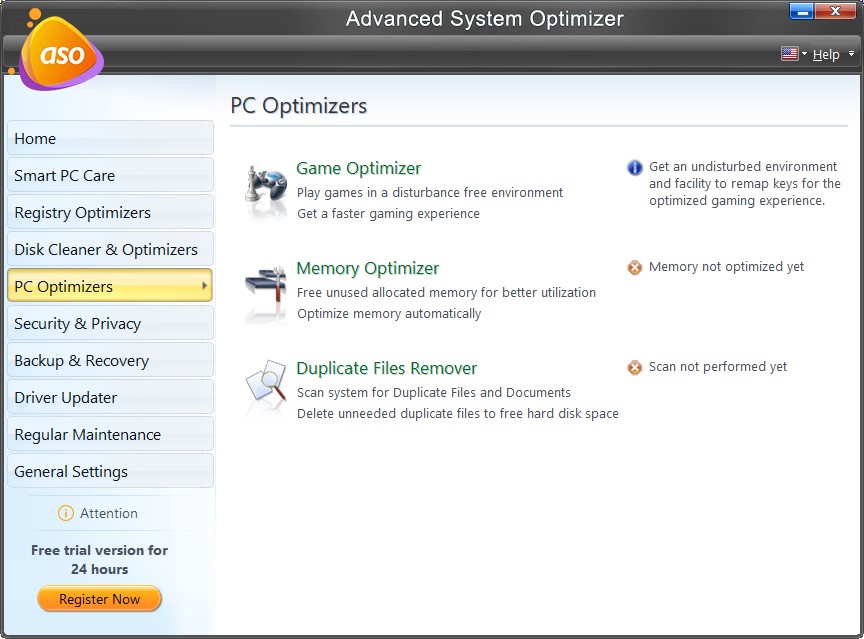
This module is divided into three categories, all of which are required to keep the PC optimized and running smoothly.
- Game Optimizer - Provides a disturbance-free environment to play games and enjoy interference-free gaming.
- Memory Optimizer - Recovers memory within minutes without affecting stability.
- Duplicate File Remover - Get rid of duplicate files and free up space occupied by duplicates.
What is Game Optimizer?
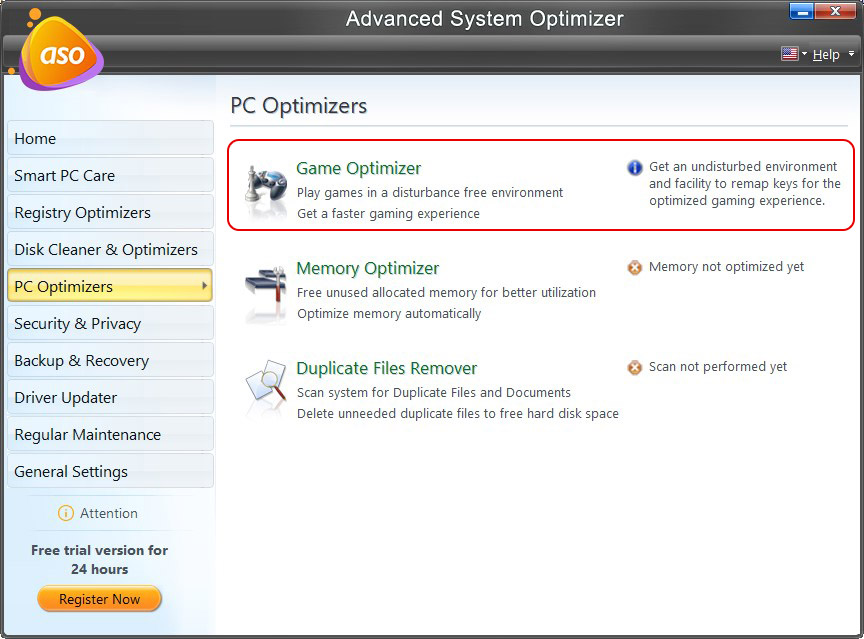
Quite often, the games we play on our computers do not perform at their best. Either the speed is slow, or the keys assigned to perform certain functions must be fixed. This happens when the games need to be allocated proper resources.
Games we play on the PC also require correctly allocated system resources. The game speed is affected without appropriate memory, and resource allocation and frequent interruptions are observed. Game Optimizer is designed to eliminate all such issues during gaming and satisfy all game lovers.
How can Game Optimizer help?
Like any software application, games need an allocation of system resources to run efficiently on the system. As per gaming needs, the system should prioritize resources; this helps improve how the games perform on the system. It offers flexibility to free up as many system resources to apply to the games you wish to play on the system.
Game Optimizer as a tool dedicates maximum allocation of system resources such that the games on your system run faster and most efficiently. It is designed to satisfy the resource hunger of gaming applications while being played.
It cleans the system’s memory occupied by unneeded processes and gives a major share of memory space to the currently played games. Furthermore, it helps provide a virtual desktop to play the desired games in a disturbance-free environment. The virtual desktop is exclusively meant for gaming such that nothing disrupts.
As the name signifies, it is an environment where only the desired games run without interruptions. While playing games, no instant messenger services, music, or other services are capable of causing any disturbance on the virtual desktop.
Game Optimizer also ensures that you can modify and alter keys (remap keys) on the keyboard as per the game’s requirement and that they work as a set and are expected. You may customize key mapping for different game titles.
To summarize, firstly, Game Optimizer optimizes resources for games. Secondly, it provides a separate desktop on the same computer that is completely dedicated to gaming and free from unwanted interruptions. Thirdly, it also facilitates difficult key combinations to be mapped against a more suitable and simpler set of keys to make game playing more enjoyable.
How to Use Game Optimizer?
Game Optimizer helps maximize system resource and memory space allocation to the games played on the PC. It is built with a simple user interface so users can relate to and work on it without seeking help. It optimizes the games running on the system in minimum clicks for the ultimate gaming experience.
Game Optimizer makes available two separate desktops. Playing games on the undisturbed virtual desktop becomes more interesting, entertaining, and innovative. After playing games, you may switch to the original desktop and continue with the routine computer activities.
Optimize Tab
Welcome
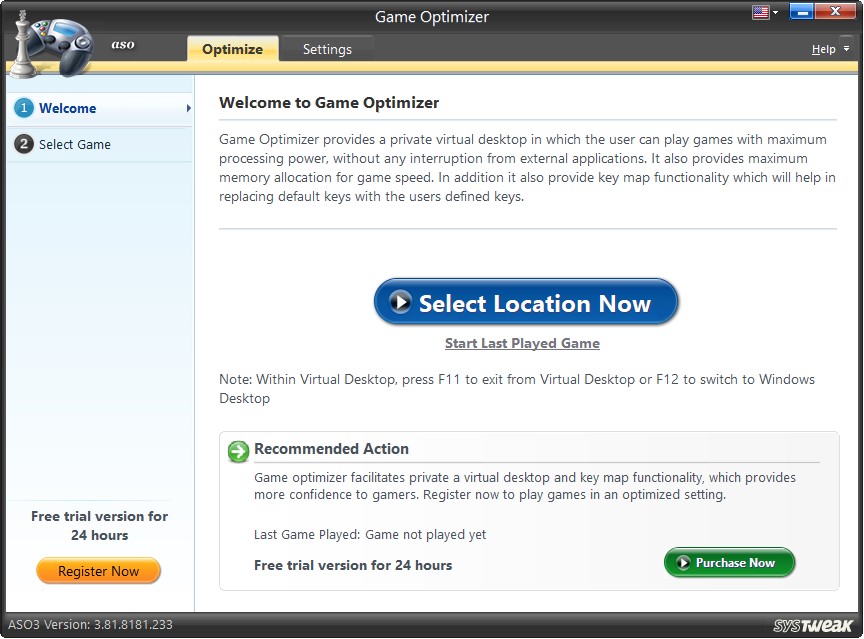
The Welcome screen of Game Optimizer directs you to select games you wish to optimize, i.e., play on a private desktop without a break or pause.
Click on the "Select Location Now" button to select the games to be played.
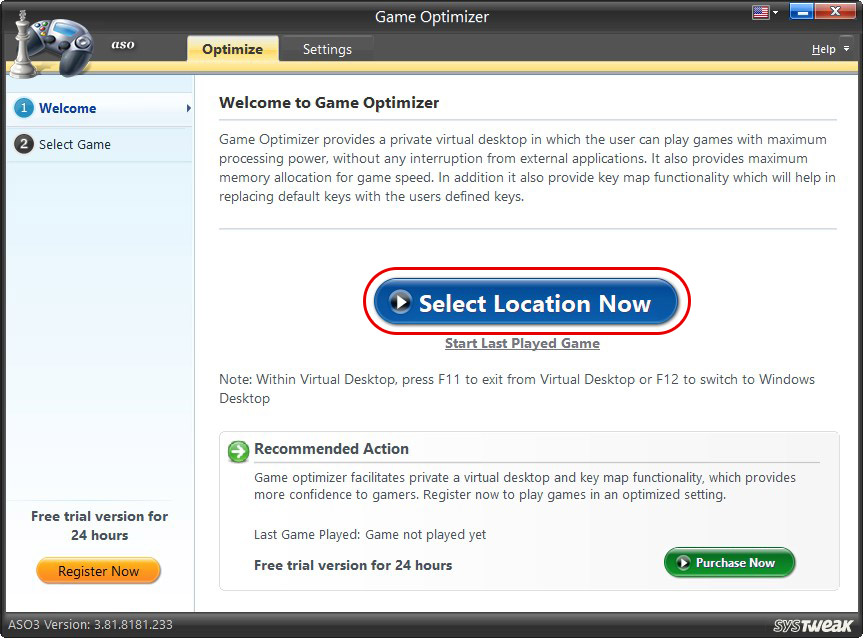
A link “Start Last Played Game” is placed below the button. You may click on the link to continue the last played game on the system.
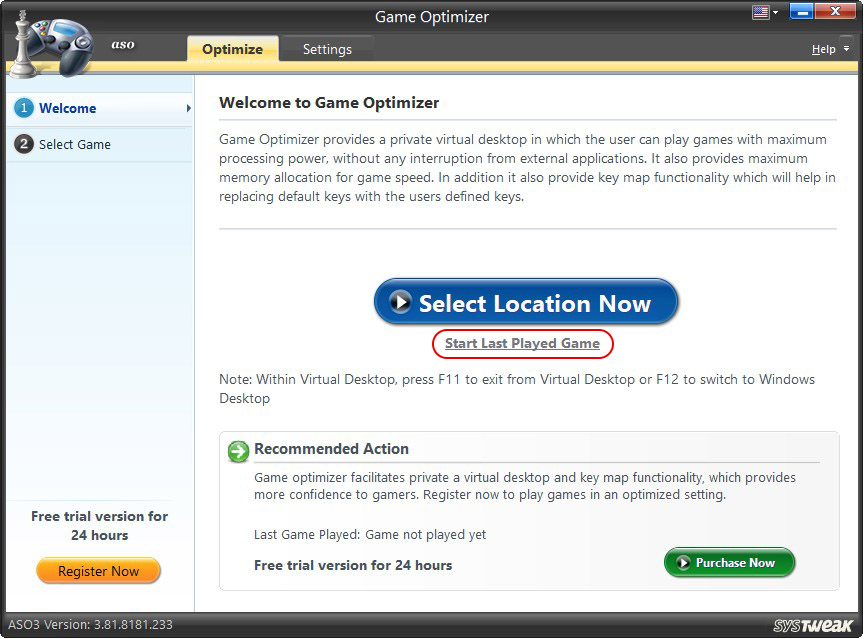
The system summary in the lower half of the screen shows the name and date of the last game played and the total number of games played to date.
Select Game
Select Games to be Optimized
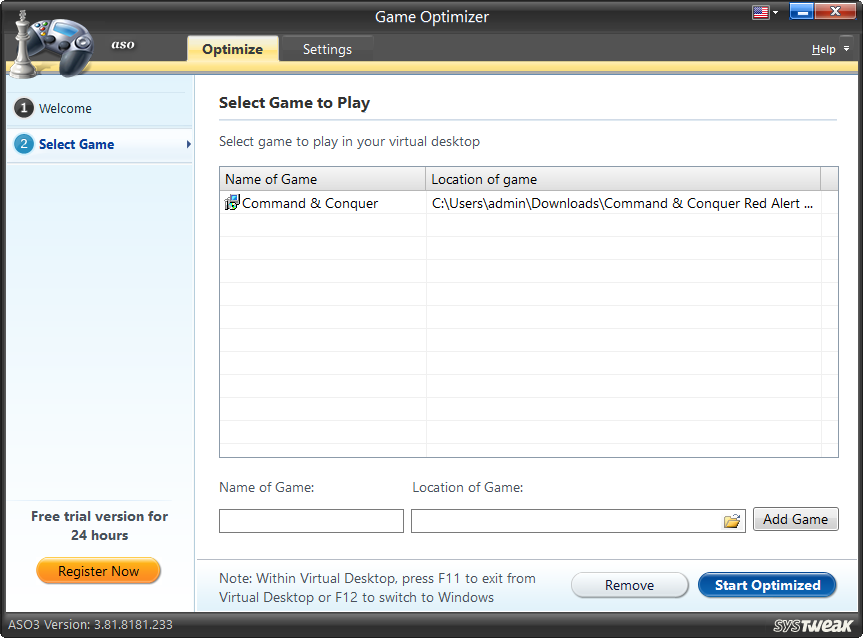
Under this section; you can select the games to be optimized. The optimized games will run on the virtual desktop. A virtual desktop is an environment on the computer system wherein only the games you wish to play are supposed to run without disruptions.
To add a game to the list box, browse Windows Explorer and select a game. Before adding the game to the list, enter a name of your choice in the edit box under the heading "Name of Game," and then click on the "Add Game" button. (You cannot add a game to the list unless you provide a name to it and enter the correct path to locate it)
Only one game can be run at a time on a separate desktop. Select a game from the list and click on the "Optimize" button to start playing the game. The added games can be removed from the list if needed; you may select the game and click on the "Remove" button.
Virtual Desktop
The game selected for optimization opens in the virtual desktop, a separate environment completely dedicated to the game. It is a game-conducive environment with maximum system and memory resources supporting a faster and smoother gaming experience. No other applications or services (instant messaging services, music, or other services) are allowed to run on the virtual desktop to prevent disruptions.
In the extreme left upper corner, you will find a link, “Click here to switch desktop,” clicking on which you can switch back to the actual desktop and perform your routine computer activities.

Settings Tab
The options given under the settings tab allow remapping keys and configuring a few settings before gameplay per your choice and needs.
Remap Keys
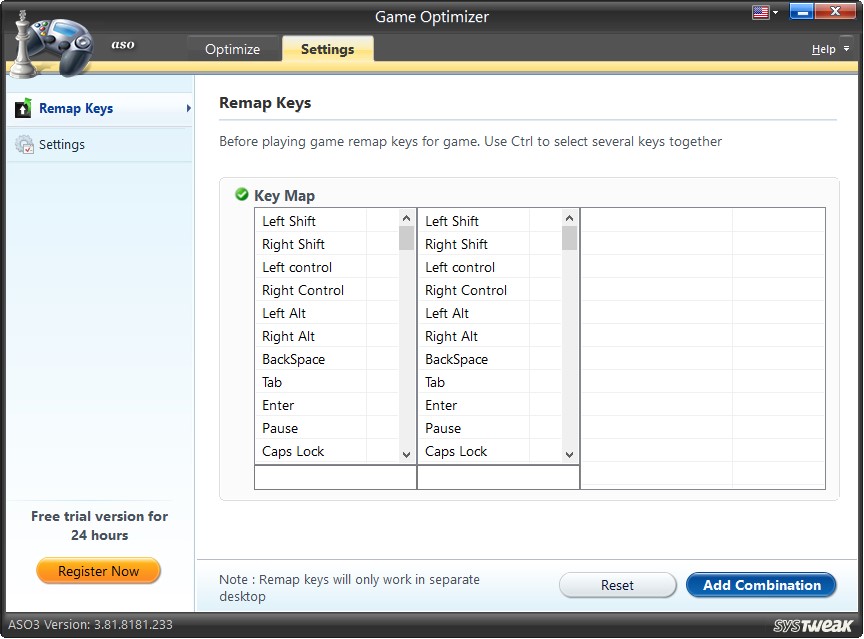
The keys on the keyboard can work as per gaming needs. You may remap the keys or a difficult combination of keys against a single or easy combination.
Under the "Key Map" section, there are three columns. The first two columns display all the keys on the keyboard, and the third column shows the remapped keys.
How to remap keys?
You may select any key or a set of three keys from the left column and remap it with a key or a combination of a maximum of three keys from the middle column. To select a combination of multiple keys, select a key and then keep pressing the “Ctrl” key until you select all the desired keys. A maximum selection of up to 3 keys is possible at a time.
Once the combinations are finalized, click on the “Add Combination” button. The list of all remapped keys is displayed in the right column. The "Reset" button helps you undo all the keys remapping and empty the right column.
With the change of the game, you may custom remap keys.
Settings
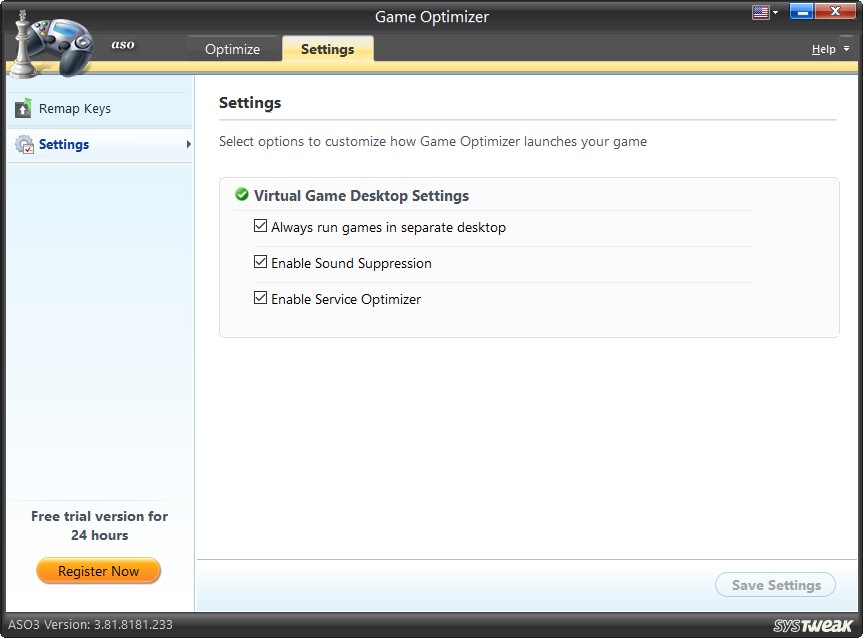
Before starting gaming, you may customize a few settings under this section and click "Save Settings" to apply the changes.
Virtual Desktop Settings
- Always run games in a separate window – Check this option to run the selected games in a private window (virtual desktop).
- Enable sound suppression – Check this option to run the desired games without sound.
- Enable service optimizer - Check this option to disable unnecessary system services during your gaming session.
What is Memory Optimizer?
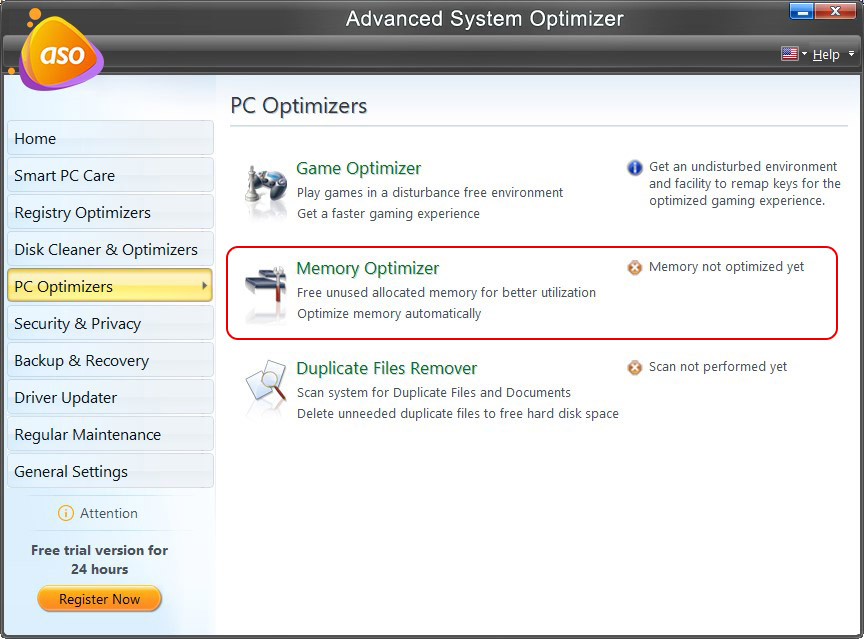
Memory Optimizer is a sophisticated, easy, and efficient memory management utility. It helps the user manage the limited memory space in a very resourceful manner. Also, it analyzes the current state of the computer memory and frees up memory for the new program. This means it swaps new programs with unused yet consuming memory.
Note: RAM optimization is performed in the background to refresh the new programs' memory.
Why do you need Memory Optimizer?
Memory is required to run programs and services on your computer, leading to a situation when the PC falls short of memory resources. This is when you need a tool to optimize memory.
Memory optimizer helps in:
- Speeding up execution time.
- Minimize Windows hangs up and crash.
- Data loss.
- Unexpected shutdown.
How to Optimize Memory?
When talking about computers, there are two types of memory ROM (Read Only Memory) & RAM (Random Access Memory). Where ROM or Hard Disk is the permanent storage for your files and data, RAM is temporary, and it holds the data of the currently running programs.
Each program on the PC consumes memory; whenever it falls short, the desired programs may not run, open slowly, or open but not with complete data. Also, the PC starts acting sluggish, and crashes, hang-ups, and sudden shutdowns are often encountered.
One solution to this problem is adding more physical RAM, which is not feasible for all. Hence, the better solution to this problem is to manage memory allocation or optimize RAM.
But optimizing memory manually is not easy. This is when the Memory Optimizer comes to play.
Memory Optimizer is an easy-to-use and finest RAM optimization tool that takes care of both physical and virtual memory.
Home Tab
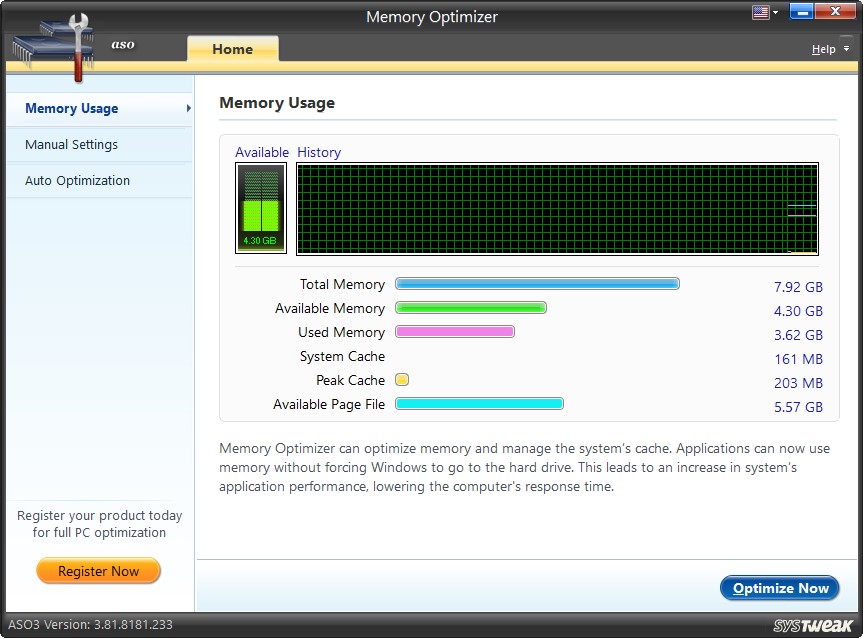
The first screen, through a graph, gives an overview of the current memory status where it talks about:
- Total Memory on the system
- Available Memory
- Used Memory
- System Cache
- Peak Cache
- Available Page File
The memory optimization process starts when you click the “Optimize Now” button. Within minutes, Windows 11/10/8/7 RAM optimization takes place, freeing up unused memory resources, thus making maximum space available for other programs to load and launch. This memory optimization takes care of unresponsive applications and programs currently running.
Note: To let the process of RAM optimization on Windows 11/10/8/7 take place, we recommend closing all the files and applications in use.
Settings Tab
The left panel shows two setting options for Memory Optimizer:
a). Program
b). Auto Optimize
Program Settings
Under this category, there are three options:
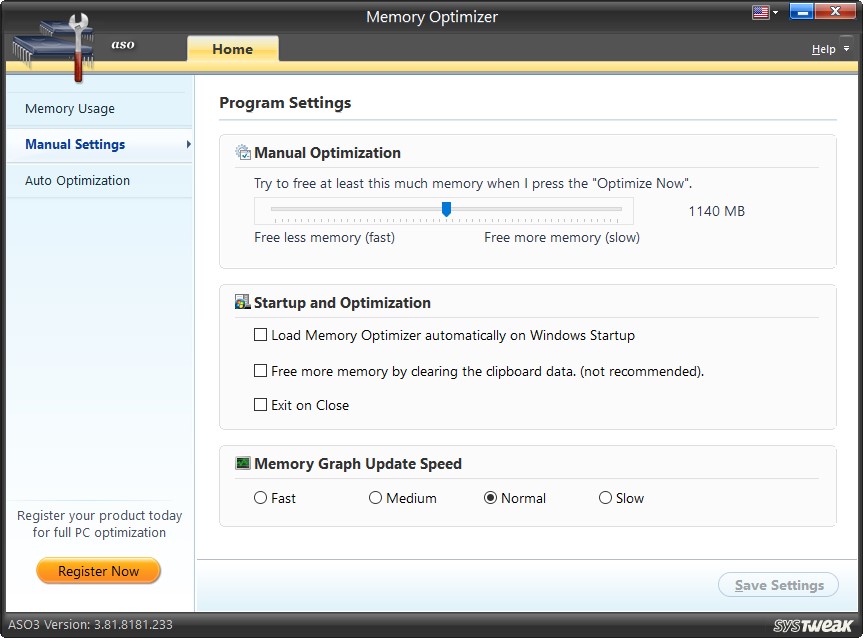
Manual Optimization - This option via the slider lets you set the amount of memory freed during manual memory optimization.
Note: If a lesser amount of memory is specified and vice versa, the optimization will be faster. However, if a higher amount is specified, the Memory Optimizer for Windows 10 will take longer to free up that much memory space.
Startup and Optimization – Using this option provided by Memory Optimizer, you can clear the clipboard data to free up more memory.
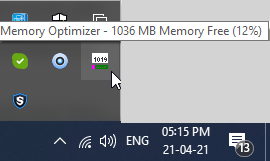
Load Memory Optimizer automatically on Windows startup-On checking this option the RAM optimization automatically loads each time during Windows startup and the application runs in the background to continuously supervise the existing memory status and settings and optimizes it whenever, wherever necessary. It runs in the minimized form in the system tray and can be maximized by double-clicking it.
Free more memory by clearing the clipboard data (not recommended)- When this option is checked, the Memory Optimizer removes the clipboard data during the optimization process. This option is not recommended because clearing data from the clipboard can lead to the loss of critical data. Hence, it should remain unchecked during memory optimization.
Memory Graph and Update Speed – This option lets you set the memory update speed. There are four speed levels: Fast, Medium, Normal, and Slow, out of which only one can be chosen. Once the settings are reset per your needs and preferences, you may click the “Save settings” button to apply all the changes.
What is Auto Optimization?
You will see three options displayed under Auto-optimize Settings
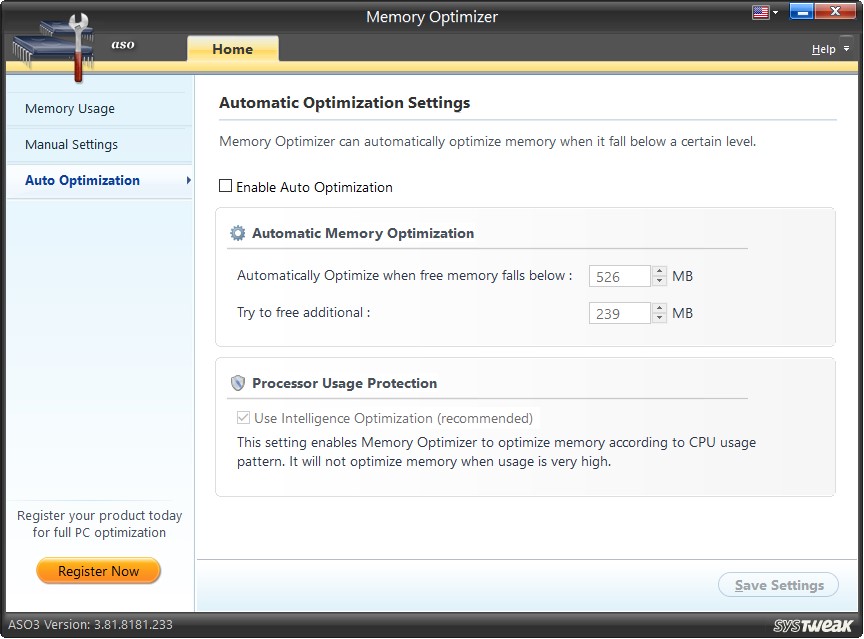
Enable Auto Optimization – As the name signifies, this option helps enable and disable auto-optimization. When enabled, the Memory optimizer automatically starts optimizing memory when the free space available falls below a specified level. This takes place in the background.
Automatic Memory Optimization - This option helps set a certain volume of free memory space below which Memory Optimizer auto-starts memory optimization.
Automatically Optimize when free memory falls below. While working on the PC, we don’t realize that the memory space is being increasingly used. Eventually, the free memory space gets exhausted, and it becomes tedious to work further.
Memory Optimizer allows adjusting the settings to a certain volume of free space so that memory optimization automatically takes place when available memory free space comes below that specified level.
Try to free additional memory: You can instruct the Memory Optimizer to free up additional memory space when memory is being optimized. You may specify the volume under this section.
Processor Usage Protection – This Intelligence Optimization option enables the processor load (CPU). If any currently running application puts a huge load on the processor, the Memory Optimizer automatically halts memory optimization to avoid slowing down the PC.
Once the settings are reset per your needs and preferences, click on the “Save settings” button to apply all the changes.
Minimizing the application window still executes its job from the system tray. It supervises and periodically optimizes memory resources so they never fall short while launching important programs.
Note: When you right-click the system tray icon, the context menu shows four options.

Help - opens the help file.
Show Main Windows - helps restore the application to the maximized state.
Optimize Now - starts the optimization process.
Exit - close the application and remove it from the system tray.
What is Duplicate Files Remover?
Device storage is like a warehouse where valuable and garbage data, including junk, duplicate files, and more, are saved. This unwanted data occupy unnecessary space and slows PC speed.
Hence, regular PC cleaning is recommended to delete duplicate files and improve performance. To perform this task, Duplicate Files Remover comes in handy. This module helps deal with the biggest culprit, duplicate files that unnecessarily take valuable storage space.
This intelligently designed module identifies duplicates by size, content, similar attributes, creation, and modification date and time. Binary Comparison is the latest and the finest mode of identifying identical files.
After reading this, most of you must think, what's the big deal, right?
Finding duplicate files manually is a cakewalk, but let me tell you if you intend to do it manually, a lot of time and attention are required. Searching for a single cluster of identical files may take much time. Moreover, our eyes may skip duplicate files with different names but the same content. Many more loopholes like this prove manual detection an impractical and unreliable venture.
With Duplicate Files Remover, the search for identical files is easy and accurate. It examines the existing files and folders on the system and does an intelligent comparison, thus putting forth the scan results. No file can skip its search; even the compressed and hidden files are included during the scan.
Surely, the scan can be customized, and the default settings may be changed using various options under the "Settings" tab.
How does Duplicate Files Remover work?
Scan System Tab
The deduplication check has been classified into 6 easy steps.

1). Welcome
2). Select Locations
3). Scan Progress
4). Scan Result
5). Cleaning
6). Finish
Step 1: Welcome

It is always better to clean the unneeded copies of original files from the PC and free up the valuable hard disk space. Hence, click on the "Select Location Now" button & specify the location to scan you wish to run a thorough scan for duplicate files. On doing this, you will navigate to the next step.
Step 2: Select Locations
Select Locations to be Scanned
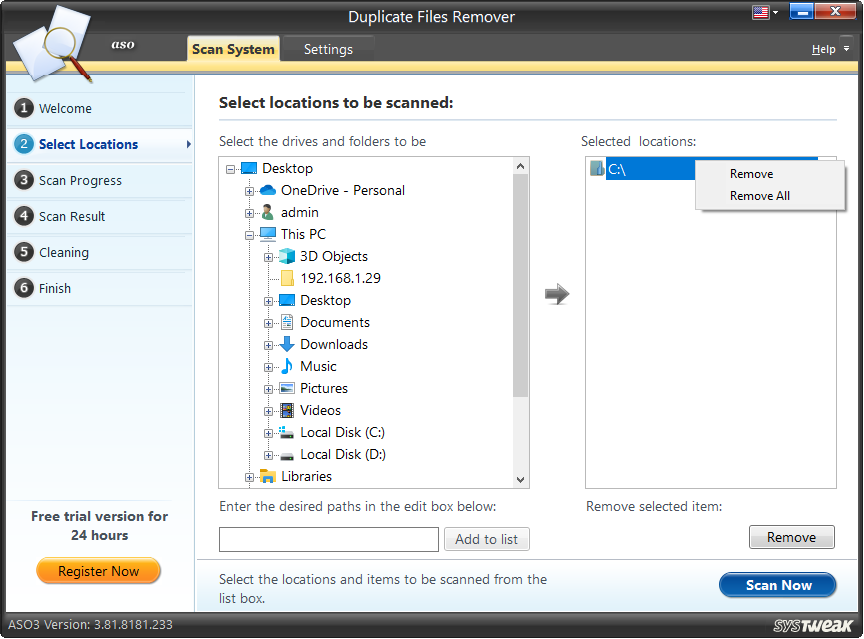
In this step, you will be able to select the locations you prefer to scan for duplicates.
Two list boxes appear on this screen, the list box (left) helps browse through Windows Explorer. You may click on the desired path or item from the list and then click on the arrow button in the middle to add it to the list box (right). Only one item can be added at a time to the list box (right).
An edit box is also given below the list box wherein you can manually type the desired paths to be scanned for duplicates and click on "Add to List". This is recommended while adding Network Locations to the scan list (right).
The added paths and items are displayed in the list box (right) which will be subsequently scanned for duplicate files and folders during the scanning process.
In short, select any location or item from the list box (left) and click on the arrow button to include it in the list of items (right) to be scanned.
On right-clicking on any item in this list, the context menu shows two options. You may click on the option "Remove" to clear the selected item or click on "Remove All" to clear all the items from the list.

Alternatively, you can use the "Remove" button to remove a single selected item or all the items selected together from the list (right).
To start the process of scanning, click on the "Scan Now" button in the bottom right corner.
Note: Any item with the parent or sub-folder already added to the scan list will not be added.
Step3: Scan Progress
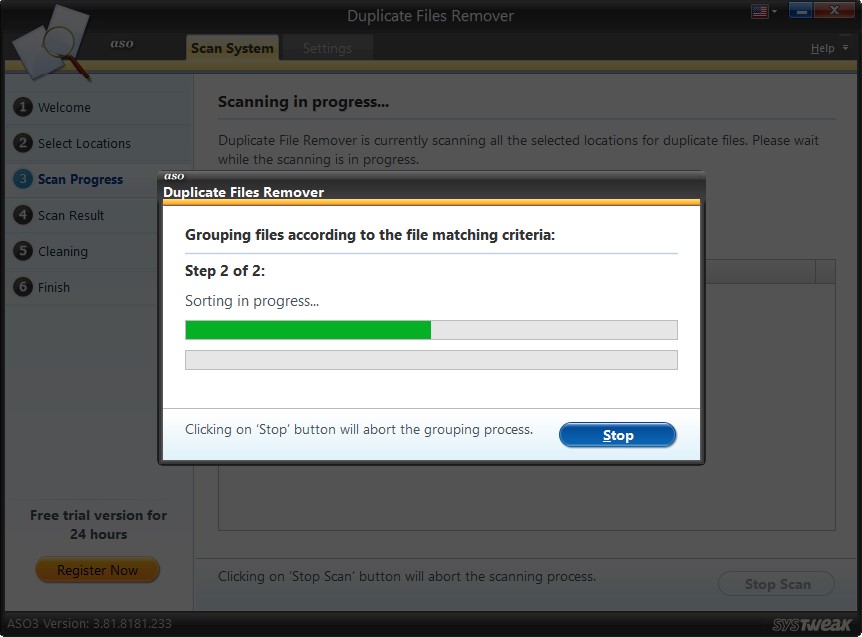
The specified locations in the last step are thoroughly scanned and analyzed in this step. The scanning progress is displayed corresponding to each specified location. At any time, the scan can be stopped by clicking on the "Stop" button.
Step4: Scan Result
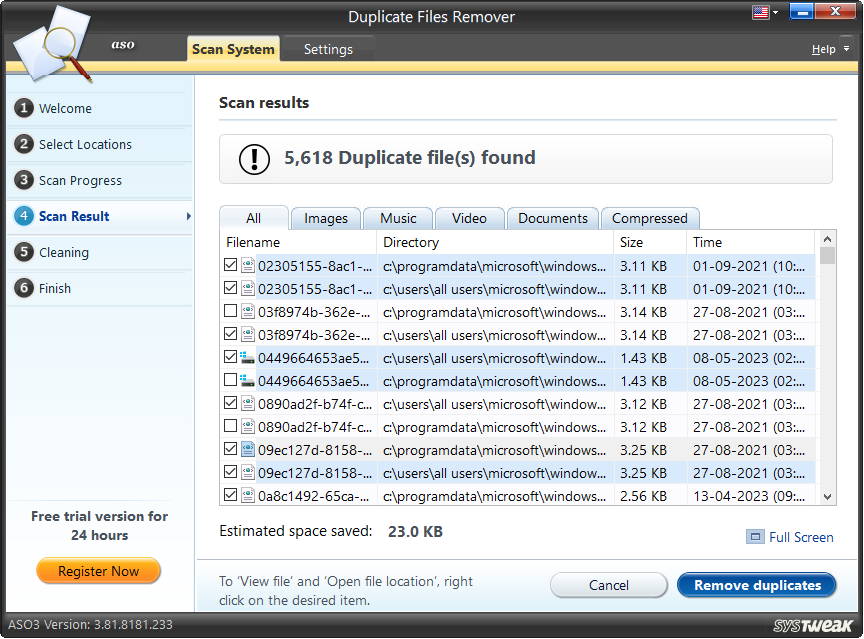
The duplicate files identified during this scan are grouped according to the file matching criteria and displayed in the tabular format. These files are clustered together in groups and are shown in alternate colors. Each group will have the file's original copy and the duplicate copies. It is up to the user to opt for files to be deleted from each group.
For convenience, the scan results are also segregated into five different categories. Each category will consist of duplicate files related to the category e.g., the duplicate image files would be displayed under the Images category.
When you right-click on any item, the context menu shows various options like
Select all files except first all groups
Select all files except last in all groups
Unselect all files
View File,and
Open File Location
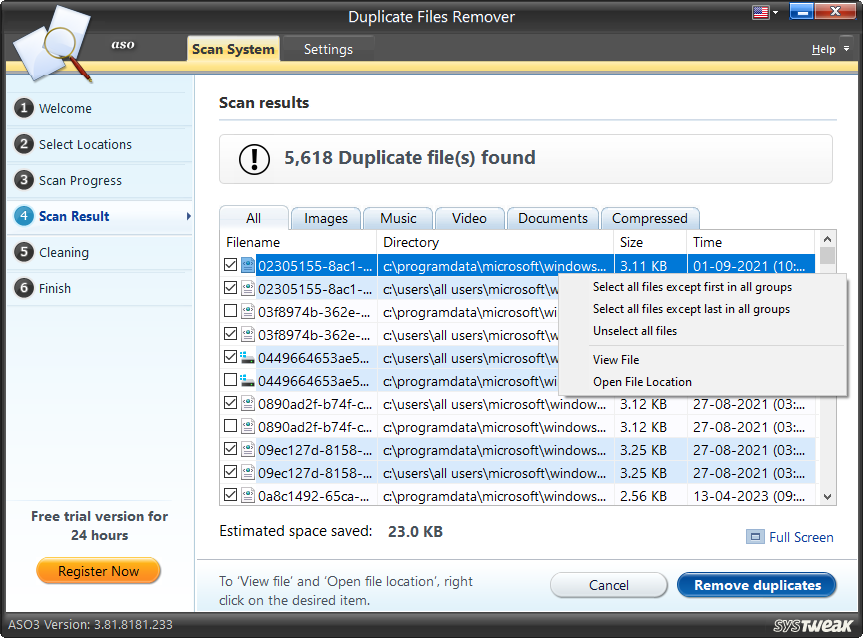
- Select all files except first all groups - Automatically checkmark all copies leaving the first one in all groups.
- Select all files except last in all groups - Automatically checkmark all copies leaving the last one in all groups.
- Unselect all files - Uncheck all checked files.
- View File – The content of the selected file can be viewed by clicking on this option.
- Open File Location – This option helps you go to the selected file location.
The duplicate files to be deleted can be selected from the list, and the cleaning process will follow by clicking on the "Remove duplicates" button. Before removing any duplicate, please be sure that the original copy is not deleted.
The “Cancel” button helps close the window and go back to the Welcome screen. On doing this, you can select another drive to scan for duplicate files and folders.
Step5: Cleaning
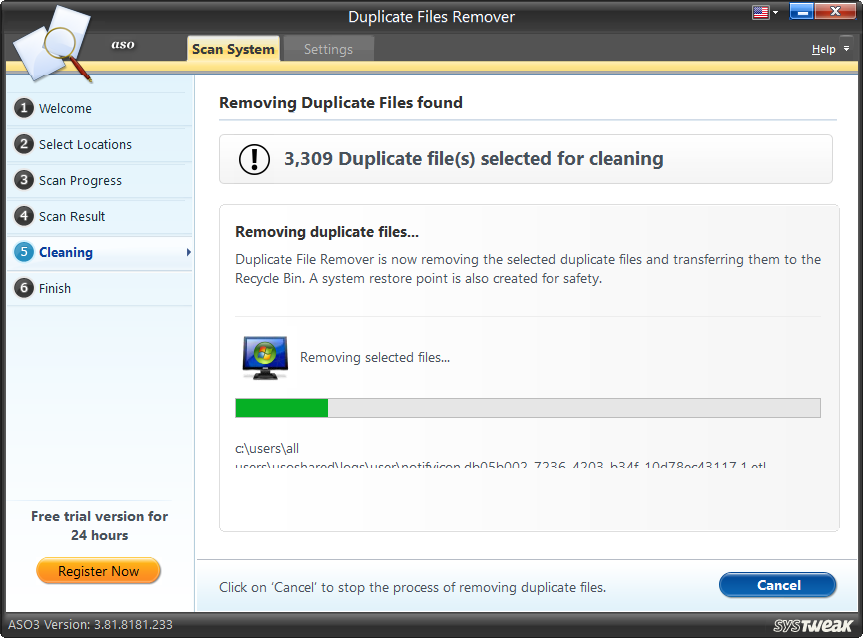
Removing Duplicate Files Selected
Duplicate Files Remover removes all the selected duplicate files and moves them to Recycle Bin. As a precaution, a system restores point is also created. In case the changes are not welcoming; the system can be restored to the last known configuration.
To stop the process of removing duplicate files, click on the "Cancel" button.
Step6: Finish
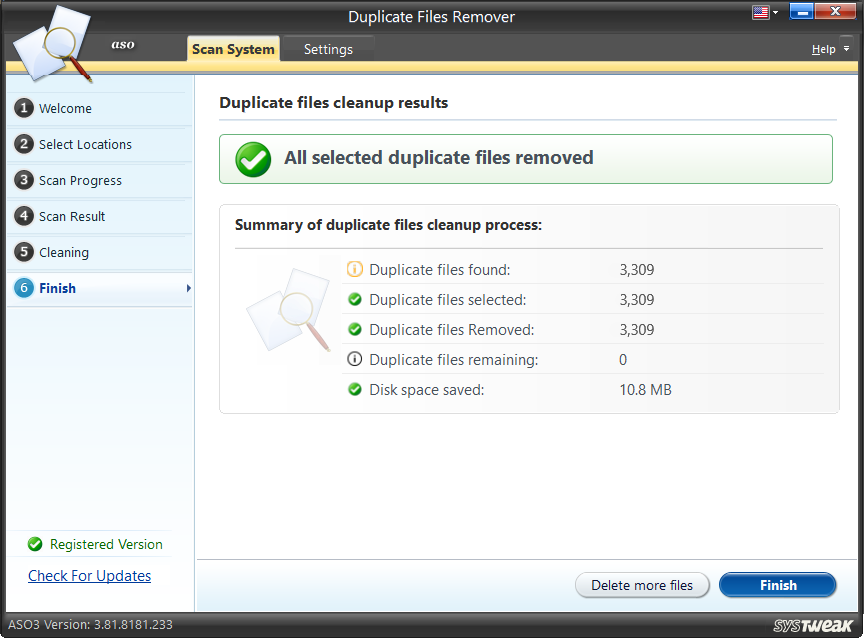
Duplicate Files Cleanup Summary
Once the cleaning is through, the cleanup summary is shown. The summary displays the total number of duplicate files found, the total number of files selected for removal and the total number of files deleted, the number of duplicate files still remaining to be deleted and the estimated disk space saved after removal.
On clicking the "Finish" button, you will return to the Welcome screen and select another drive to scan for duplicates.
Settings Tab
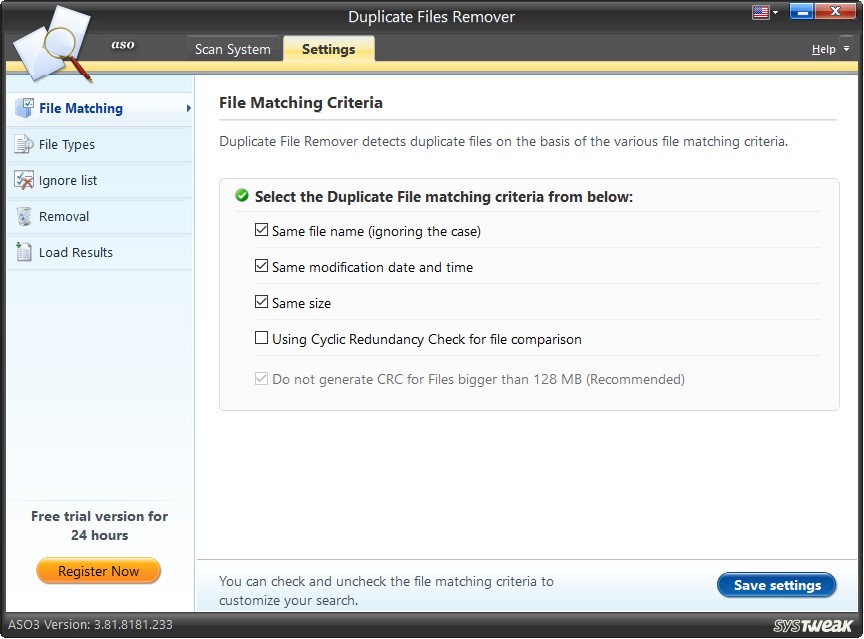
Under this tab, you will find various options to customize scan settings. In addition, you may add files and folders to the Ignore List to be excluded from the scan and load earlier scan results for reference.
You may click on any option from the left panel to modify the settings for Duplicate Files Remover.
File Matching Criteria
You may check/uncheck the file matching criteria to customize the scan. During the scanning process, the duplicate files will be matched and compared as per the chosen criteria and accordingly the scan results are exhibited. Here, we explain the five file matching criteria:
- Same file name (ignoring the case) – Files with similar names are grouped together.
- Same modification date and time – Files with the same creation and modification dates are grouped together.
- Same size – Files of the same size are grouped together.
- Using Cyclic Redundancy Check for file comparison – CRC is the Cyclic Redundancy Check. Two files with matching CRC, in most cases, have the same content and can be marked as duplicate files. Comparison becomes quite easy using the CRC method. It is a slow process of comparison but very reliable.
- Do not generate CRC for Files bigger than 128MB (Recommended) – If this option is checked, CRC would not be generated for files with a size of more than 128MB. It is recommended that the option remains checked during scanning.
To apply the changes done in this section, click on the "Save Settings" button in the below right corner
File Types
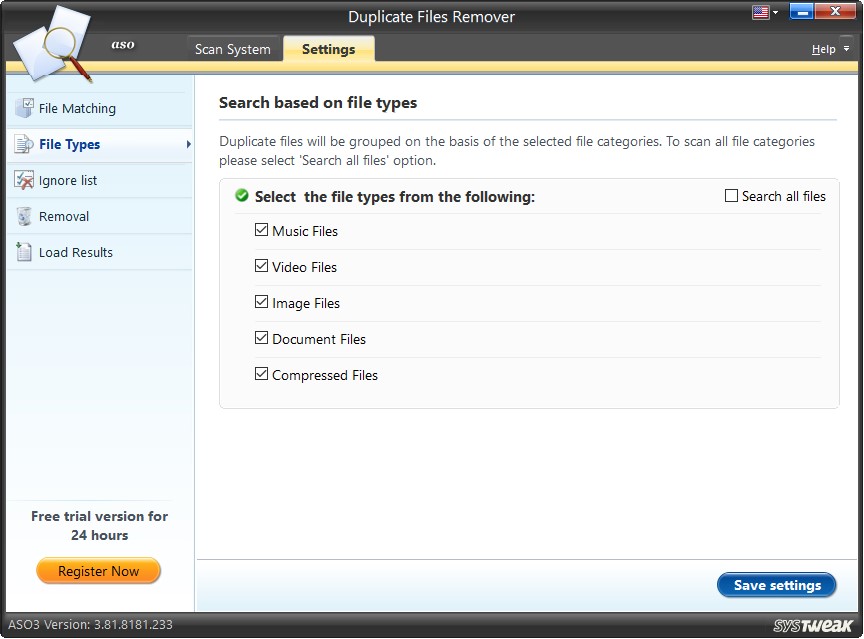
The duplicate files found are sorted under various file types/categories. The duplicate files to be removed can be selected from the different lists and an original copy of each should be preserved.
- Search all files – All the duplicate files along with the original copies are listed under this category.
- Music Files – All duplicate music files along with the original copies are sorted under this category.
- Video Files – All the duplicate video files along with the original copies are sorted under this category.
- Image Files - All the duplicate image files along with the original copies are shown under this category.
- Document Files - All the duplicate document files along with the original copies are shown under this category.
- Compressed Files - All the duplicate compressed files along with the original copies are listed under this category.
To apply the changes done in this section, click on the "Save Settings" button in the below right corner
Ignore List
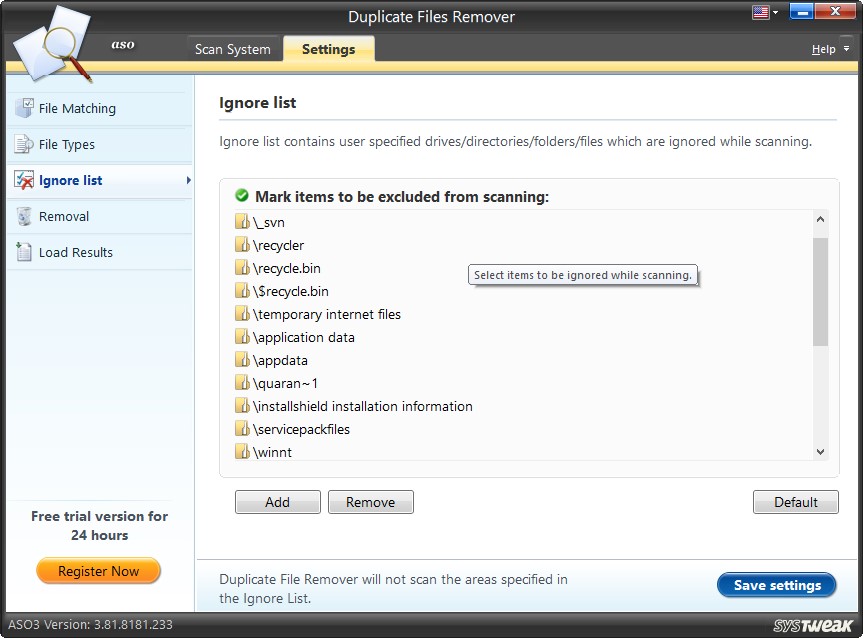
There may be several duplicate files on the system that are intentionally saved and such files should be skipped while scanning so that they do not appear in the list of the detected duplicate files.
Duplicate Files Remover helps add such important files/folders to the Ignore List. Items in the list will only be scanned once and when removed from the list.
To add items to Ignore List, you may click on the "Add" button and browse through Windows Explorer to locate them. For removing the items, you may select the item and click on the "Remove" button. The removed items will be incorporated in the subsequent scans.
A default list is also displayed in the Ignore List. These are a list of items that Duplicate Files Remover considers important and ignores during the scanning process. In case, you wish to get the default list back, you may click on the "Default" button.
Please click on the "Save Settings" button in the below right corner to apply the changes done in this section.
Removal
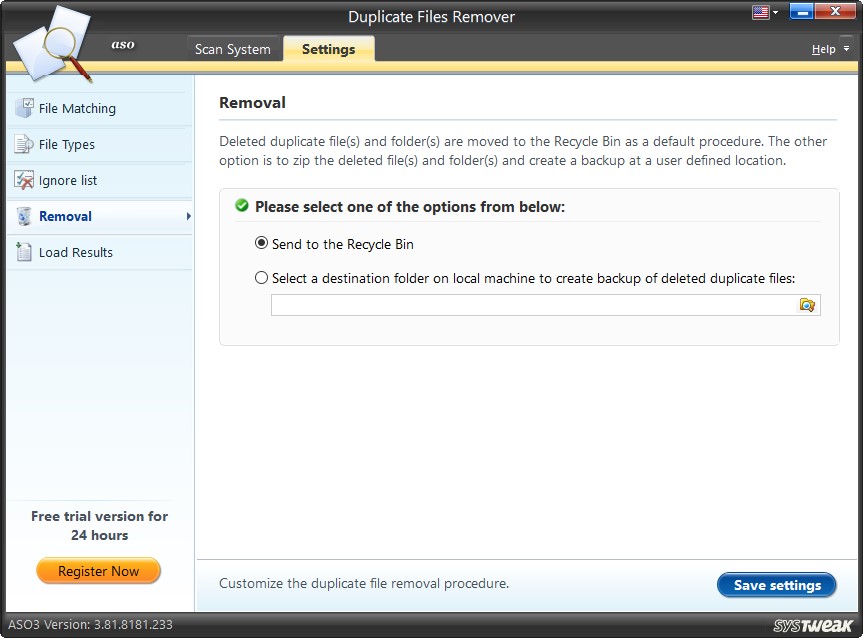
The removal procedure under this section can be customized, and the duplicate files detected can be deleted in two possible ways. You may select any of the two options suggested.
The default removal procedure is moving the deleted duplicate files to the Recycle Bin. The other procedure would be to zip the deleted files and folders, create a backup, and save it in the location specified by the user. For this, you may select the destination folder on the system and save all the deleted duplicate files/folders there.
Please click on the “Save Settings” button to save the changes made in the settings.
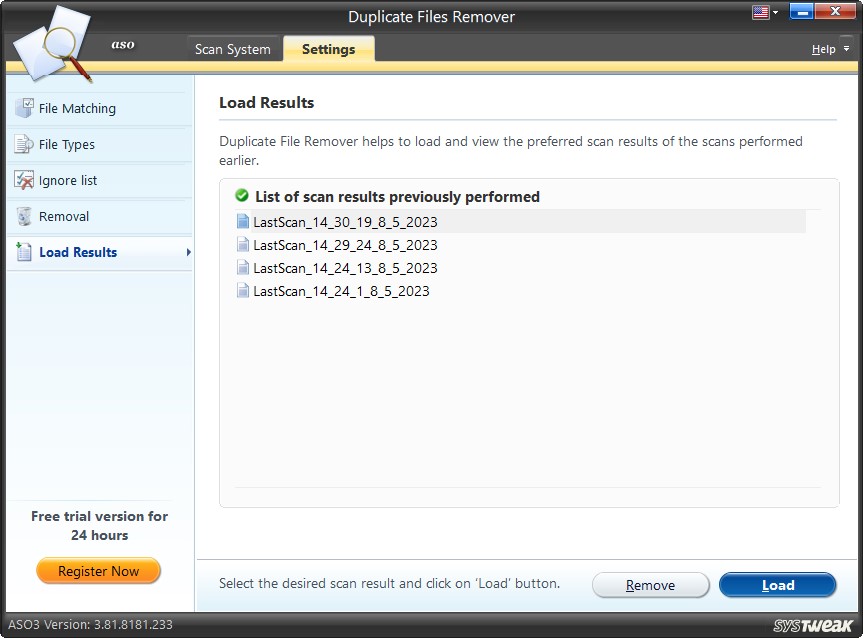
Load Results
Each time a scan is performed on system, the entire list of duplicate files found is saved in this section as a scan result item. Whenever you select any item in the list and click on the “Load” button, the scan results of that particular scan are loaded and displayed. This might prove helpful when you intend to restore particular duplicate files.
You may remove the unneeded scan result items by selecting the item and clicking on the “Remove” button.
- Terms of Use
- |
- Privacy Policy
- |
- Careers
- |
- Sitemap
- |
- Blog
