 Advanced System Optimizer
Beware Of Fraud Calls & Emails
It has come to our notice that certain people/companies may be impersonating Systweak Software and/or other reputed companies, and are contacting users to promote their services in our name via fake emails and calls.
Please note Systweak Software does not make any unsolicited calls nor sends emails to anyone regarding errors on devices or internet browsing or any such other device issues.
We urge you to beware of any such scammers and request you to NOT call back any number provided in the email or via caller ID in case you receive any unsolicited calls or emails.
Please reach out to us at report@systweak.com in case you come across any such scammers and fraudsters impersonating Systweak Software.
- Getting Started
- Why Should You Use A PC Cleaning Software?
- What is Advanced System Optimizer?
- What is Smart PC Care?
- What makes Advanced System Optimizer the best PC Optimization tool?
- How to Install Advanced System Optimizer
-
 Registry Optimizers
- What is Registry Optimizer
- Disk Cleaners and Optimizers
-
 PC Optimizers
-
 Security & Privacy
- Backup & Recovery
-
 Common Issues Fixers
- Driver Updater
- Regular Maintenance
- General Settings
Advanced System Optimizer / Driver Updater
Driver Updater
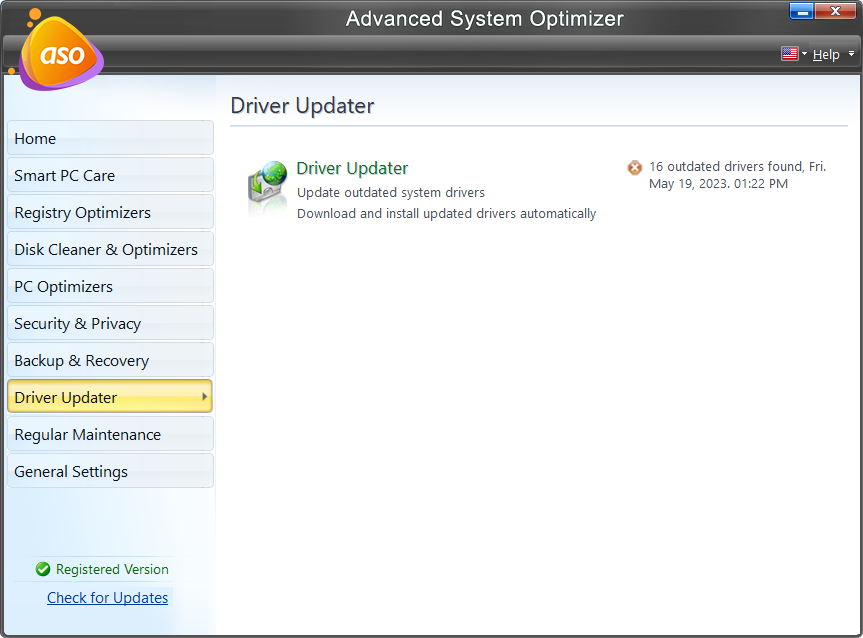
In computer terminology, a Driver is software that helps the system communicate with the hardware devices to run certain programs. A driver operates like a translator for programs that use hardware devices to perform specific functions. Each device that is used comprises specialized commands which the driver comprehends for the program.
Many drivers are installed in the system when the operating system is installed. With time the existing drivers become old and outdated. This possibly limits the hardware functionality, and you may experience many after-effects.
- The applications may not function accurately.
- Applications might run with issues and are slow.
- New and improved features in the applications may not work appropriately.
- System failure may happen on many occasions.
What does Driver Updater do?
Drivers support software that helps the system interact with the hardware devices to carry out some important operations. The existing drivers on the system may not be up to date and need to be replaced with new ones. It is challenging to visit all the sites which give complete information on the latest drivers available and download and install them on the system. This task can be easily accomplished using Driver Updater.
Driver Updater incorporates a rich database of all the latest and upgraded versions of drivers available in the market. Driver Updater scans through the whole system, checks the existing drivers against the database, and lists the outdated drivers specific to the operating system of the computer set, which can be upgraded to the new and improved versions. As per needs, users can download and install the updates without making the task very bothersome. As an effect of this, the system performance is majorly enhanced.
Driver Updater also takes a backup of the old drivers before replacing them with the new ones. The new updates are often bothersome and interfere with the proper system functionality. You can restore the system with all the existing drivers and eliminate all the current issues.
How to Use Driver Updater?
Driver Updater is a reliable tool to update outdated drivers to their upgraded versions. Firstly, it checks the existing drivers with the database containing the latest updates and points out the drivers that need to be upgraded.
Driver Scan Tab
The whole process has been divided into 5 steps under the Driver Scan tab (see left panel):
1). Welcome
2). Scan
3). Results
4). Installing
5). Finish
Step1: Welcome

Outdated drivers on the system may pull down the system’s performance. It is necessary to update the latest drivers to allow the system to work to its full potential.
The Welcome screen helps you to initiate the process of driver scan. Driver Updater will thoroughly scan the system to identify the out-of-date drivers specific to the computer's operating system. The System Summary in the lower half of the screen gives you the details of the Last Scan Date, Total Drivers on System, Total Outdated Drivers, and Total Up To Date Drivers.
Click on "Start Scan Now" to go to the next step.
Step2: Scan
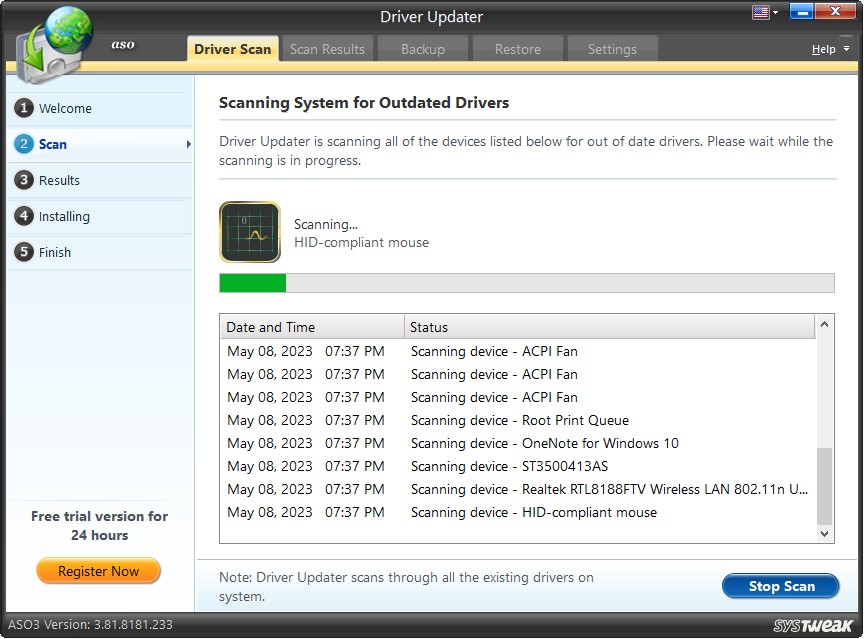
Scanning System for Outdated Drivers
During the scanning process, the drivers for the following devices are checked.
Disk Drives – Disk Drives or Hard Disk Drives are the data storage devices of the system. Driver Updater scans the disk drives to point out the associated out-of-date drivers.
Printer Drives – Printer drivers are required for the smooth working of connected printers and to avoid printer, not working issues. Driver Updater scans for the out-of-date drivers for printers, scanners, and fax machines.
Keyboard –The keyboard is an input device. It has multiple arrays of buttons to help you type characters and perform certain functions on striking buttons. Driver Updater will scan through the drivers used for this device.
Monitors –Monitors are electrical devices that display images generated by computers. Driver Updater will scan through the drivers used for these devices.
Other Devices – The driver updater will scan the existing drivers for other necessary system devices.
SCSI/RAID – SCSI (Small Computer System Interface) is a set of standard commands, protocols, and electrical interfaces that help peripheral devices connect to computers. RAID (Redundant Array of Independent Disks) is a technique for storing the same information on multiple disks in the system. Driver Updater checks through the drivers supporting their function and identifies the out-of-date drivers, if any.
System Devices – System Devices include chipsets and controllers, BIOS, cache, etc., which control data transfers within the computer between the processor, cache, system buses, and peripherals. Updated system device drivers positively impact the PC's operation and performance; hence, Driver Updater reads through all system device drivers and points out the out-of-date ones.
Display Adapters – Display Adapters are plug-in cards that support the functioning of Monitors. It determines the maximum resolution, the number of colors displayed, and many more. Driver Updater examines the drivers associated with Display Adapters and points out the outdated drivers if any.
IDE ATA/ATAPI Controllers – IDE (Integrated Development Environment) are software applications that give programmers software development facilities. ATA (Advanced Technology Attachment) is a mass storage device interface, and ATAPI (Advanced Technology Attachment Packet Interface) are ATAs to attach SCSI devices.
Driver Updater thoroughly checks the drivers associated with IDE ATA/ATAPI controllers to find out-of-date drivers.
Mouse and other pointing devices – A mouse and other pointing devices like a joystick, light pen, or trackpad control the cursor's movements for a visual computer.
Network Adapters – Network Adapters provide interfaces to connect the computer to a network connection. Driver Updater scans the drivers used for Network Adapters to identify outdated drivers.
Processors – Processors like the CPU (Central Processing Unit) or Microprocessors are electronic circuits that help to execute computer programs. Driver Updater checks the existing drivers to find the total number of outdated drivers associated with processors.
Sound, Video, and Game controllers – Driver Updater also checks for the drivers related to sound, video, and game controllers to identify the outdated drivers, if any.
Universal serial bus controllers – Universal Serial Bus (USB) is a standard to connect devices and computer peripherals like mice, keyboards, printers, digital cameras, and external hard drives to the host computer. Driver Updater scans for the out-of-date drivers associated with USBs.
Step3: Results
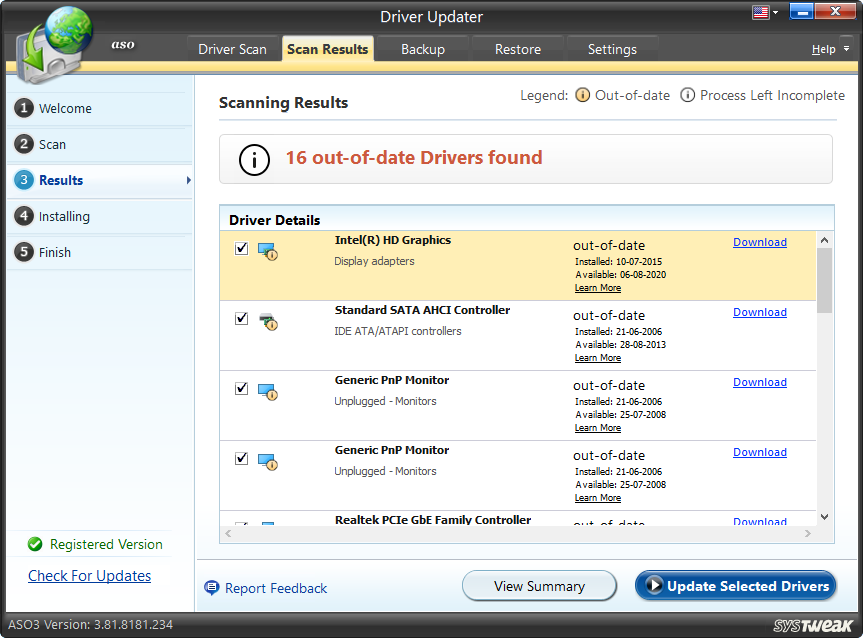
On clicking on the "Learn More" link, a new window opens, which show the table with details of Old Driver (outdate) and New Driver.
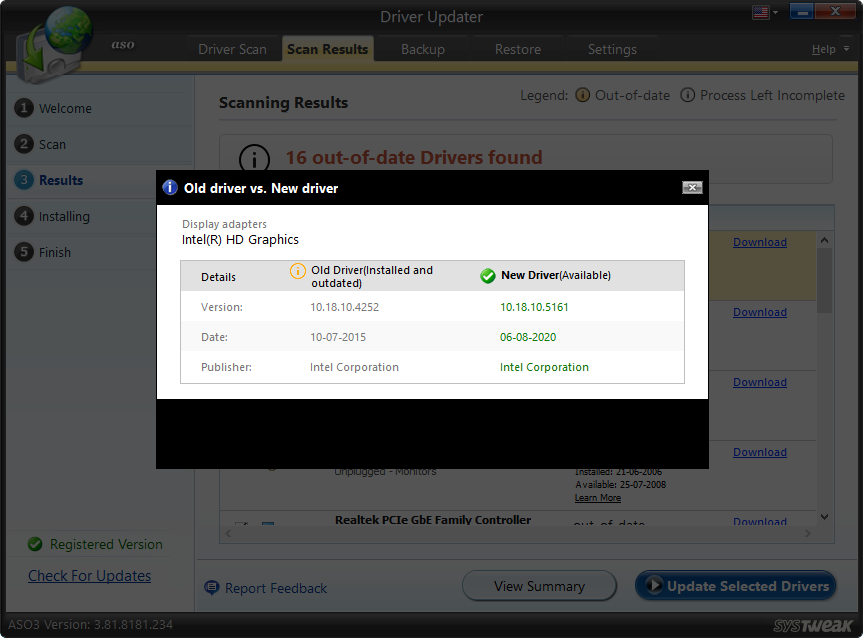
Scan Results
Once the scan is through, the out-of-date drivers will be listed. You can also see the installed date, and the date of the available driver version. Learn more shows Publisher details.
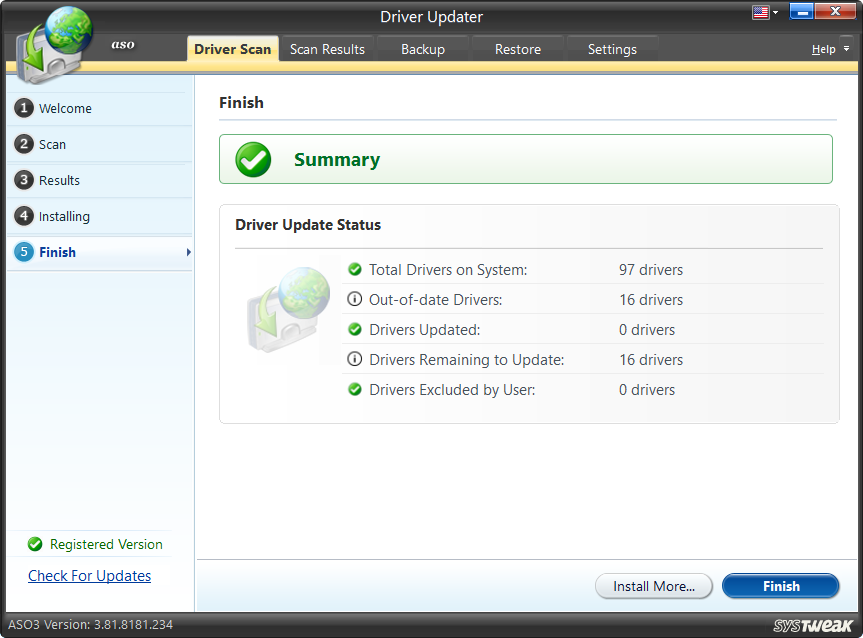
To update the driver, you can use the Download link provided against each driver. This simplifies the task of downloading the updated driver for individual devices on your system. A facility to update the selected drivers in one go is also given; you may just click on “Update Selected Drivers” and get all the updates in one shot.
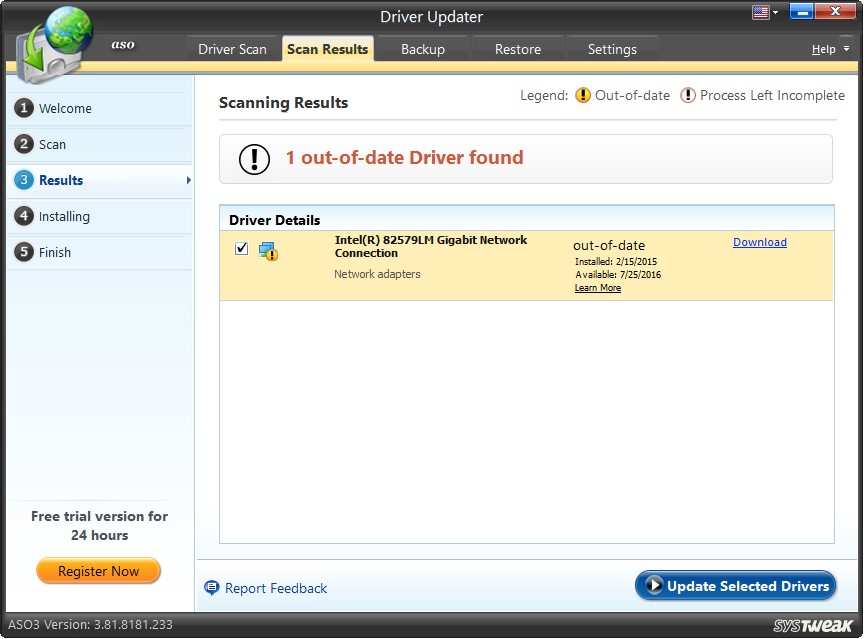
Click on the "View Summary" button to view the summary after the scan and update the driver.
Report Feedback
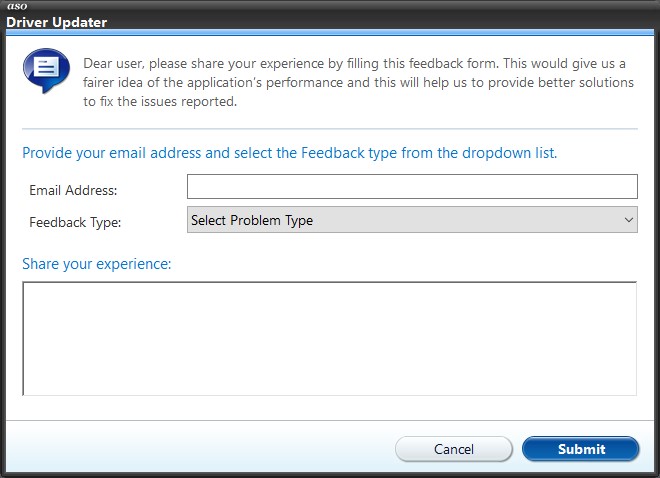
You may report feedback about the experience you had using the application by clicking on the link "Report feedback". The information about the issues you faced can be passed on to us, which will help us make the application bug-free and error-free. (This is optional).
On clicking on the link, a new window opens, which asks for your email address and gives you a few common problems to choose from, from the dropdown list, and you may also brief out the difficulty faced in words in the blank space provided. Before submitting details, you may preview them by clicking on the “Preview Feedback” button and then clicking on the "Submit" button. You may close the window by clicking on the "Cancel" button.
Step4: Installing
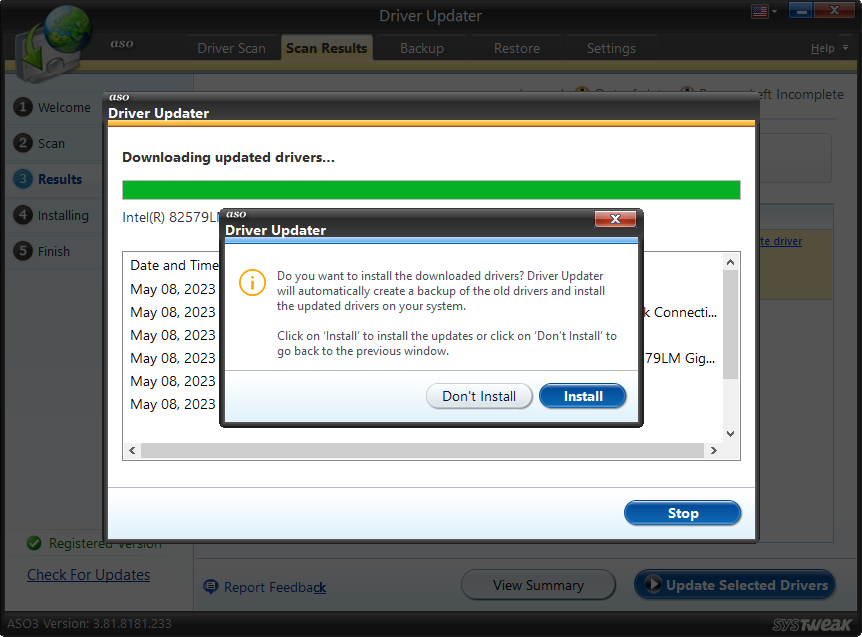
After downloading is completed for the selected drivers or all the drivers, Driver Updater will prompt you to install the updates on your system. Before installing the changes, the backup of the old drivers is taken. If the system does not respond well to the changes or updates, the system can be reverted to the last configuration. This operation is done as a precaution to prevent the system from any bad installations.
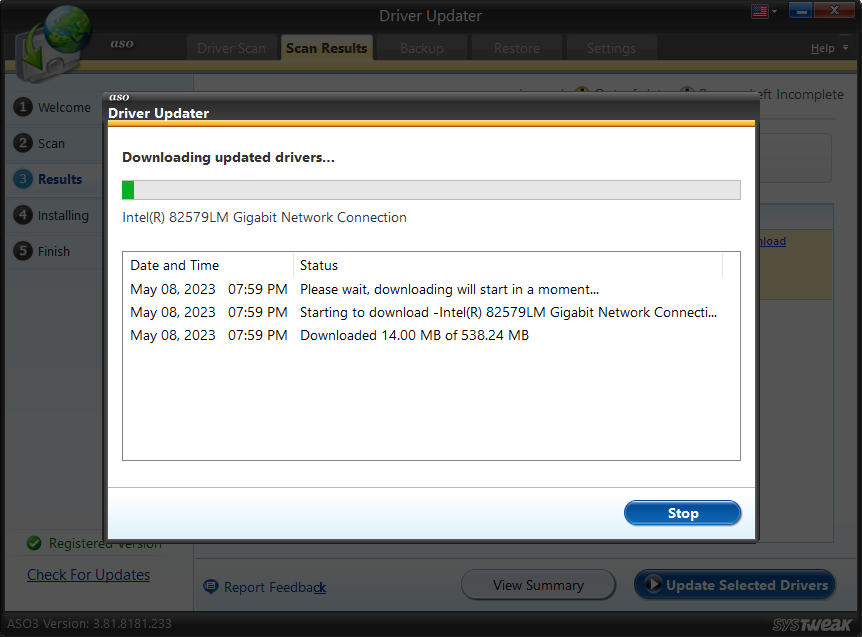
To install the updates, you may click on the "Install" button or "Don’t Install" to discontinue.
Step5: Finish
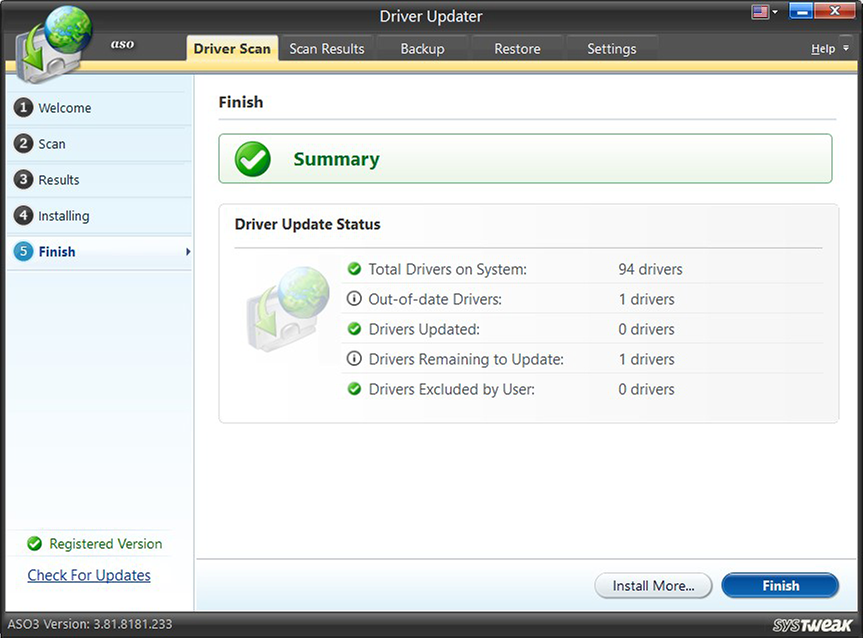
On successfully installing the updates, it is essential to restart the system so that the new ones replace the old drivers. Working on a system with installed updates may lead to system-related issues; hence, Driver Updater will prompt you for a restart. Depending upon your choice, you may either restart the system immediately and click on the “Restart Button” or restart the system manually later and click on the “Cancel” button. It is recommended to restart immediately.
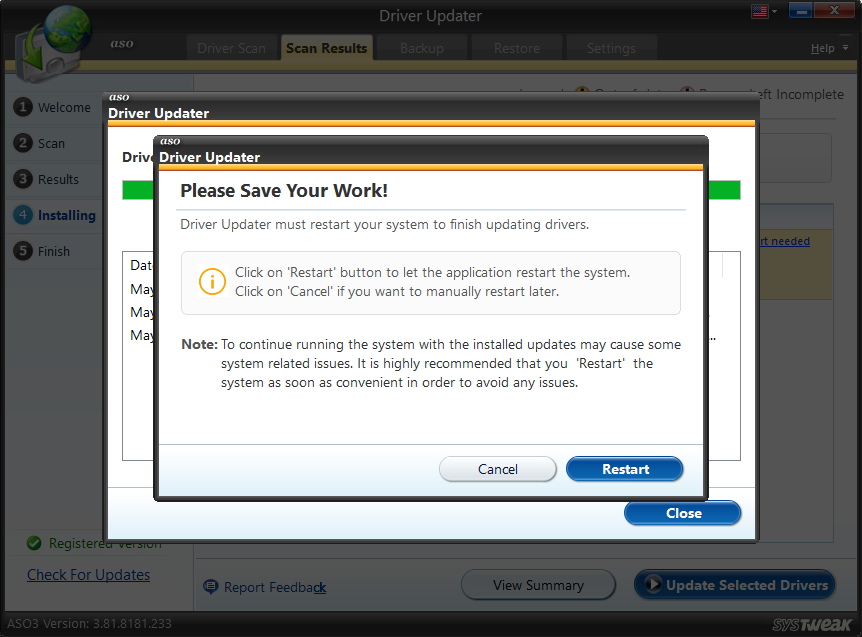
Note: Before initiating a restart, the work you were doing on the system should be saved so that you do not lose your hard work.
Backup Tab
Select the Type of Backup
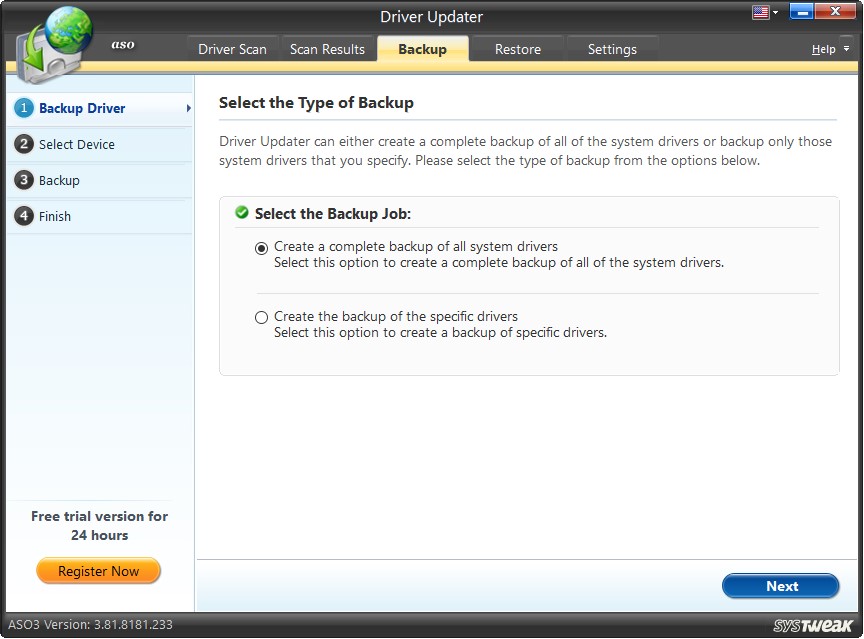
Drive Updater offers two kinds of backups, explained below. It is entirely up to the user to select the type of backup per the needs.
Select Backup Job:
-
Create a complete backup of all system drivers – This option lets you take the complete backup of all the existing drivers on the system before installing the updates.
On selecting this option, click on the "Next" button to initiate the backup process. To stop the backup process in between, you may click on the “Stop Backup” button. The backup summary is immediately displayed following the successful completion of the backup process. To move to the Welcome screen, click on the "Finish" button.
- Create the backup of selected drivers- This option lets you take the backup of drivers selected for driver updates.
On selecting this option, click on the "Next" button to initiate the backup process. A new screen opens, displaying a list of all the devices with outdated drivers. You may check mark the devices you intend to update the corresponding drivers. To stop the backup process in between, you may click on the "Stop Backup" button. The backup summary is immediately displayed following the successful completion of the backup process. To move to the Welcome screen, click on the "Finish" button.
Restore Tab
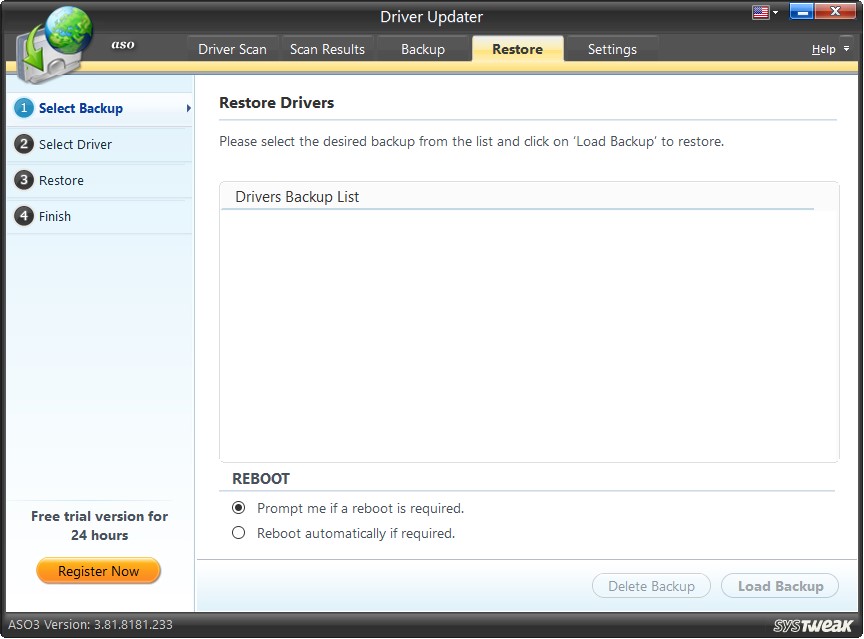
Restore Drivers
Driver Updater also provides undo support. It saves all the backups taken in the form of logs and lists them under the heading “Drivers Backup List.” Any backup item from the list can be restored if deemed necessary. For this, just select the backup item from the list and click on “Load Backup” to restore or “Delete Backup” to delete its entry.
You can choose either of the two Reboot settings given hereunder.
- Prompt me if a reboot is required – Driver Updater will always ask the user before restarting the system to select this option.
- Reboot automatically if required – Driver Updater will restart the system, when necessary, without taking permission from the user.
In short, the first option will prompt you before a reboot, and the second option will automatically reboot to affect the changes.
Select Drivers to be Restored
When you select a backup to be restored, a list is displayed on a new window. The list displayed shows all the devices and the backup of corresponding drivers in that particular backup.
Either you may check the option "Select All" to select all the devices for restoring and then click on the "Restore" button.
OR
You may check the desired device(s) to restore the associated driver(s) and then click on the "Restore" button to restore.
The system may require a restart to complete the process of restoring the backups. To continue working on the system with an incomplete restoration process may cause serious system issues. Hence, Driver Updater will prompt you for a restart. Depending upon your choice, you may either restart the system immediately and click on the "Restart Button" or restart the system manually later and click on the "Cancel" button. It is recommended to restart immediately.
Note: Before initiating a restart, the work you were doing on the system should be saved so that you do not lose your hard work.
A restore summary would be shown on successful completion of the selected drivers' restoration process, providing details of the number of drivers restored and the number of drivers remaining to be restored.
Settings Tab
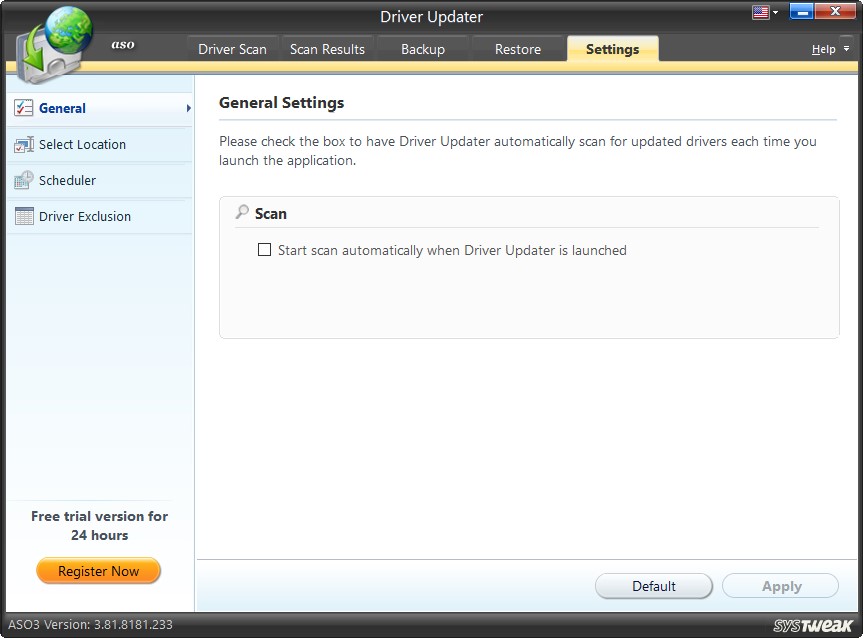
Under this section, you may reset the application execution settings, select locations for saving the downloaded updates and backups taken, and add or remove drivers from the Driver Exclusion list.
General Settings
Under this, you may check/uncheck the option to automatically start scanning for outdated drivers when the Driver Updater is launched.
Select Location
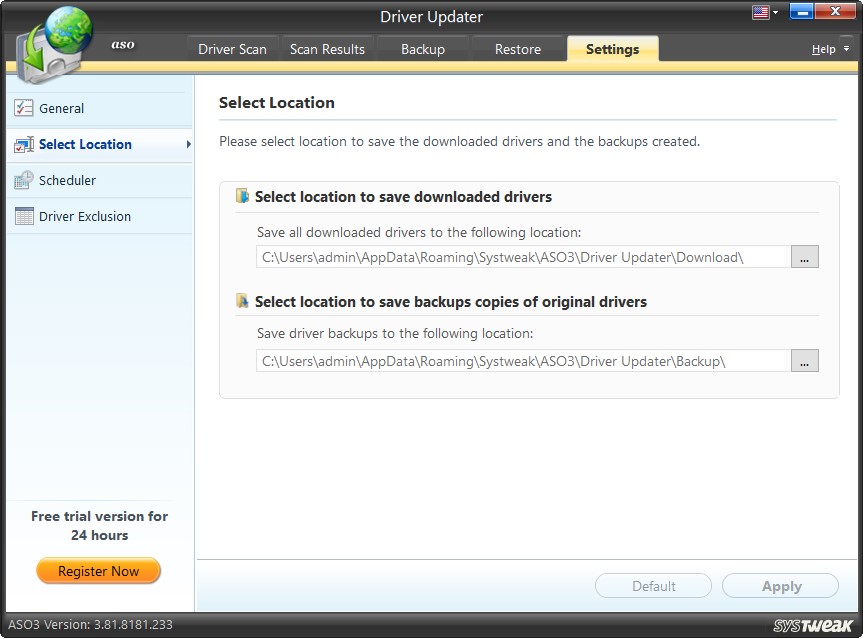
Under this section, you may select:
- Any location on the system where the driver downloads can be saved.
- Any location on the system where the backups are taken can be saved.
To save any changes in the settings, you may click on the "Apply" button, or to restore the default settings, click on the "Default" button.
Scheduler
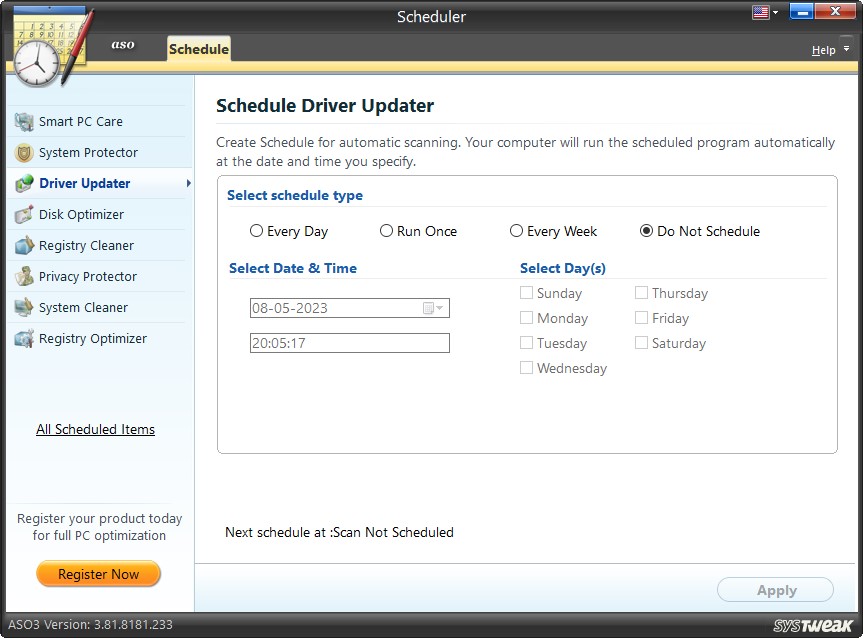
Switching on to improved and updated drivers is periodically recommended. The scheduler facilitates scheduling the driver scans as per the user’s priorities. The scan starts automatically on the predefined day, date, and time. This is a helpful mechanism as we might skip this important task quite often.
You may set the scan time by using the various options given.
Options to schedule scan:
“Every Day” at a specified time.
OR
“Run Once” on a specified date (can be set using the calendar dropdown) and time.
OR
“Every Week” on specified days at a particular time (check mark the days of the week for the automatic scan).
OR
“Do Not Schedule” scan (undo the scheduled scans).
The next scheduled scan is displayed at the bottom of the screen. You may also view all scheduled scans by clicking on the "All Scheduled Items" link in the left panel.
Two very important options are added to the Scheduler for your convenience. Check the options depending on your choice and requirement.
Fix the issues automatically – On checking this option, the scheduler will fix the issues detected in the scan without demanding user intervention.
Shut down PC automatically after fixing issues – On checking this option, you choose to shut down your computer system after the issues are fixed. This will help save power as the system will not keep running until the user reuses it.
Every time you schedule a scan or edit a scheduled scan, you must click on the "Apply" button to save the changes you have made.
Driver Exclusion
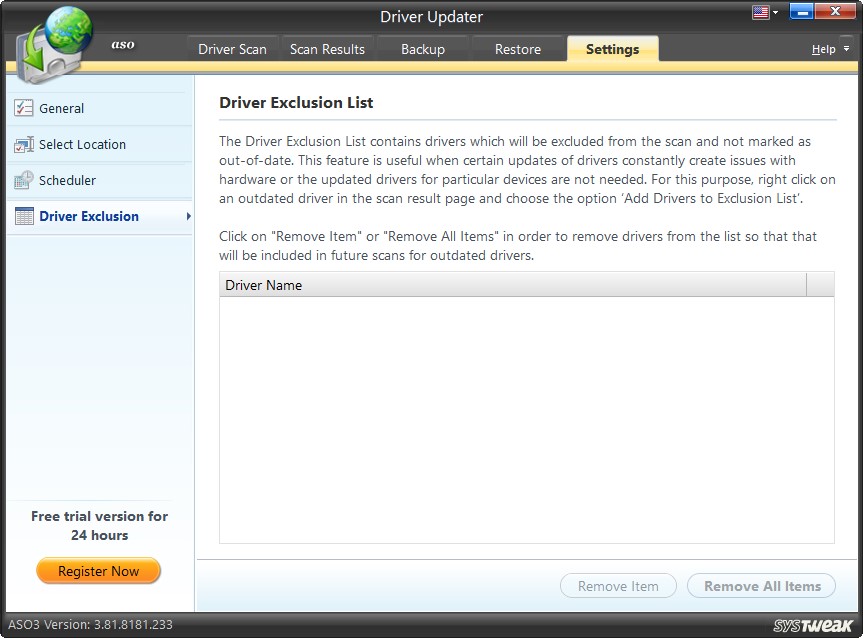
You can add drivers to the Driver Exclusion List, that you intend to skip from scanning. Added drivers are excluded while scanning for outdated drivers and are not detected as obsolete until removed from the list.
You may remove individual drivers or all the drivers using the "Remove Item" and "Remove All Items" buttons. The removed drivers would be included in the subsequent scans, and the updates can be seen eventually.
You may alternatively remove items using the options (Remove All From Exclusion List and Remove This From Exclusion List) in the context menu displayed by right-clicking on any item.
- Terms of Use
- |
- Privacy Policy
- |
- Careers
- |
- Sitemap
- |
- Blog
