 Advanced System Optimizer
Beware Of Fraud Calls & Emails
It has come to our notice that certain people/companies may be impersonating Systweak Software and/or other reputed companies, and are contacting users to promote their services in our name via fake emails and calls.
Please note Systweak Software does not make any unsolicited calls nor sends emails to anyone regarding errors on devices or internet browsing or any such other device issues.
We urge you to beware of any such scammers and request you to NOT call back any number provided in the email or via caller ID in case you receive any unsolicited calls or emails.
Please reach out to us at report@systweak.com in case you come across any such scammers and fraudsters impersonating Systweak Software.
- Getting Started
- Why Should You Use A PC Cleaning Software?
- What is Advanced System Optimizer?
- What is Smart PC Care?
- What makes Advanced System Optimizer the best PC Optimization tool?
- How to Install Advanced System Optimizer
-
 Registry Optimizers
- What is Registry Optimizer
- Disk Cleaners and Optimizers
-
 PC Optimizers
-
 Security & Privacy
- Backup & Recovery
-
 Common Issues Fixers
- Driver Updater
- Regular Maintenance
- General Settings
Advanced System Optimizer / Backup & Recovery
Backup & Recovery
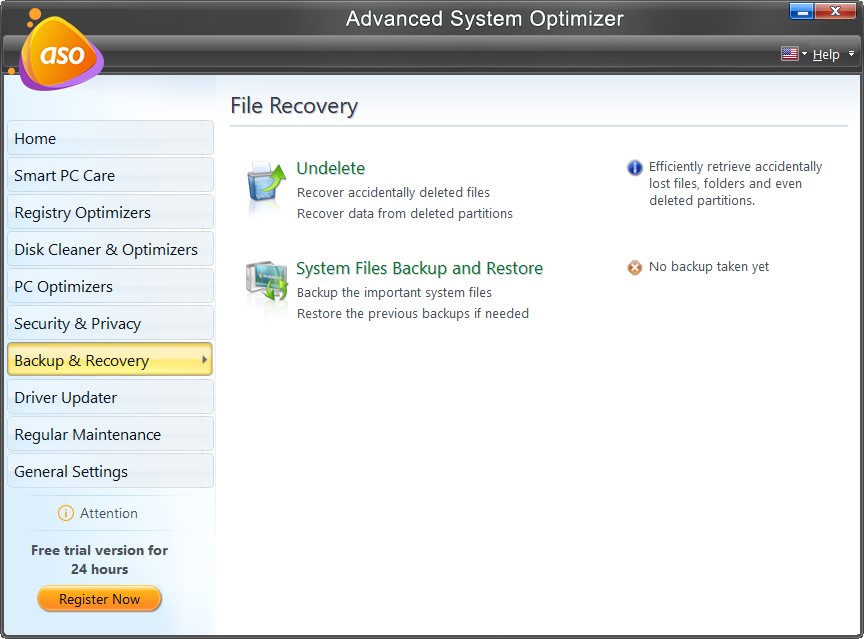
With the increased use of electronic devices, our dependency on them is increasing. This makes losing an important file a nightmare come true. If you are stuck in a similar situation, use Undelete.
- Undelete - Recover deleted or lost files from the internal hard drives and removable storage devices.
- System Files Backup and Restore - Help take system backup and revert to any last known good configuration.
Undelete
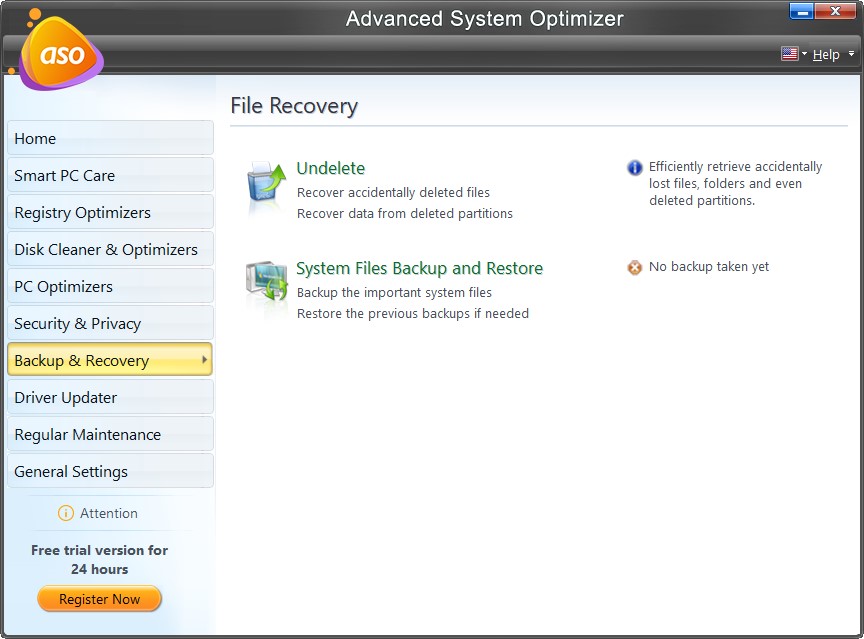
In our day-to-day lives, we often come across this problem. We do not know how to recover important data that is accidentally lost.
Many of us would not be aware that the lost data does not go anywhere but lies on the hard disk. It is not visible but is present and can be recovered using smart and powerful undelete software utilities.
How can files be recovered?
When a file is deleted from the system, the space on the hard disk where the file was present is freed, but the file's content remains intact. The freed space can be reused for new files and folders, overwriting the old data. But this does not happen immediately; therefore, there are chances of recovery.
Some recovery tools are technically advanced to retrieve the data from the worst conditions.
How to Use Undelete?
Undelete is a software application designed to recover data that has been accidentally deleted effectively. It retrieves lost files and folders swiftly and stores them in the user-defined location from where you can restore them to the system.
The undelete action has been divided into 5 major steps under the “Scan” tab (see left panel):
Scan Tab
1). Welcome
2). Scanning
3). Scan Results
4). Recover
5). Finish
Step1: Welcome
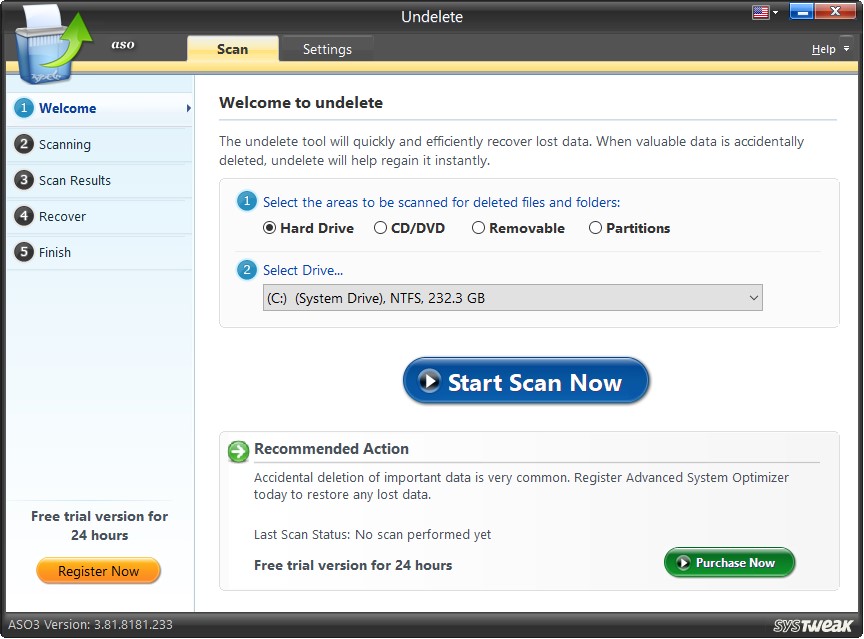
The main or the Welcome screen from Undelete lets you choose the areas and drives from where the deleted files and folders need to be recovered. The selection of the locations has been further divided into two steps.
In the first step, select the area to be scanned. And in the second step, choose an available option from the dropdown menu for the area selected in the first step.
The system has been divided into four areas.
(i). Hard Drive – Select this option and choose a drive from the dropdown menu. Undelete will scan thoroughly through the selected drive for deleted files and folders and help recover them.
(ii). CD/DVD – Select this option and choose a CD/DVD drive from the dropdown menu to retrieve lost data from the selected drive.
(iii). Removable – Select this option and choose a Removable drive from the dropdown menu to recover deleted files and folders.
(iv). Partitions – Select this option and choose a Partition from the dropdown menu to run a comprehensive scan.
Once you have selected an area for scanning, you may click the "Start Scan Now" button and initiate the process. But before performing an analysis of the selected drive/partition, Undelete will prompt the user to choose a Scan Type.
Select Scan Type

Undelete makes you choose between two scan types, Quick Scan and Deep Scan.
- Quick Scan – Gathers information about the deleted files and folders from the Master File Table (MFT) and helps to retrieve them. It is a faster method of scanning.
- Deep Scan – Performs a detailed sector-wise scanning to identify deleted files based on signatures.
The default way of scanning is the Quick Scan, and the recommended scan type is the Deep Scan. You may choose either and click on the "Scan Now" button.
You may revert to the default scan type by clicking on the “Default” button. The "Settings" tab allows you to configure scan settings per your choice and need.
Step2: Scanning
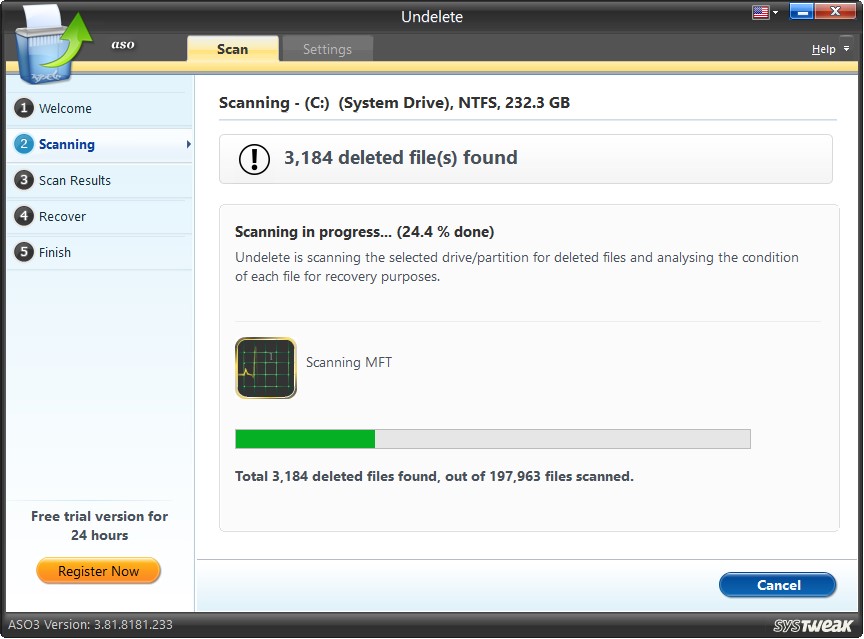
The second step shows the progress of the scan. Undelete analyzes the selected drive/partition and judges the condition of each deleted file to see whether it is in a recoverable or unrecoverable state. To cancel the scan operation, you may click on the “Cancel” button any time during the process. Once stopped, Undelete will ask the user to save the scan results of the current incomplete session.
If the results are saved, you may continue with the same session. An option “Last Session” will be added to the Welcome screen under the heading “Select the areas to be scanned for deleted files and folders” for this purpose. You may select this option and complete the scan operation of that particular session.
Step3: Scan Results
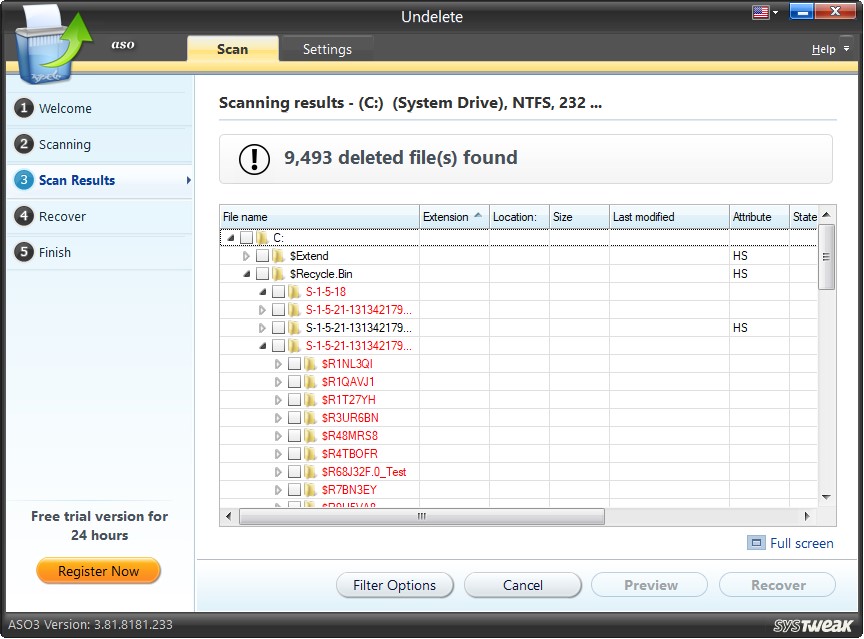
The scan results are displayed in a table format once the scan is through. Check the items from the list you wish to recover and click on the "Recover" button. Before recovering any file or folder, click the "Preview" button to preview the contents. You may click the “Filter Options” button to filter and refine the results per your requirements. To close this window, click on the “Cancel” button.
Table of Scan Results (explanation):
All the items of the selected drive are listed under 8 columns, namely File Name, Extension, Location, Size, Last Modified, Attribute, State, and Comment. The items listed can be sorted column-wise by clicking on the column headings.
Against each item in the table, a check box is placed. You will also see a small arrow button against many items. The "White Arrow" button turns to a "Black Arrow" button and shows the extended folder tree. The folder tree can be further extended following the same procedure as the arrow buttons.
The items in red are the deleted files and folders. You may check these items and click the "Recover" button to retrieve them.
You can view this table of contents in the full view mode by clicking on the "Full Screen" in the lower right corner.
Context Menu Options – When you right-click on any item in the table, a context menu shows five options.
Click on "Preview" to preview the selected deleted file/folder, and click on "Recover" to restore data to the system. To select all items, click "Select All" or "Deselect All" to deselect all items in the list. An "Invert" option is given, which will help to revert the selection, i.e., the items checked will be unchecked and vice versa.
Note: Please see the detailed explanation of Filter Options under the "Settings" tab.
Step4: Recover

The selected files and folders to be recovered will be stored in the user-specified location on the system. For this, you may browse through your system and choose a location. You may also "Create New Folder" to restore selected files and folders.
may make them unrecoverable and defeat the purpose of retrieval.
Whenever you restore the selected files and folders to their original locations, Undelete will prompt you and ask if you want to continue the recovery process. You may click on the "Yes" button to continue and click on the "No" button to choose an alternative location.
Recovering Deleted File(s) and Folder(s)
Undelete will recover the selected files to a user-defined location in this step. The recovery progress can be easily seen from the progress bar. Undelete also maintains the original hierarchical structure of the file(s) and folder(s) during recovery.
Step5: Finish
Once the recovery process is completed, a summary of the recovery process is displayed. The overview shows the total number of files scanned, the number of deleted files found, the number of files selected for recovery, the number of files recovered, and the total number of files remaining to be recovered.
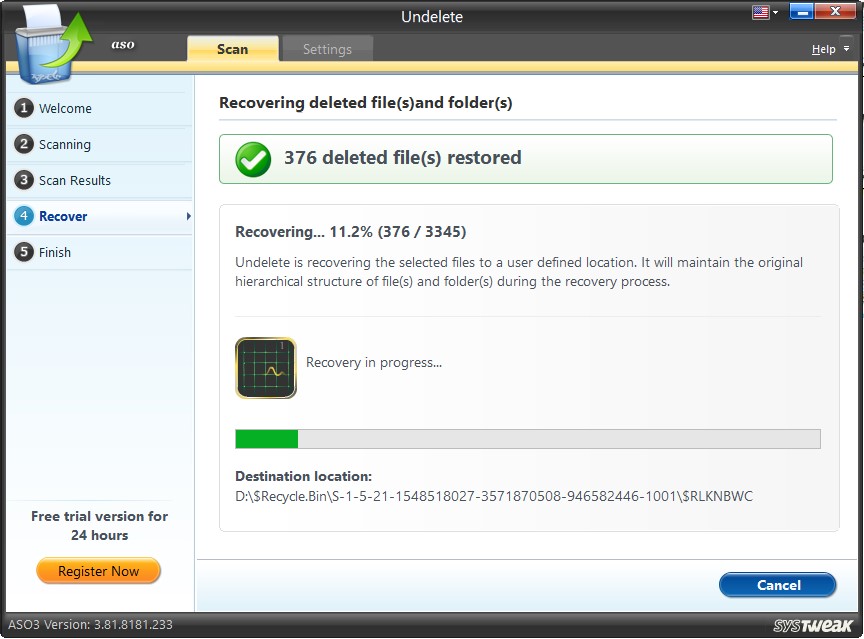
You may return to the Welcome screen to restart the undelete process for another drive-on system by clicking on the "Finish" button.
Settings Tab
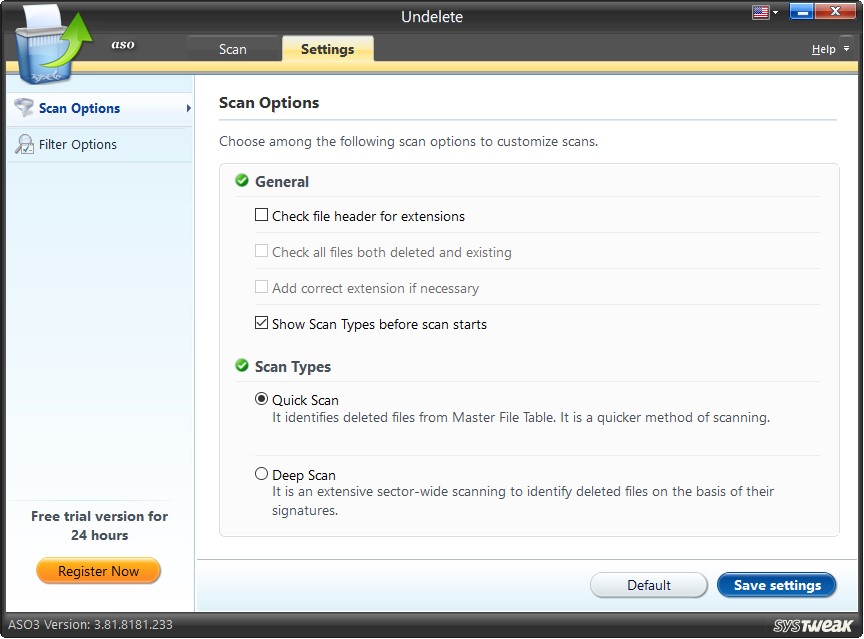
Under the Settings tab, you will see two options, “Scan Options” and “Filter Options,” in the left panel.
Scan Options

You may configure scan settings under this section. Scan options are divided into segments:
General
There are a few important choices under this segment.
- Check file header for extensions – Files can be identified with their header information. The files with wrong extensions can also be identified using the file header information. If you check this option, Undelete will examine each file closely, check the file header information for correct file extensions, and conduct a more logical search. The other two choices are grayed out unless this option is checked.
- Check all deleted and existing files – If you check this option, all deleted and existing (not yet deleted) files will be included in the search. (This option is grayed out unless the first option is checked).
- Add a correct extension if necessary – You may check this option to rectify the wrong file extensions based on file header information. Correct extensions would be added to the files with incorrect extensions and then included in the search. (This option is grayed out unless the first option is checked).
- Show Scan Types before the scan starts – You may check this option to allow the Undelete tool to show the Scan Types (Quick Scan and Deep Scan) before the scan operation. You may choose the scan type of your choice and proceed further.
Scan Types
You may choose the type of scan you wish to scan the selected areas for deleted files and folders.
- Quick Scan – Each file on the system is a part of MFT (Master File Table). MFT contains all the information of all files with their respective characteristics and attributes. When a file is deleted, it can still be traced from MFT and retrieved. Quick Scan helps to identify deleted files and folders from MFT. This is a faster but less comprehensive scan type.
- Deep Scan – Deep Scan helps carry out a sector-wise scanning of hard disk wherein the deleted files and folders are searched based on their unique signatures. This is a slower but more comprehensive scan type.
To apply the changes done in the scan settings, click on the "Save Settings" button.
Filter Options
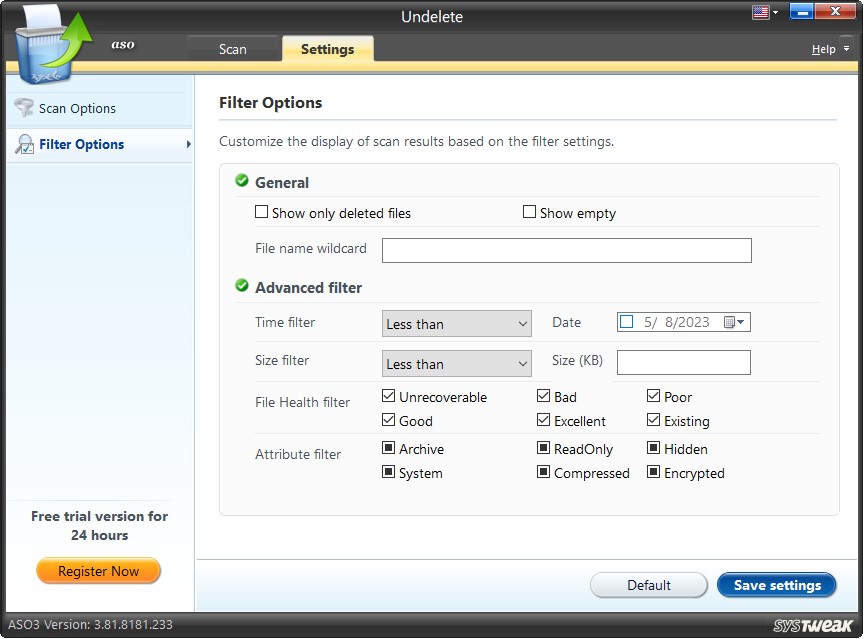
You may filter and refine the search results using various options divided into two broad sections and subdivided further.
General Filter Options

- Show only deleted files – Check this option to show only the deleted files and folders in the scan results.
- Show empty – Check this option to show empty files and folders in the scan results.
- File name wildcard – You may type text/characters in this box and accordingly filter search results.
Advanced Filter Options
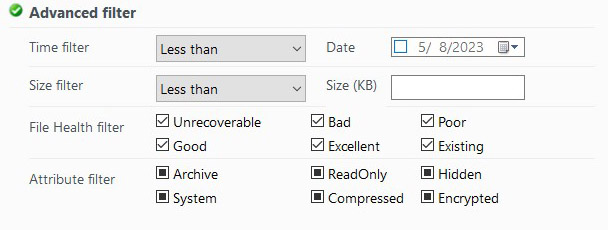
- Time filter – You may filter search results based on date and time. Set a date under the “Date/Time” section and use filters (less than, less than equal to, equal to, greater than, and greater than equal to) to get the desired results.
- Size filter – You may filter the search based on file size. Set a figure in the “Size” section and use filters (less than, less than, equal to, equal to, greater than, and greater than equal to) to get the desired results.
- File Health filter – You may filter the search results based on the current recoverable status of the files. There are 6 options under this filter section, namely Unrecoverable (files that cannot be recovered), Bad (partially recoverable), Poor (cannot be recovered at all), Good (recoverable), Excellent (fully recoverable), and Existing (files which have not been deleted). You may check one or multiple options for customizing the search.
- Attribute filter – The search can be filtered based on the file attributes. Six attributes are 6 attributes given under this filter section: Archive, Read-Only, Hidden, System, Compressed and Encrypted. You may check one or multiple options for customizing the search.
The changes done in the settings should be saved by clicking on the "Save Settings" button in the lower right corner.
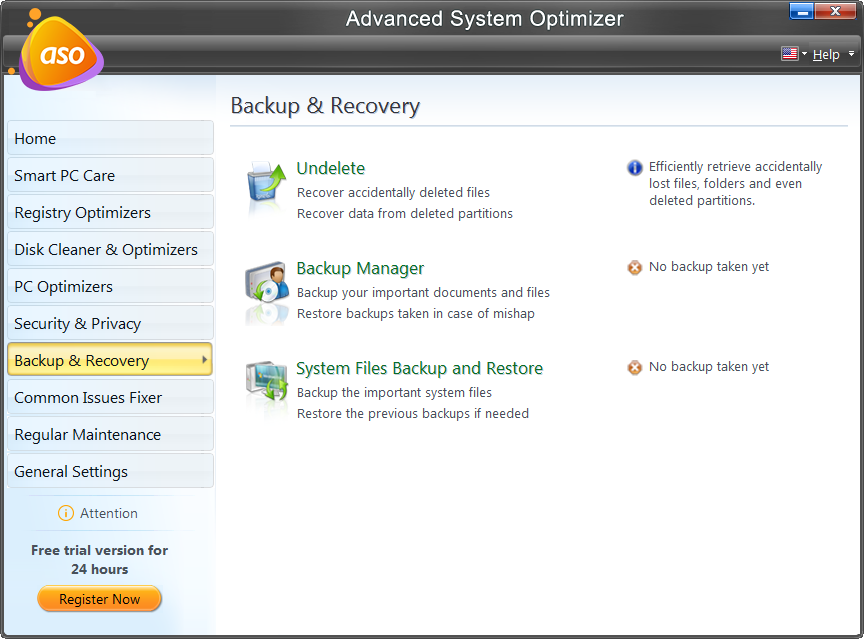
Note: *Backup Manager is unavailable in Windows 10 and 11. Therefore, we will not show it on the PC running Windows 10 and 11*.
Backup Manager
Even after knowing machines are unpredictable and hard disks can crash, most of us don't pay much attention to keeping backup of important files, folders, and emails. Either we do not know how to do it or find it challenging and time-consuming. But in this fast-moving world, losing data is unaffordable and risky. Hence, it is vital to keep a backup of whatever is important to you to overcome this problem.
Why is there a need to keep backup?
Unforeseen situations like system crashes, hard disk failures, ransomware attacks, natural calamity, and virus intrusions make us lose data. Due to this, prioritizing regular backup of files, folders and emails is a must. This helps retrieve data and keep it secure logically.
Backup Manager- The Life Saviour
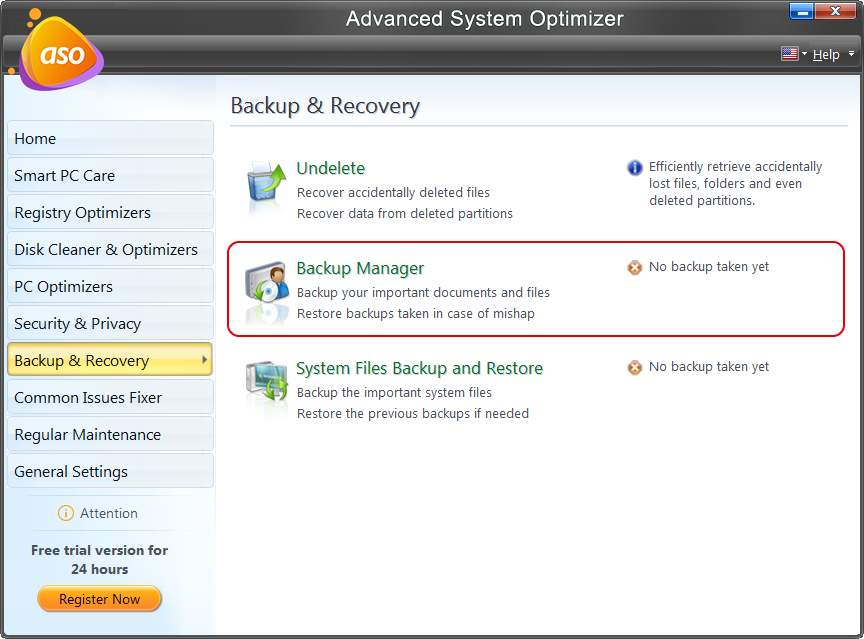
If you are looking for a helpful and easy-to-use way to backup data, Backup Manager is the right tool for you. Using it, you can save and protect your data from all unexpected circumstances. Moreover, it will not let you lose your critical data, crucial files, essential folders, and important emails. Also, it facilitates users to backup data and helps recover the same if required faster and more efficiently.
This tool is logically designed and suits novice and advanced users who do not want a complicated tool to manage backup. Also, to simplify things, the Backup Manager allows scheduling of the backup process. Using this option, you automatically take a backup of files at the time and date specified by you.
How to use Backup Manager
PCs are electronic devices susceptible to damage. This means you can face a data loss anytime, anywhere. Therefore, to stay protected against these losses keeping a backup of important files, folders and emails is a must.
Backup Manager with a user-friendly interface allows quick backup of all critical data. This helps in an inexpensive and instant data restoration when something unexpected happens.
Home Tab
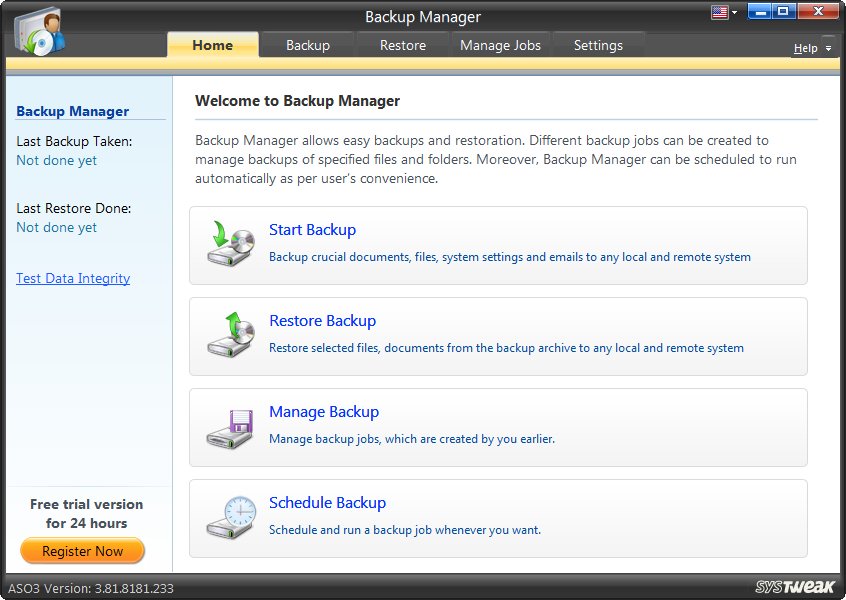
The Welcome Screen of Backup Manager gives you four options -
- Start Backup
- Restore Backup
- Manage Backup and
- Schedule Backup
To perform the task, you need to click on the respective tabs.
Backup Tab
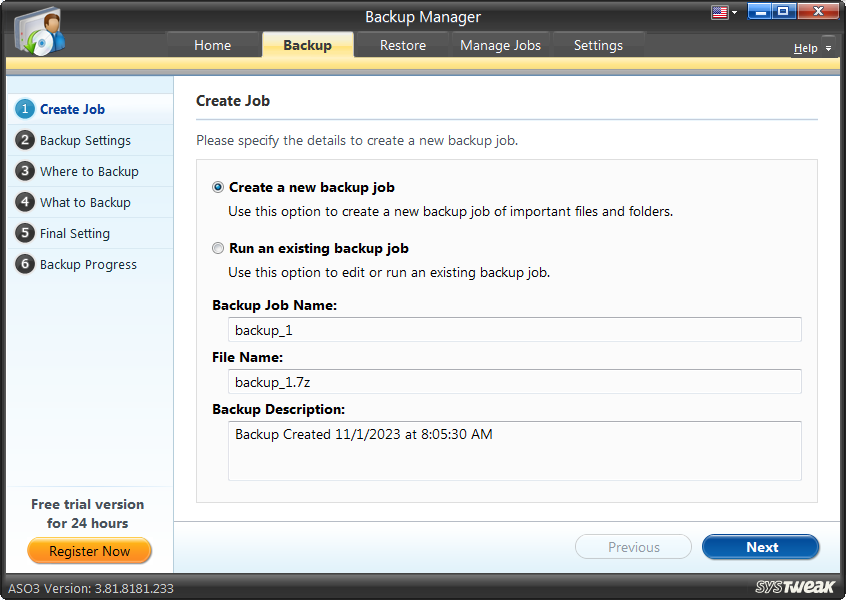
Backup Manager allows a complete backup of all important files, folders, and emails. This backup is saved in a user-defined location on a local or remote system.
To start the backup process, you need to click on “Start Backup” > select the radio button next to “Create a new backup job”> give a name to the backup job, give a description > Next.
Select the Backup Media Type:
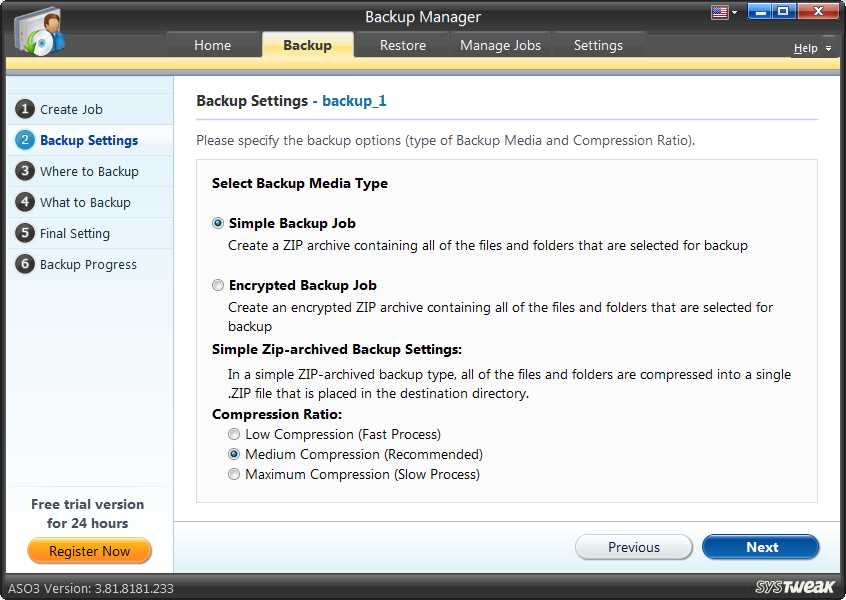
Simple Backup Job
Encrypted Backup Job
Click Next, select backup location > Next, select what you want to backup > Next > you can Backup Immediately or can add selected files and folders to Exclusion List > Next > Wait for the Backup to complete.
Backup Summary - the left panel of the screen displayed the date when the last backup was created and the final restoration was done.
Test Data Integrity

Click on this link to verify the data integrity of the backed-up files and folders. Select the backup job to be tested and click “Test Now.” The percentage shows the originality maintained during backup. If it's 100%, the backup performed was purely authentic with no discrepancies.
To select Data Integrity of all backup jobs, click on the “Browse” button, navigate to the backup jobs, select the jobs for which a Data Integrity check has to be performed, and click on “Refresh List” to refresh the list of backup jobs.
Create a Job
Under this section, you may enter the details to “Create a new backup job” or “Run an existing backup job.”
1). Backup Process When You Create a New Backup Job
Step1: Create a new job

Enter a job name for the new backup job in the edit box under the head “Backup Job Name” the File Name will show the backup job with the default extension (.7z), and the Backup Description will show the date and time of the newly created job. You can edit the description in the box.
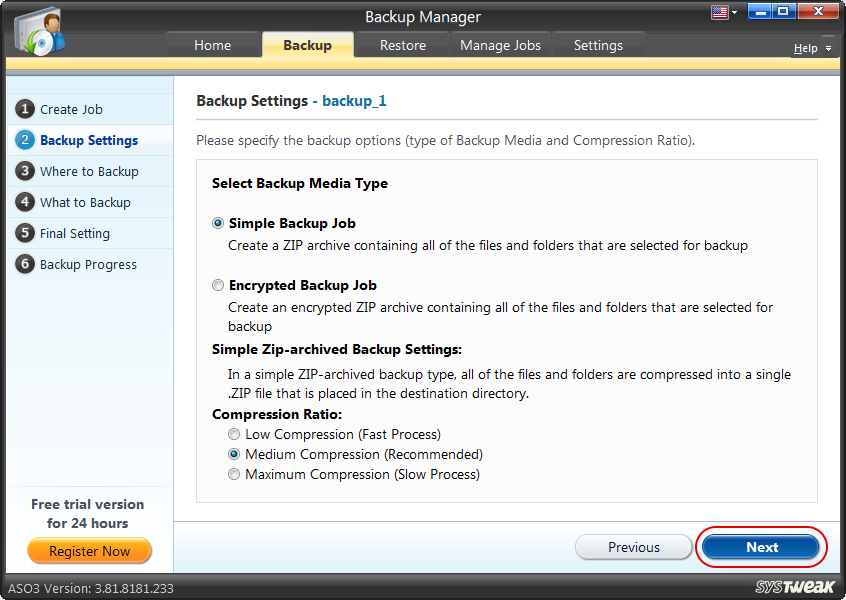
Once the required details are entered, click the “Next” button to proceed and follow on-screen instructions.
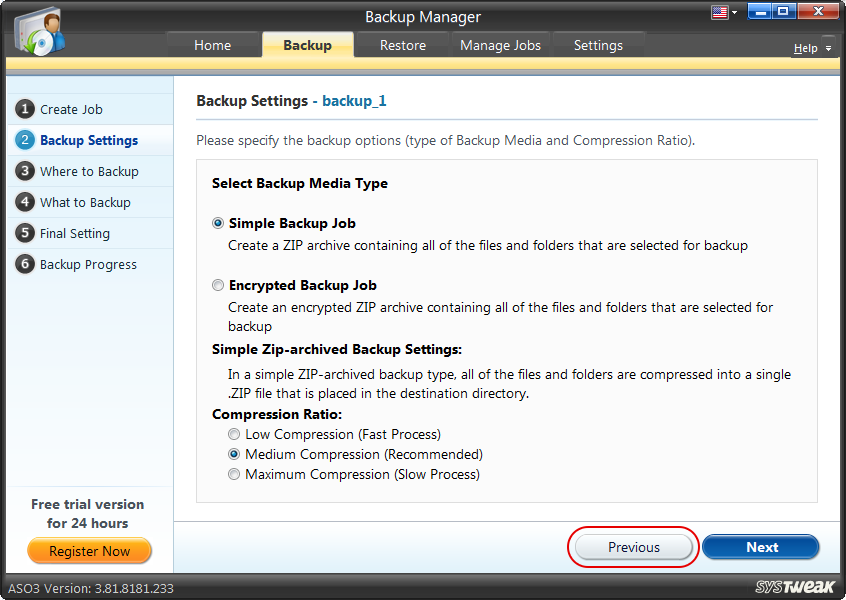
Note: To go back to the previous screen, click the “Previous” button
Step2: Backup Settings
In this step, firstly, you need to select the backup media to create a new backup job. Secondly, you might have to specify a compression ratio.

- Select Backup Media
Backup Media assists in taking the backup of selected files and folders and saves them in compressed form on the system.
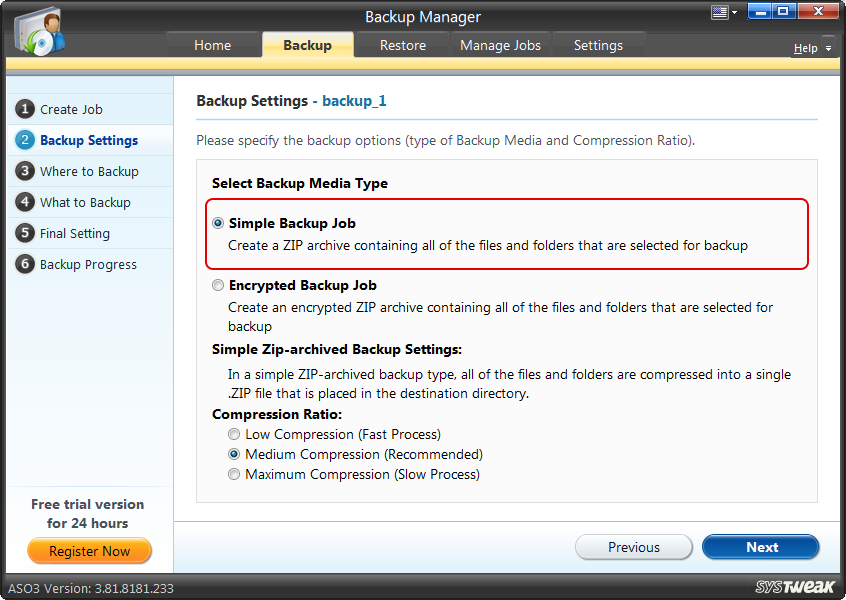
- Simple Backup Job – Allows creating a zip archive containing all files and folders selected for backup into a single .7Z file which is then saved in the destination folder.
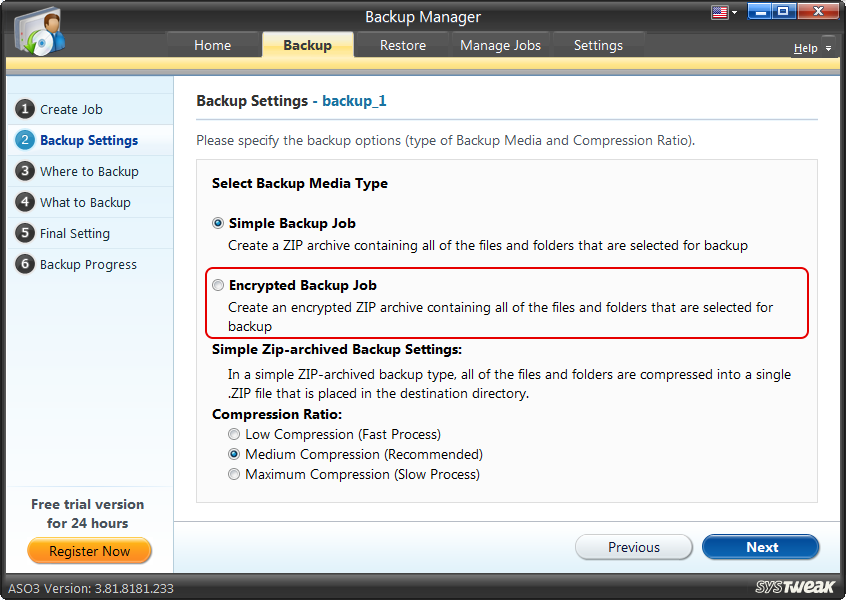
- Encrypted Backup Job – This allows creating an encrypted (password protected) zip archive containing all files and folders selected for backup into an encrypted .7Z file. On selecting this option, you need to set a password for the encryption.
- Compression Ratio
The level at which the size of any file or folder is compressed is mentioned under the compression ratio. Backup Manager offers the following three levels of compression:
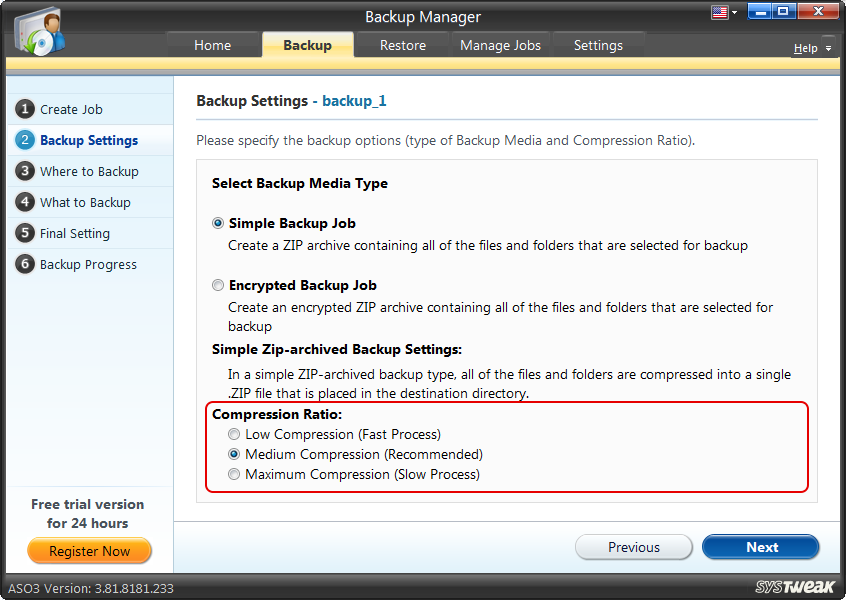
- Low Compression (Fast Process) – By selecting this compression ratio, you can compress the actual size of the backup files with a fast speed, but there would not be much of a difference in the size.
- Medium Compression (Recommended) – The compression level is higher than the first ratio on selecting this compression ratio. Still, the speed with which the compression is done is a little low. It is the recommended ratio of compression.
- Maximum Compression (Slow Process) – On selecting this compression ratio, the compression level will be highest, but the speed with which the actual file is compressed is the slowest. You will find a major size difference from the file's original size.
Once the backup settings are selected, click the “Next” button to continue.

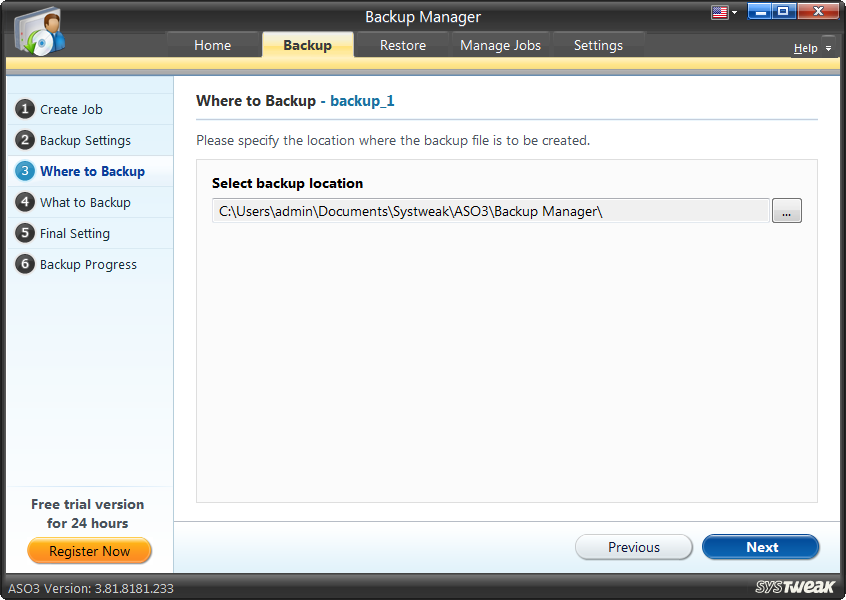
Step 3: Where to Backup
Browse and select the backup location where you want to save the backup data and click “Next.”
Step 4: What to Backup
Check the files you want to back up, put them under two heads, the “My Personal” and “My Folders” tab, and click “Next”.
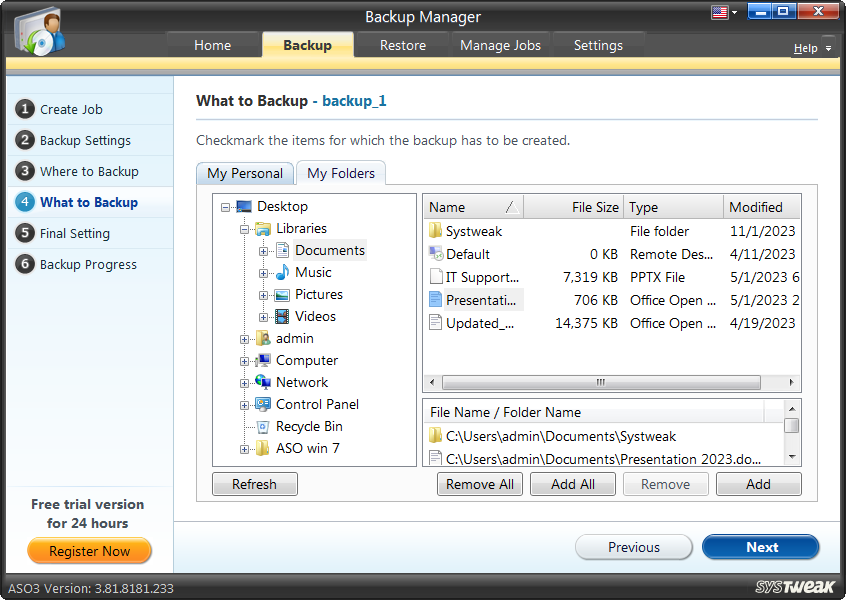
Note: Using Backup Manager you can backup the entire or selected registry key(s).
My Personal (Tab)
This tab lists the following items:
(i). Windows Registry
You may either select to Backup entire Registry or Backup selected Registry key(s) and then click “Next.”
Backup of selected Registry key(s)
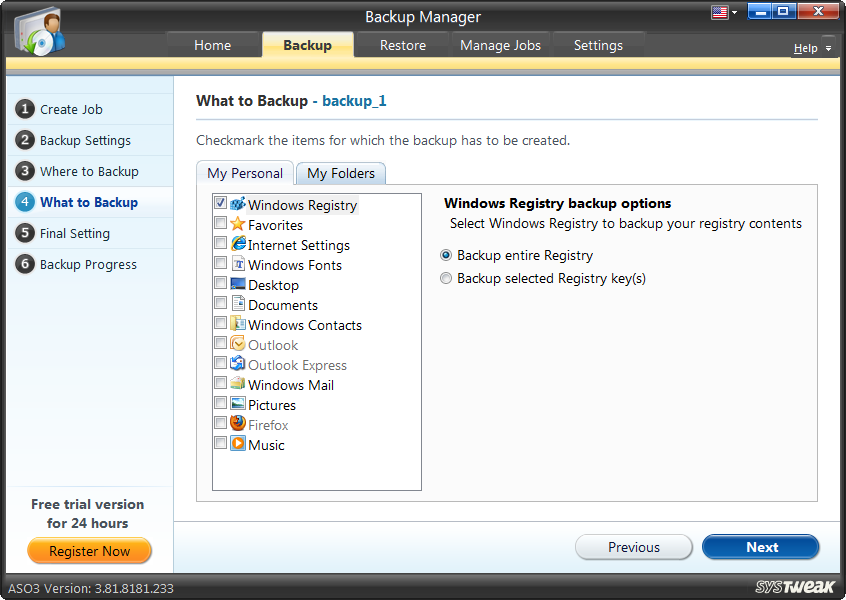
To backup selected Registry key(s), click the “Add Key” button to add Registry key(s) to the list or click on “Delete Key” to remove selected key(s) from the list.
(ii). Favorites
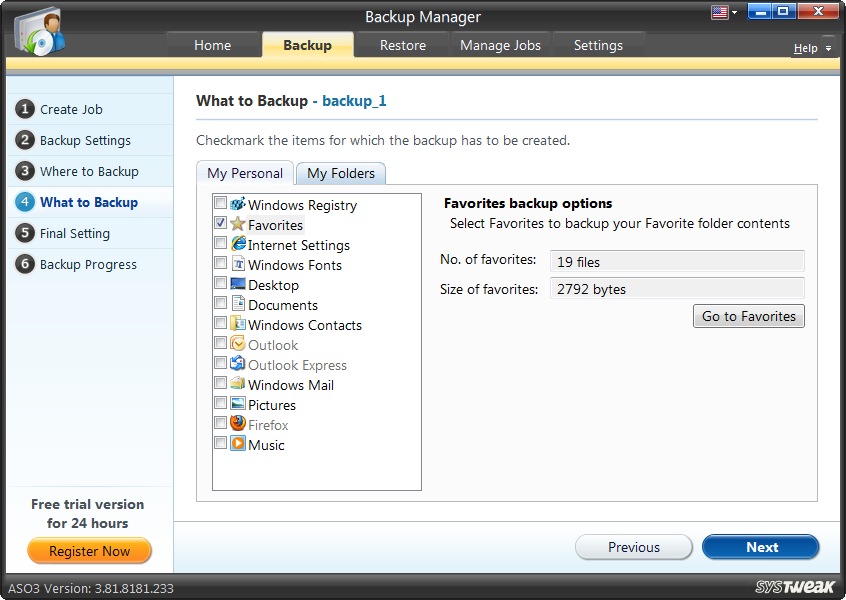
Click “Go to Favorites,” select files and folders from the Favorite folder to backup, and click “Next.” The count and the selected items will be displayed in the “No. of favorites” and “Size of favorites” boxes, respectively.
(iii). Internet Settings
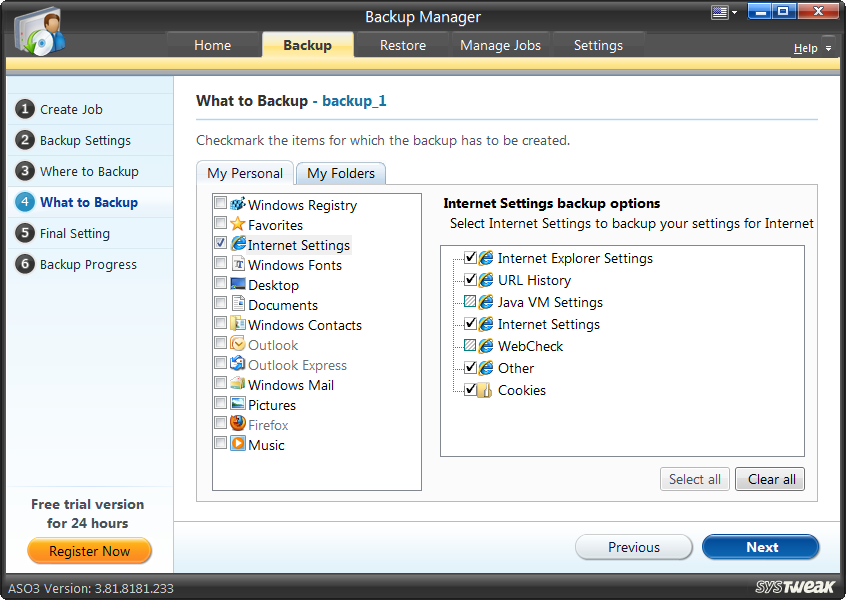
Check the items to back up from the right pane and click “Next.” Click “Select All” to select all the items or “Deselect All” to deselect all items from the list.
(iv). Windows Fonts
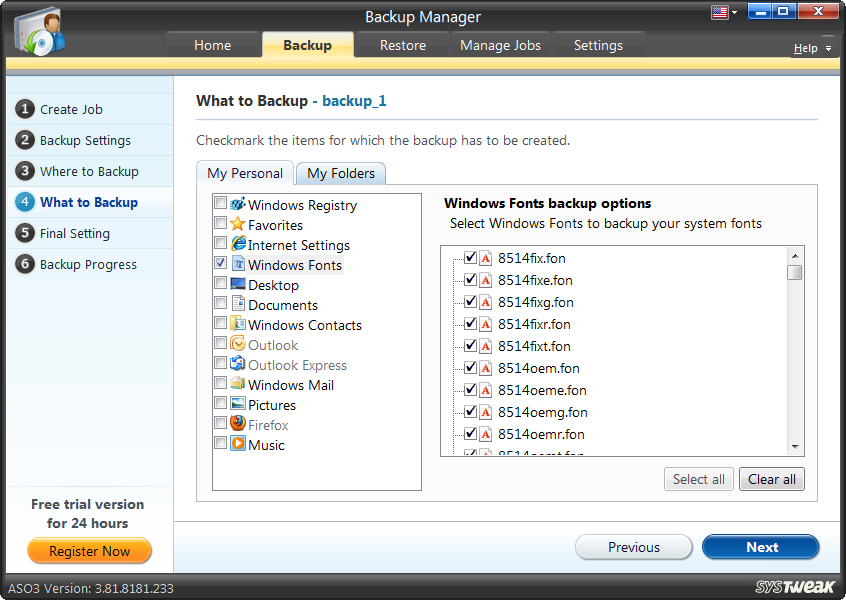
Choose the fonts Windows uses from the list to backup and click “Next” to continue. Click “Select All” to select all the items or “Clear all” to deselect all items from the list.
(v). Windows Desktop
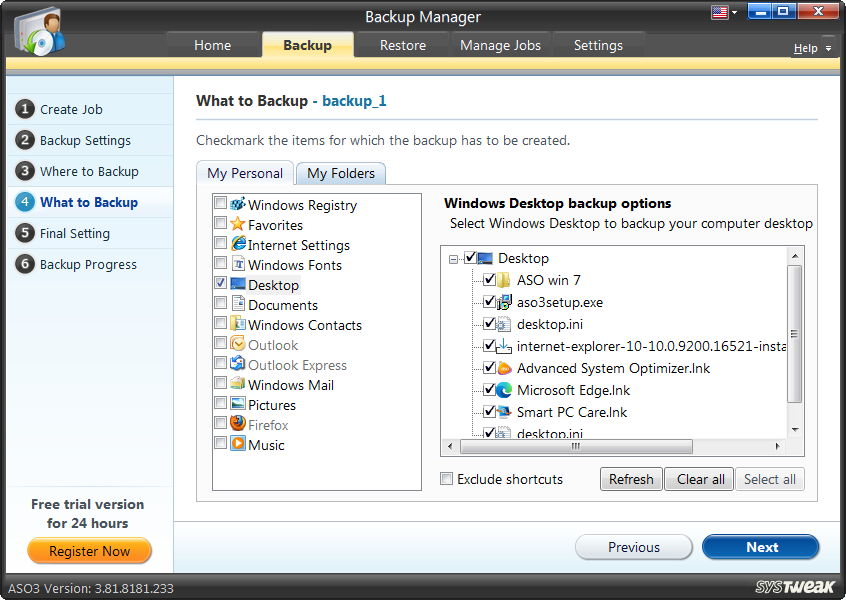
Select the Desktop items from the right pane to backup and click “Next.” Click “Select all” to backup all listed items and to remove them, click “Clear all.” To list the new entries, click on the “Refresh” button.
Note: You can avoid backing up shortcuts by checking the box next to Exclude shortcuts.
(vi). My Documents
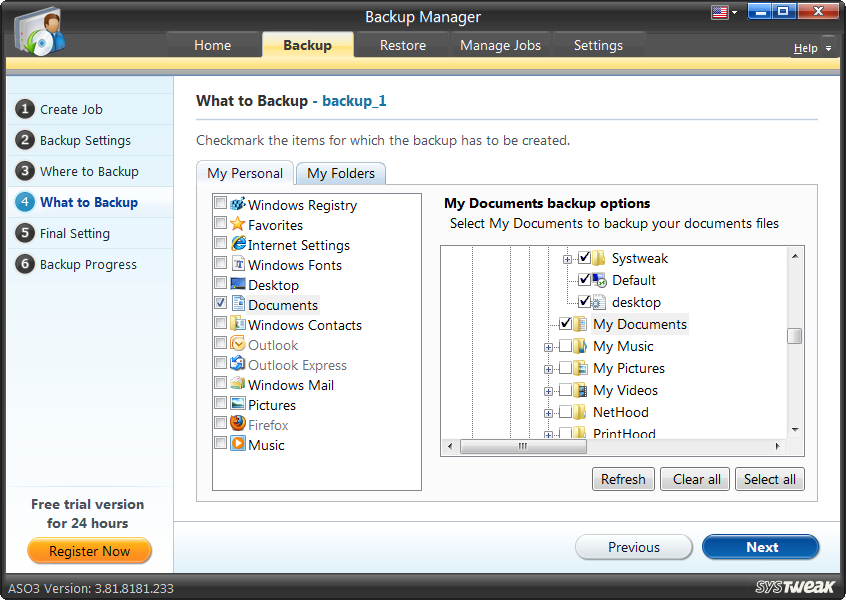
Choose the items from the My Documents folder from the right pane and click “Next.”
To take backup of all listed folders, click “Select All” and “Clear all” to deselect all items from the list. You may refresh the list with new arrivals by clicking on the “Refresh” button.
(vii). Windows Address Book
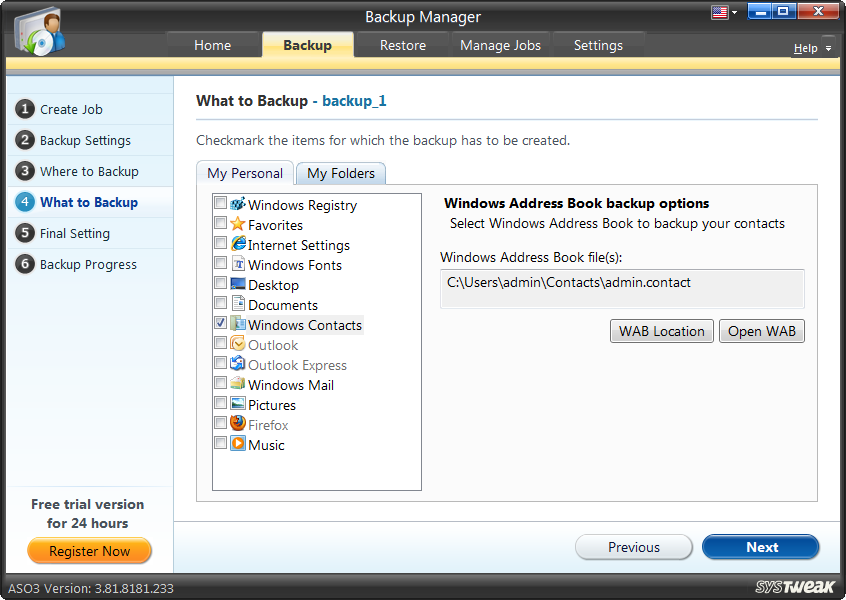
Windows Address Book (WAB) contains the contact list. Check this item in the left pane to take its backup such that if WAB is emptied accidentally, the backup can be restored to get back to the contact list. Click on “WAB Location” to view the physical location of the WAB on the system and click on “Open WAB” to open the Address book.
(viii). Outlook
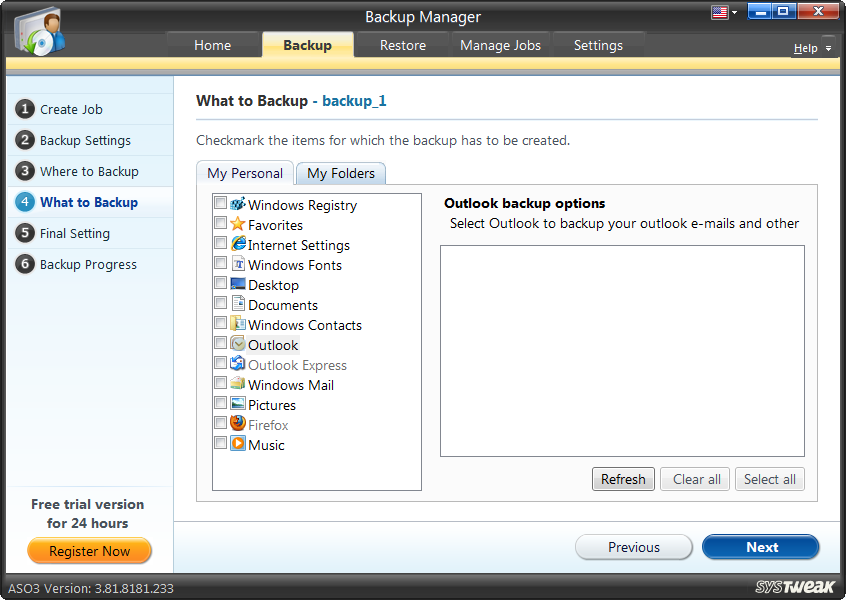
Microsoft Outlook works as a personal information manager. It is used as an e-mail application. To keep a backup of Outlook, select the item from the left pane, take its backup and then click “Next.” Click “Select all” to backup Outlook emails and “Clear all” to deselect all items from the list. You may refresh the list with new arrivals by clicking on the “Refresh” button.
(ix). Outlook Express
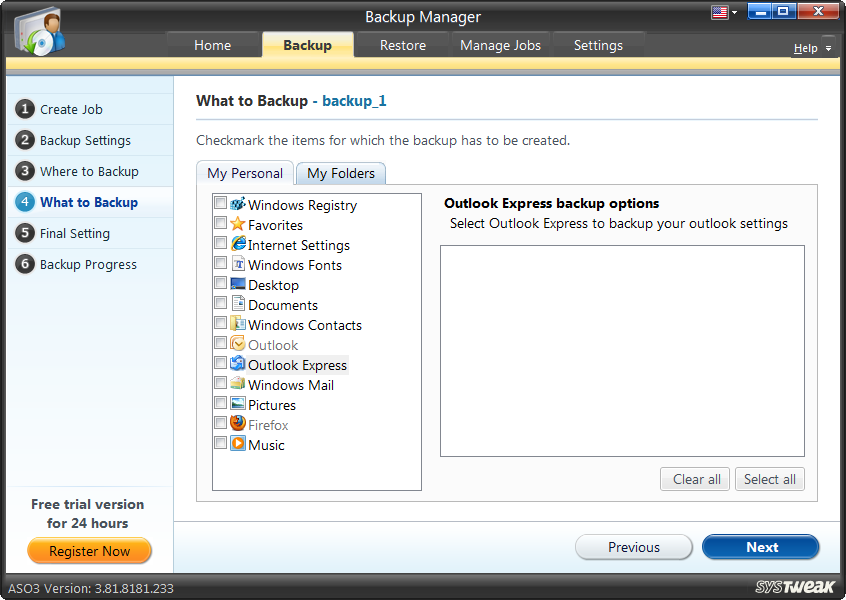
Outlook Express is an e-mail and new client from Microsoft. Check desired items from the right pane to take backup and click “Next”. Click “Select all” to select all the items or “Clear all” to deselect all items from the list. You may refresh the list with new arrivals by clicking on the “Refresh” button.
(x). Windows Mail
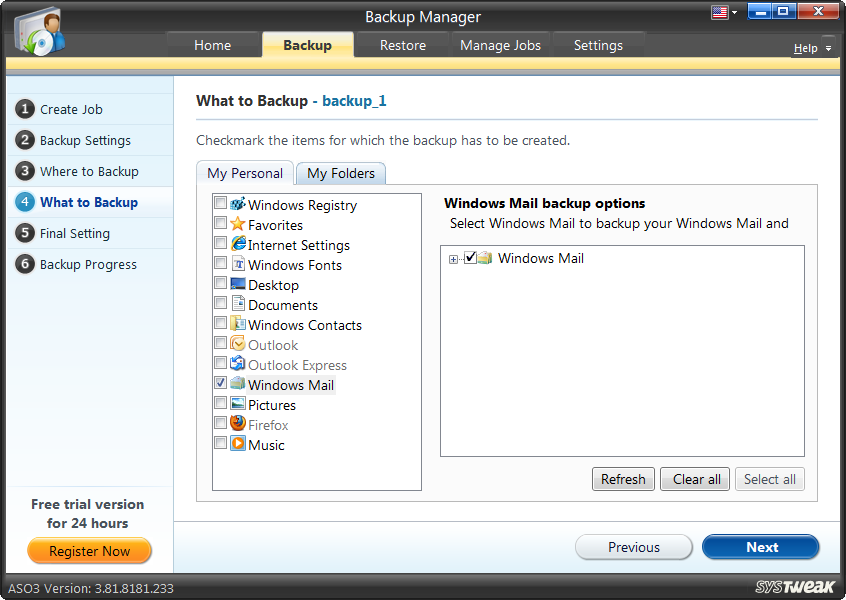
A successor and an improved version of Outlook Express, Windows Mail is also a Microsoft e-mail/news client. Check desired items from the right pane to take backup and click “Next”. Click “Select All” to select all the items or “Clear all” to deselect all items from the list. You may refresh the list with new arrivals by clicking on the “Refresh” button.
(xi). My Pictures
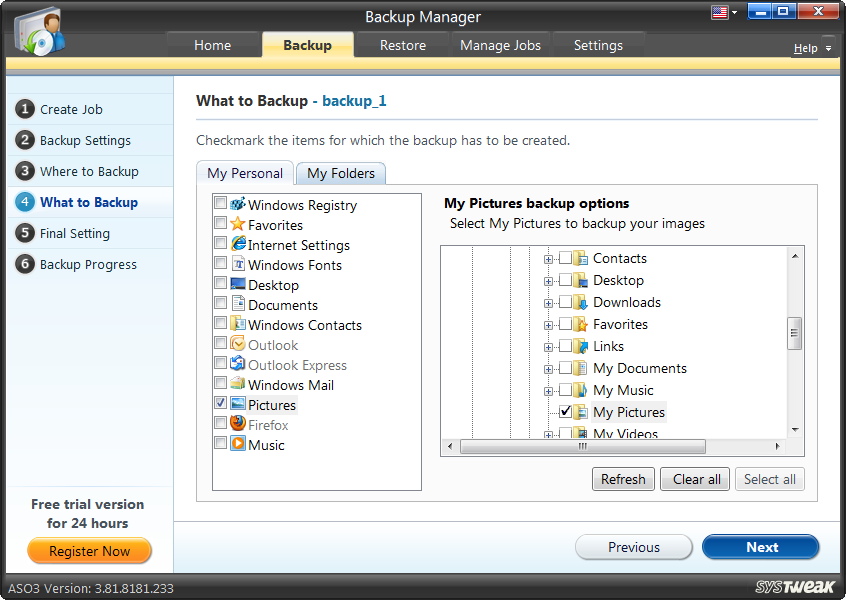
Select items from the My Pictures folder and click “Next” to continue. Click “Select all” to add all the items or “Clear all” to deselect all items from the list. You may refresh the list with new arrivals by clicking on the “Refresh” button.
(xii). Firefox
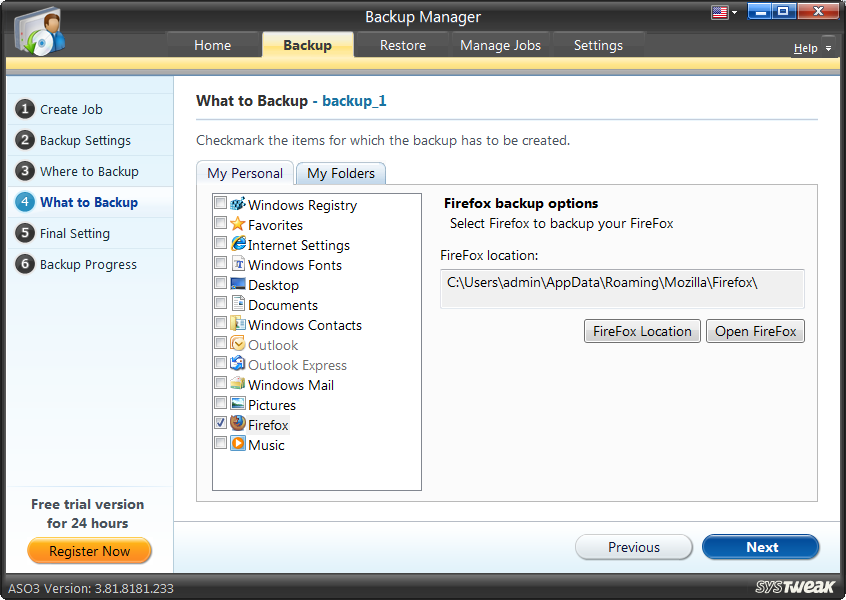
Select Firefox from the left pane to take its backup, and click “Next.” Click on “Firefox Location” to view the physical location of Firefox on the system and click on “Open Firefox” to launch Firefox.
(xiii). My Music
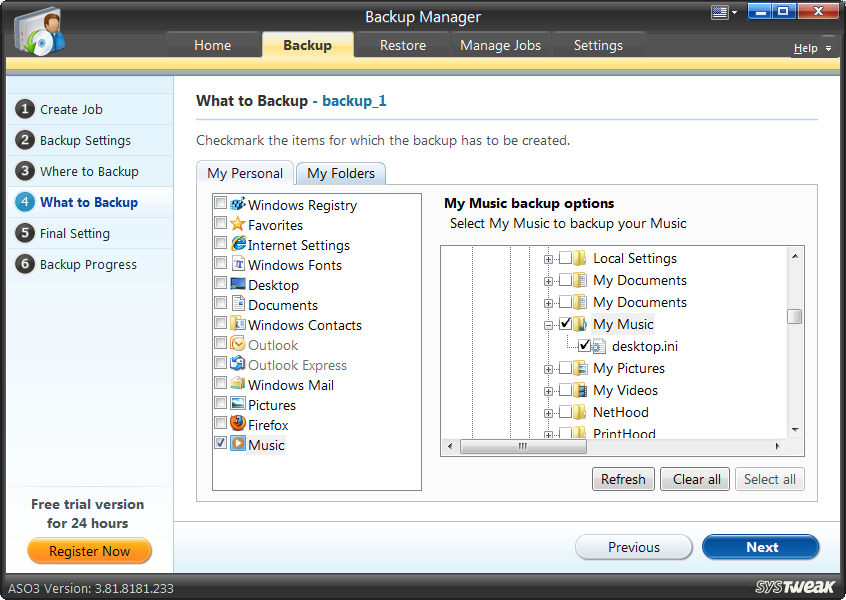
Select items from the My Music folder to backup and then click on “Next.” Click “Select all” to select all the items or “Clear all” to deselect all items from the list. You may refresh the list with new arrivals by clicking on the “Refresh” button.
My Folders (Tab)
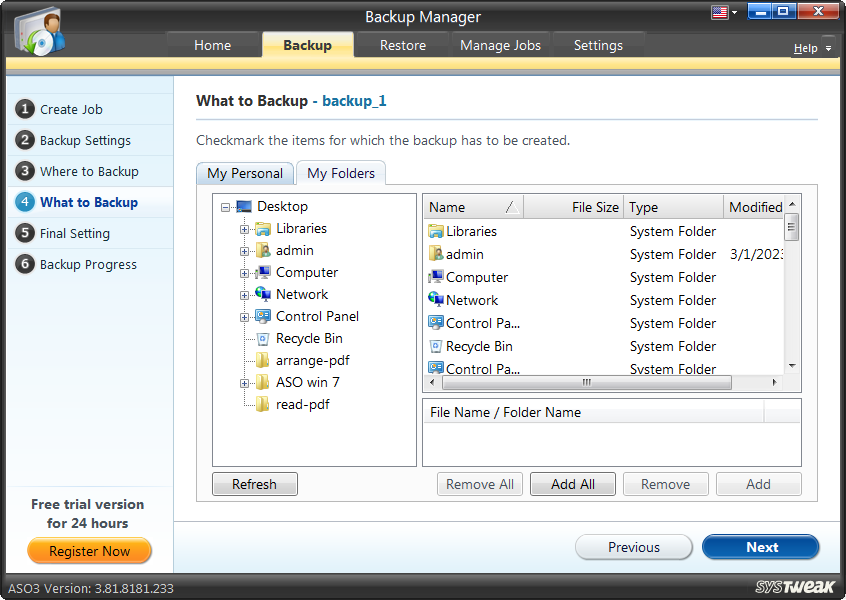
On this tab, you will see a list of all Desktop items in the tree format in the left pane. You may expand the folders to view the items in them. The “Refresh” button can be used to refresh the list. The list of items is also shown in the list box in the upper right pane. You may open any file or folder or launch any application from this list by double-clicking on it.
File Name/Folder Name
Click on the “Add” button or “Add All” button to add files and folders to this list from the upper right pane. Click on the “Remove” button or “Remove All” button to remove items from this list.
Once all the settings are done and folders have been added, click Next.
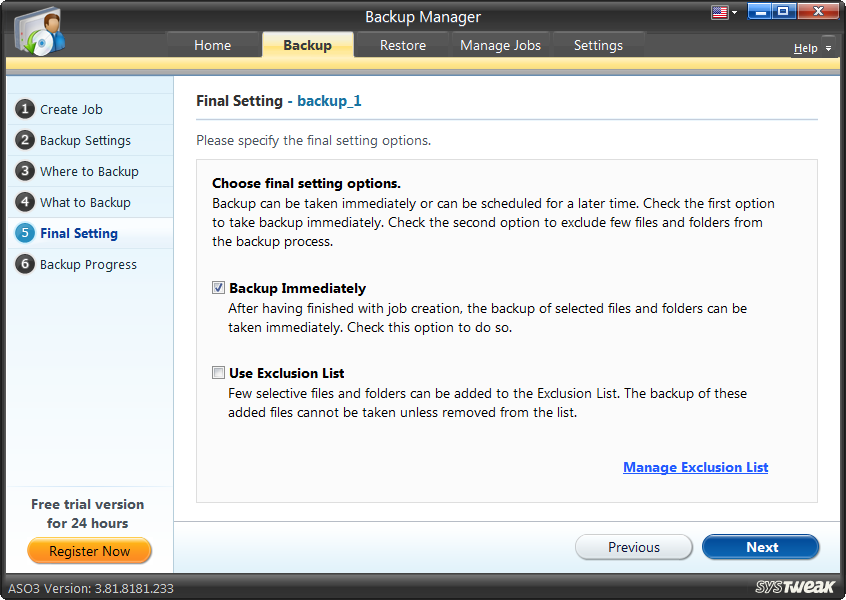
Step5: Final Setting Options
Choose from the given two options as it is the final backup setting. You can either backup selected files and folders immediately or schedule the backup process at your convenience.
The other option allows you to add items to the Exclusion List; the backup of such items cannot be created then. Check the desired options and click “Next.”
Backup Immediately
Check this option when you intend to start the backup process immediately after successfully creating a backup job. As soon as a backup job is completed, Backup Manager will instantly begin to create a backup of selected files and folders.
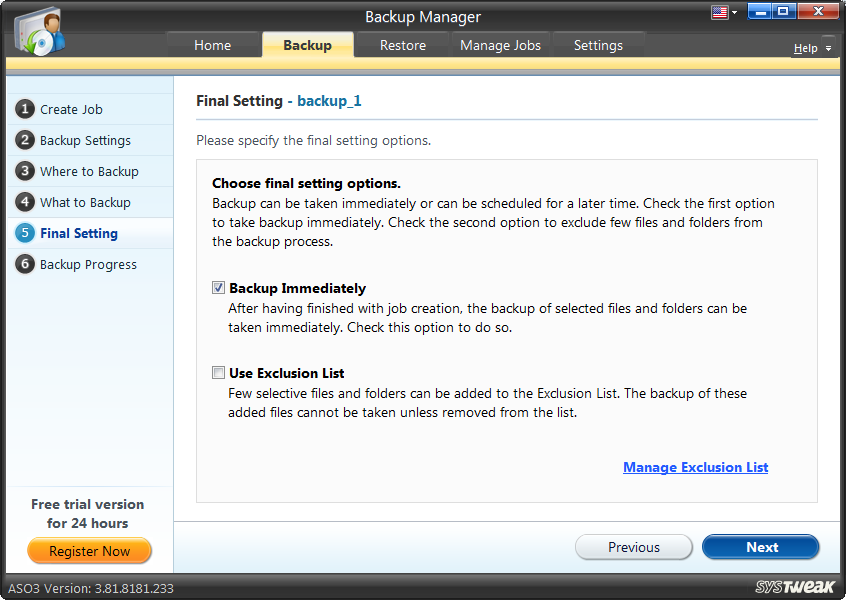
Use Exclusion List
All items you wish to skip in the backup process can be added to the Exclusion List. The backup Manager will not take backup of these items unless removed from the list.
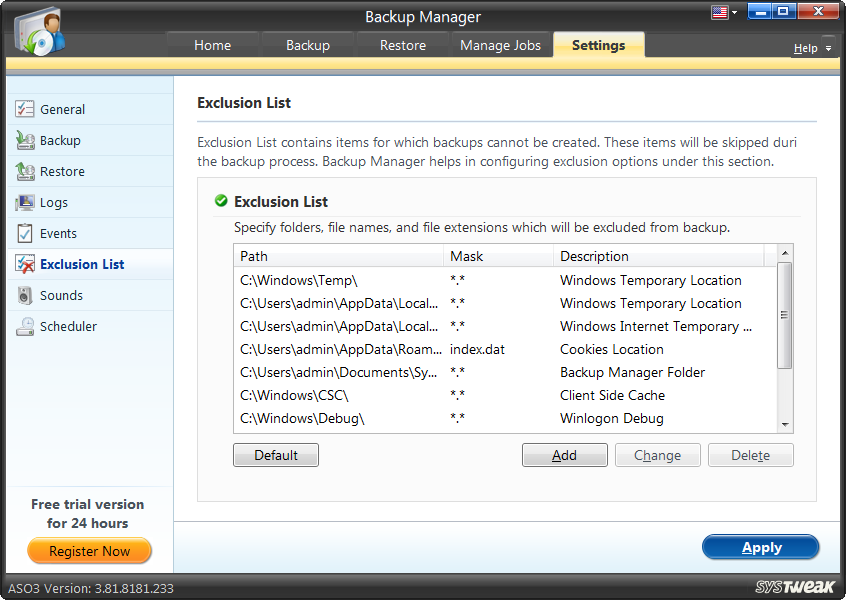
Manage Exclusion List - On clicking this link, you can add, remove, and customize the items in the Exclusion List.
Step6: Backup Progress
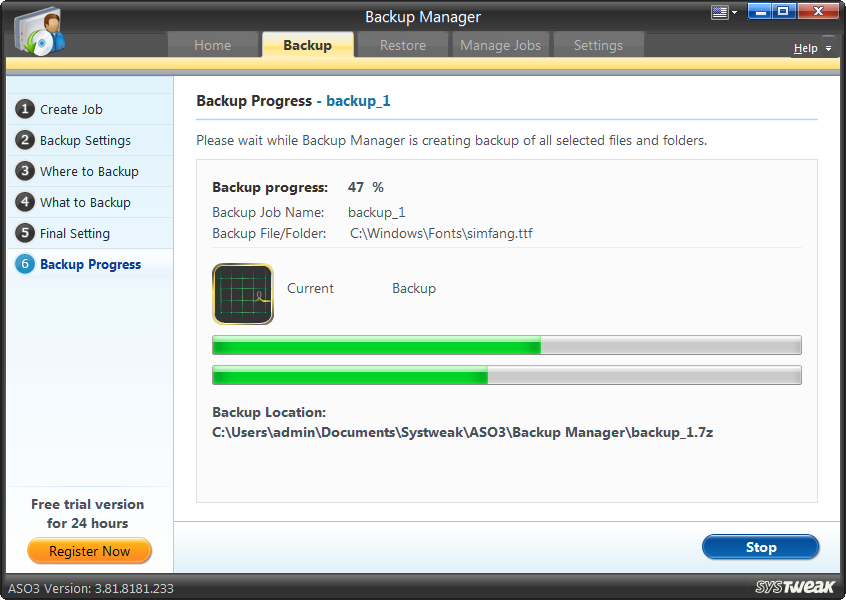
Here you may view the progress status of the backup process. On successful completion of the task, a message box appears on the screen. Click on the “OK” button and a log table shows the backup and restoration entries.
You may click on the “Stop” button to stop the backup process.
2). Backup Process When You Edit or Run an Existing Backup Job
Step1: Run an existing backup job
Select this option to edit or run an existing backup job and click on the “Next” button. A list of the existing backup jobs will be shown in the lower half of the screen with complete details. To edit a job, you may click on the desired backup job and click on “Load Job”. You may also add the fresh jobs created by clicking on the “Add new Job” button.
Following this task, click on the “Next” button to proceed further.
Edit a Job

Here, you can edit the selected backup job. Either you can rename the backup job and enter its details in the backup description section or can simply click “Next,” to proceed.
The rest of the procedure is the same as for creating a new job.
In case, you do not wish to continue editing, click on the “Back” button. You will be redirected to the “Create a Job” page.
Logs
Log table saves logs of all events as entries. Select any log from the table and click on the “Save” button to save the selected log in a user-defined location. (The location can be defined under the “Settings” tab).
There is a Search window also which facilitates the convenient search for desired backup jobs.
Restore Tab
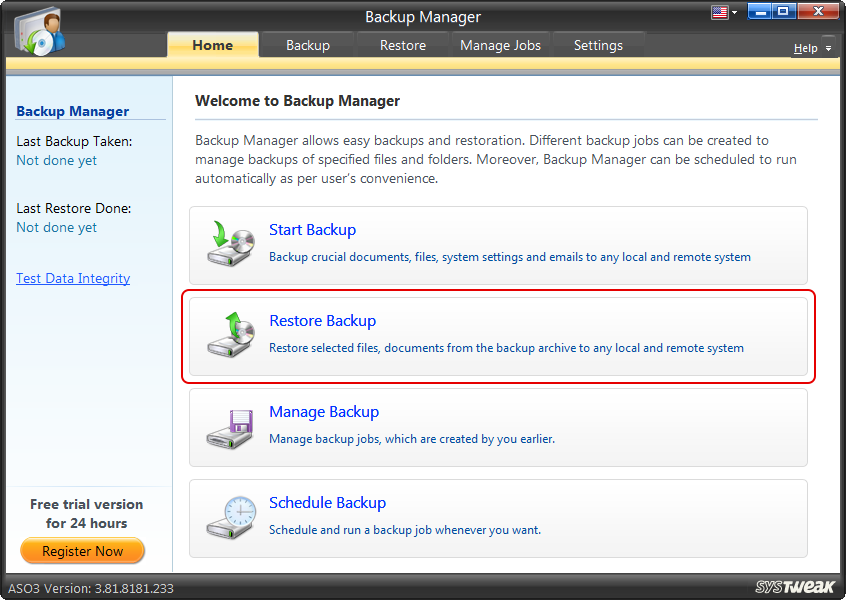
Backup Manager helps create backup jobs for important files and folders. It also facilitates easy restoration. Explained below is the restoration process.
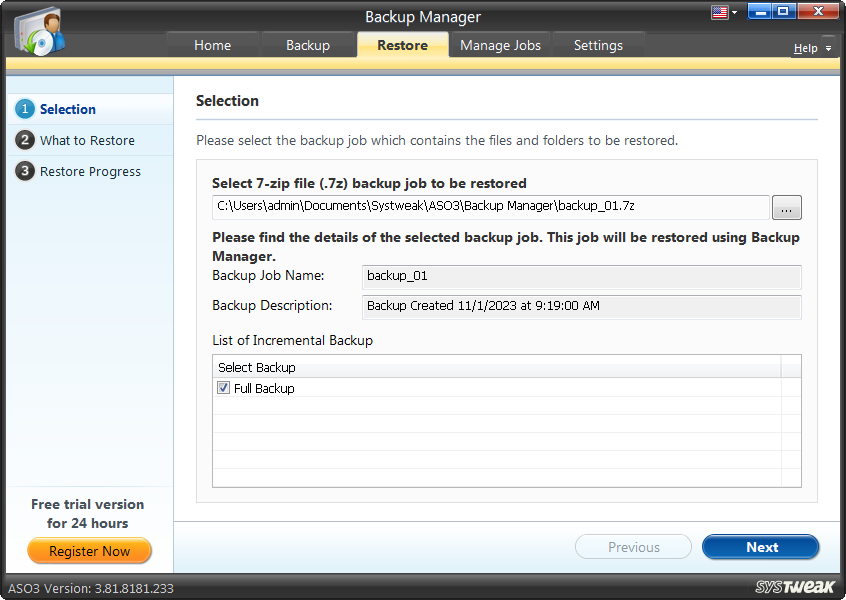
Step1: Select Backup Job to Restore
Browse and select the backup job to be restored and click “Next”.
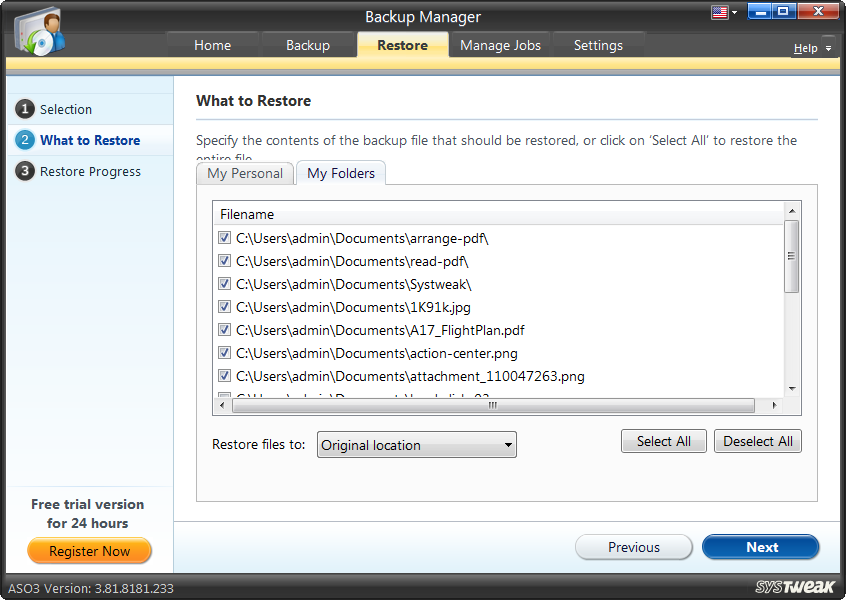
Step2: What to Restore
Here specify the files and folders from the “My Personal” and “My Folders” tabs to be restored and click “Next”. Click “Select All” to select all the items or “Deselect All” to deselect all items from the list.
Step3: Restore Progress
You will now be able to see the progress in the restoration process. A message box appears on the screen after successfully completing the task. Click on the “OK” button, and a log table opens, showing the entries of all events captured as log entries.
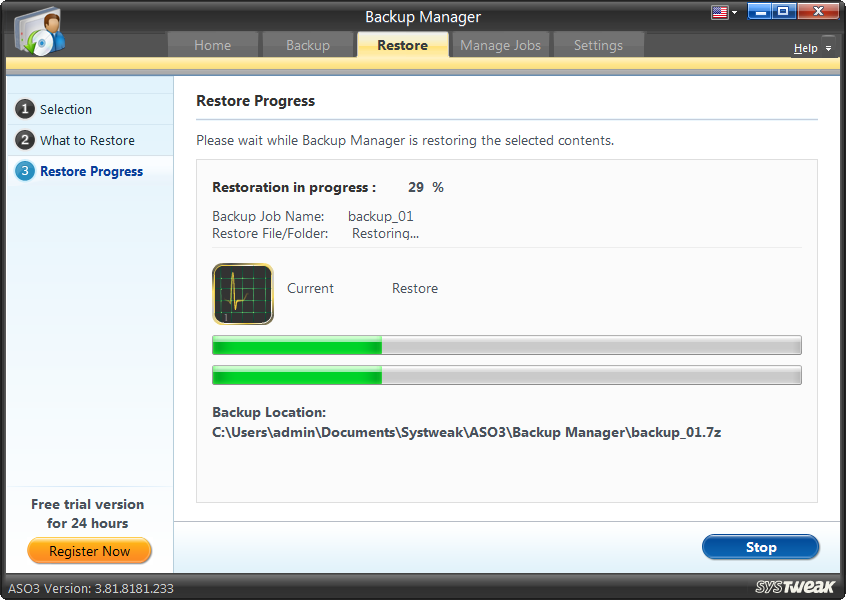
You may click the “Stop” button to stop the restoration process.
Manage Jobs Tab
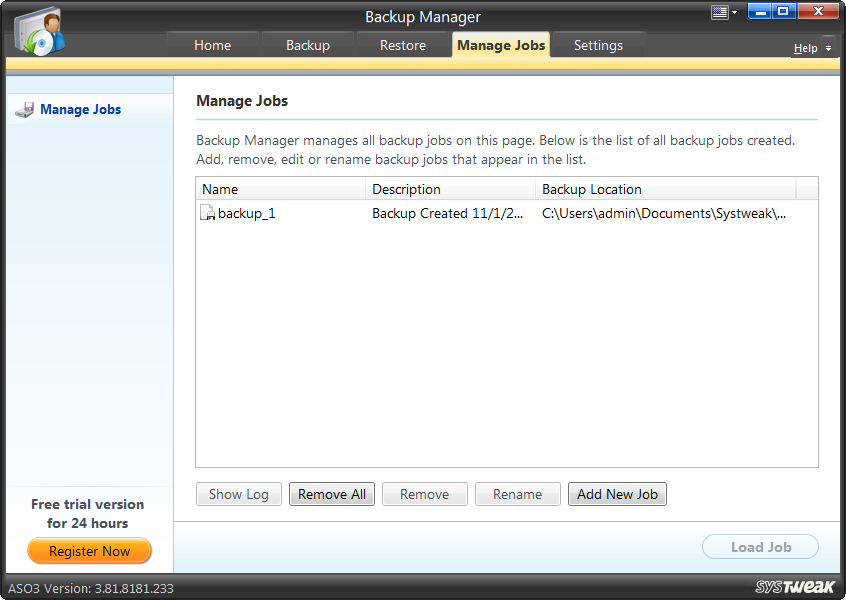
View all the backup jobs created to date under the “Manage Jobs” tab. Here you may “Add New Job” or “Remove” selected backup jobs or “Remove All” of them in one go or “Rename” a backup job or edit a selected job by clicking on the “Load Job” button.
You may click the “Show Log” button to view the logs maintained so far.
Settings Tab
Under the “Settings” tab, you can configure various application settings and customize them per your needs and preferences. Each time a change is done in the settings, click on the “Apply” button to save and apply all the changes.
General Settings
General
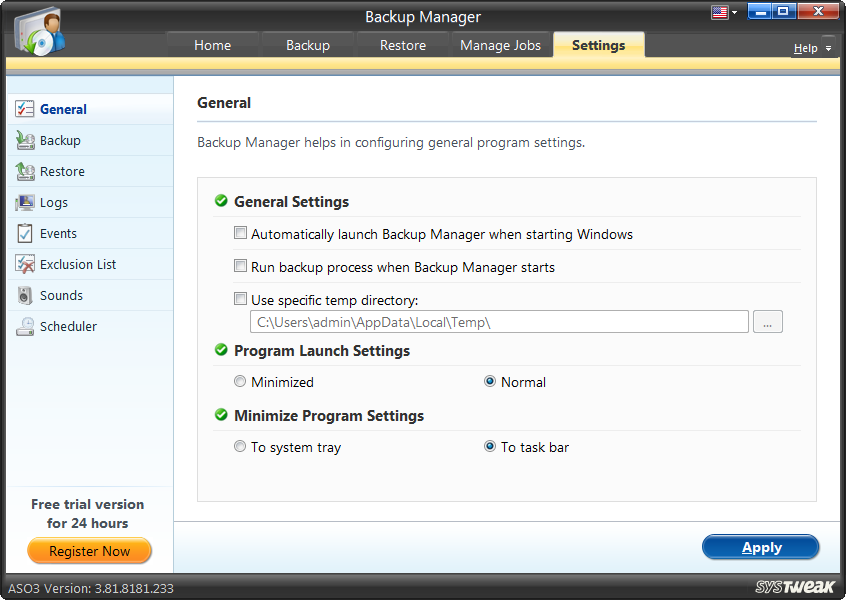
- Automatically launch Backup Manager when starting windows – This option will launch Backup Manager at every Windows startup.
- Run backup process when Backup Manager starts – This option makes you choose to directly move to the “Backup” tab when the application launches.
- Use specific temp directory - Check this option to specify Backup Manager, a temporary directory for temporary storage. You may browse through Windows Explorer to select a temporary directory.
- Program Launch Settings
- Minimize Program Settings
Minimized - Select this option to launch Backup Manager in the minimized form, wherein you will not be able to view it on the screen. You will find it as an item in the taskbar or the system tray.
Normal - Select this option to launch Backup Manager in a normal form/size on the screen.
You may select the location of the launch of the application in the minimized form.
To system tray - Select this option to launch Backup Manager in the system tray directly.
To taskbar - Select this option to launch Backup Manager in the taskbar directly
Backup Settings
You may change the backup settings using the following options:
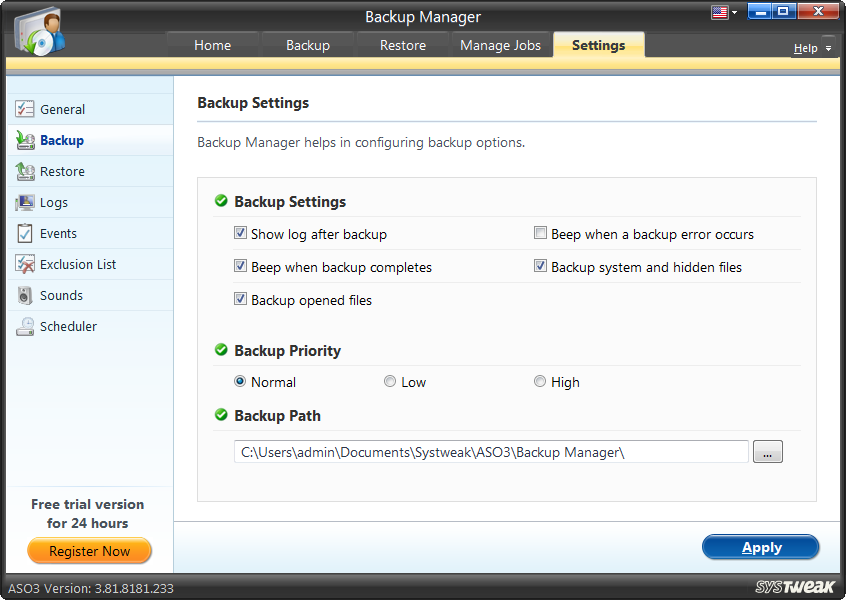
Backup Settings
- Show log after backup – Check this option to show the log table each time a backup job is created.
- Beep when a backup error occurs – On checking this option, you can hear an assigned beep sound whenever an error occurs during the backup process.
- Beep when the backup completes – On checking this option, you can hear an assigned beep sound whenever the backup is completed.
- Backup system and hidden files – Check this option to take the backup of all system files and hidden files.
- Backup opened files – Check this option to backup all the files currently in use.
Backup Priority
You can set the priority for the application on the system. As per the priority set, the system will prioritize CPU and Memory resource allocation for Backup Manager as an application.
- Low – If you select the “Low” priority level, the system will minimize CPU and Memory resource allocation, and other applications on the system will be given higher priority.
- Normal – On selecting the “Normal” priority level, the system will give regular priority to the Back Manager as far as the CPU and Memory resource allocation is concerned.
- High – On selecting the “High” priority level, the system will maximize CPU and Memory resource allocation, and the other applications will be given lesser priority. This will allow the Backup Manager to run without any disruptions.
Backup Path
By browsing through Windows Explorer, you may select a suitable destination for saving the backups.
Restore Settings
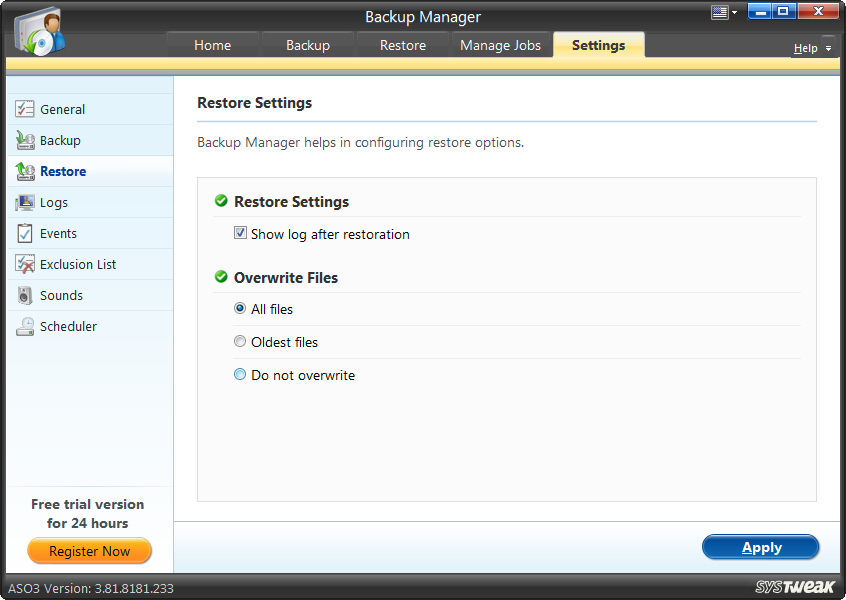
The Restore settings can be changed under this section. The backups restored to a location can be overwritten in the existing files of that particular location.
Restore Settings
- Show log after restoration - See the log table each time a backup is restored successfully.
Overwrite files
- All files – You may opt to overwrite all existing files of a selected location while restoring backups.
- Oldest files – You may also choose to overwrite only those files which are the oldest among all files in the selected location.
- Do not overwrite – On selecting this option, Backup Manager will restore backups without overwriting or replacing existing files in the selected location.
Logs
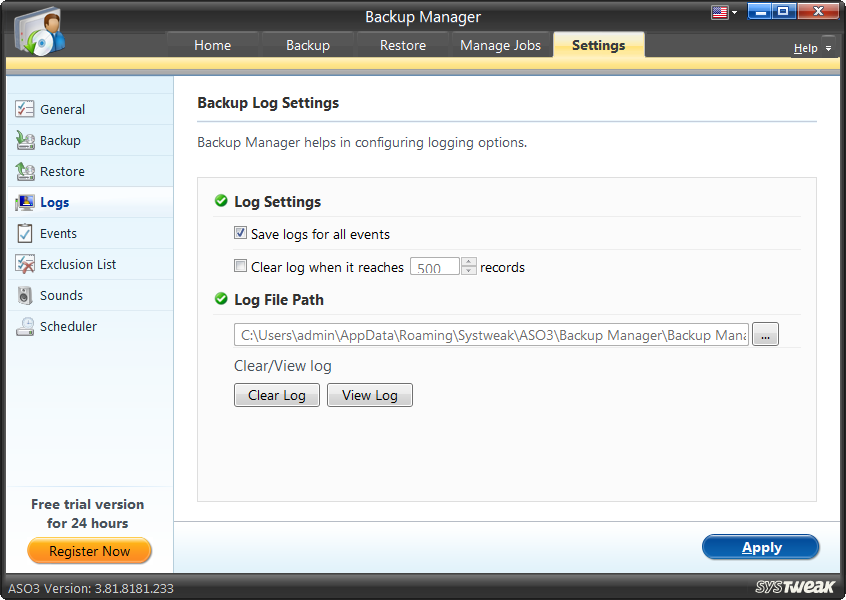
Backup log Settings
Save logs for all events – On selecting this option, you choose to maintain log entries for all events (backups, restorations, backup aborted, restoration aborted). This can prove to be helpful when something goes wrong. You may always refer to the log table to find out the problems that might have occurred due to backups or restores.
Clear log when the count crosses - You may put a limit to the number of log entries the log table should maintain. You may check this option to allow the Backup Manager to clear the log table automatically when the count exceeds the specified number. You may modify the number using the up and down arrow keys.
Log File Path
The log entries are saved in a default location on the system from where they are being read and shown. You may also browse through Windows explorer to select a location of your choice to save all the log entries.
Event Settings
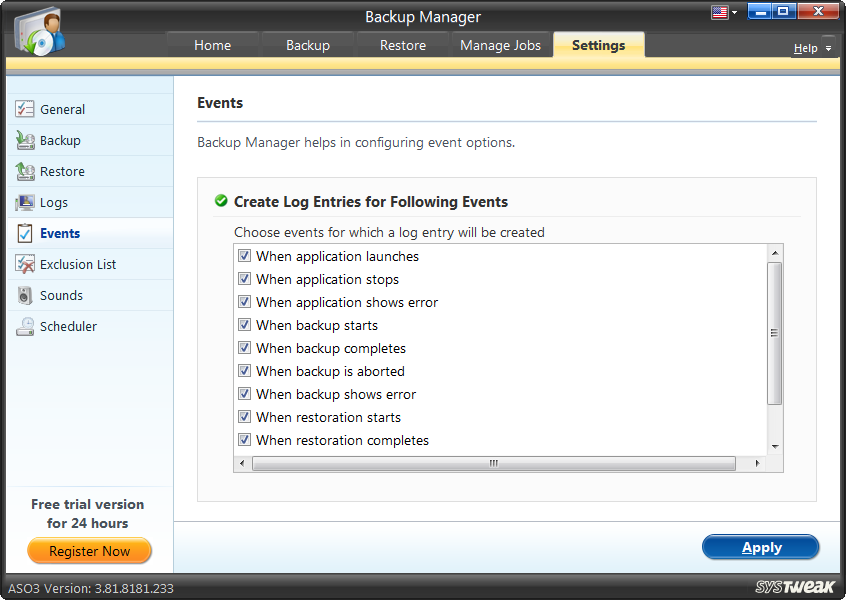
Under this setting category, 11 events are listed. The Backup Manager will create log entries for all the check-marked events.
- When application launches – Check this event to maintain a log when the application launches.
- When the application stops – Check this event to maintain the log when the application stops.
- When the application shows an error - Check this event to maintain a log when the application shows issues.
- When the backup starts - Check this event to maintain the log when the backup process starts.
- When backup completes - Check this event to maintain the log when the backup process completes.
- When backup is aborted - Check this event to maintain a log when the backup process has been aborted.
- When backup shows error - Check this event to maintain the log when the program encounters an error during the backup process.
- When restoration starts - Check this event to maintain a log when the restoration process starts.
- When restoration completes - Check this event to maintain a log when the restoration completes.
- When restoration is aborted - Check this event to maintain a log when the restoration process has been aborted.
- When restoration shows error - Check this event to maintain log when the program encounters an error during the restoration process.
Exclusion List
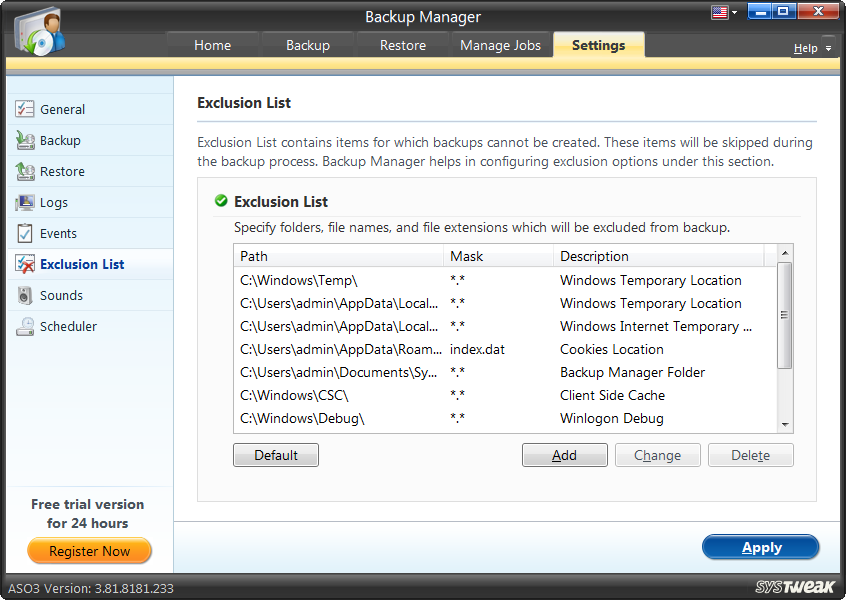
Exclusion List is the list of items that will be excluded from the backup process, i.e., the backup of these files cannot be taken unless removed from the list. You may “Add” or “Delete” items from the list. To restore the default list, click on the “Default” button, and to edit the Path, Mask, and Description of a selected item, click on the “Change” button.
Sound Settings
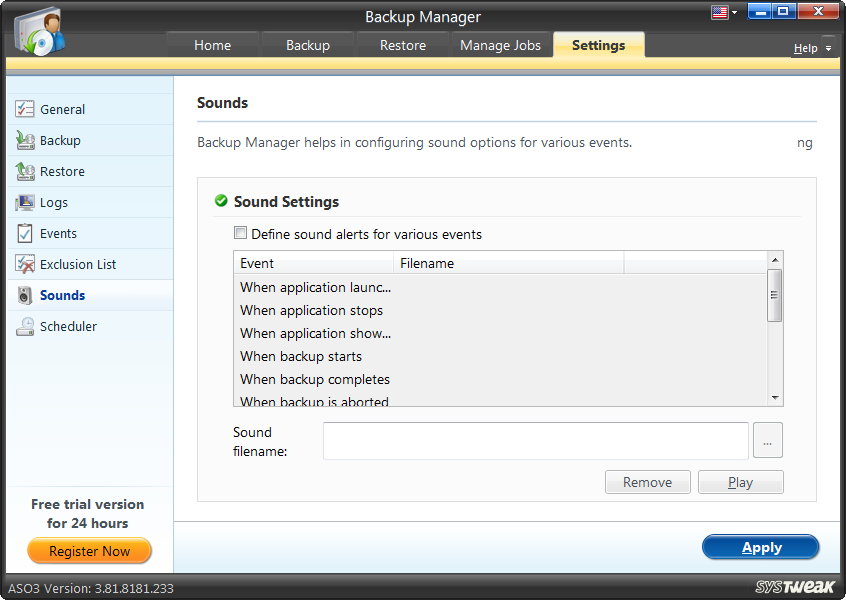
Here, you may assign different sound alerts to the events listed above. Click on the “Define sound alerts for various events” to designate sound alerts.
You may browse through Windows Explorer and select a “Sound filename” for a specific event. You may play and confirm the sound alert assigned by clicking on the “Play” button. To undo sounds for any event, click the event and click on “Remove Sound Alert.” This will delete the sound alert assigned to that event.
Scheduler
When the backup of selected files and folders has not been taken immediately following the backup job creation, the backup process can be scheduled to start automatically at the specified time and date using the scheduler option.
Select a Backup Job
Click “Create Schedule” to select a backup job and schedule its backup process for selected files and folders. You may “Add New” backup jobs to the existing list and create schedules for them. Once you have selected the backup job, click “Next.”
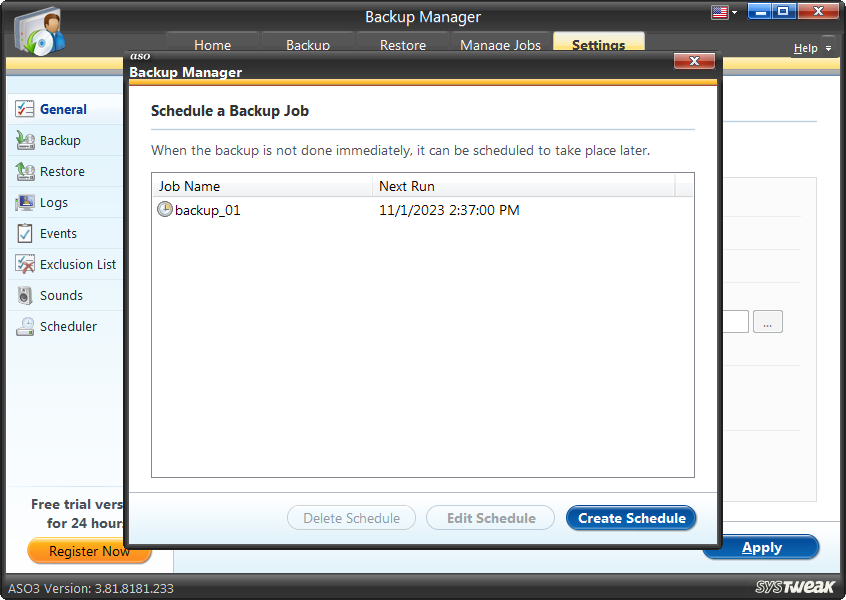
You may click on “Edit Schedule” to modify schedule options for a scheduled backup or click on “Delete Schedule” to delete a scheduled backup from the list.
Set a Schedule for Backup Job
Here, you may schedule an automatic backup process for backup jobs.

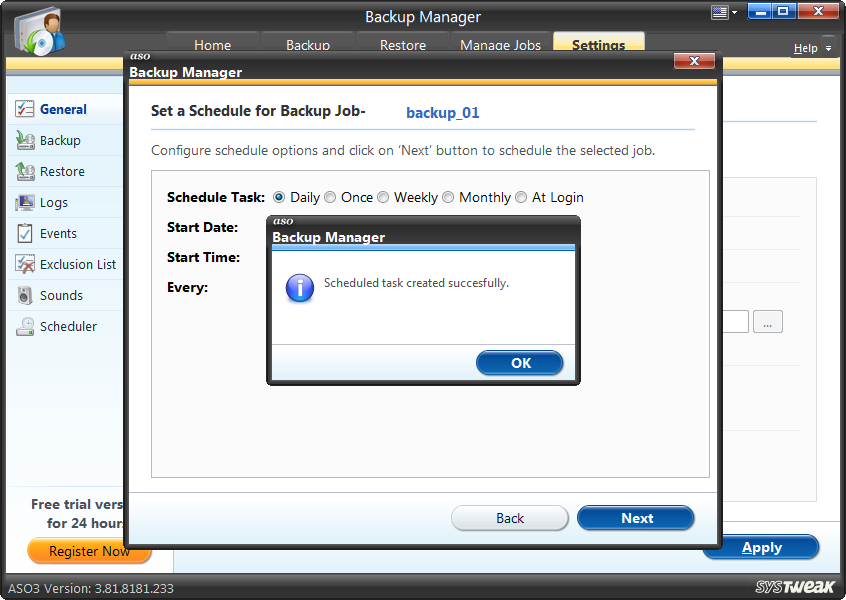
You may choose to Run It Daily, Once A Week, Weekly, Monthly, Or At Login.
System Files Backup and Restore
No one can afford to lose even a bit of critical information in today's fast-moving world. And when we talk about computers, the information stored on them is prone to be damaged due to system failures, hard disk failures, sudden catastrophic failures, human issues, and accidental deletions.
Hence, a copy of each document, file, and folder is important. This helps avoid unexpected repercussions. The same is true for System Files. But how can one take Windows file backup?
This is when you use the System Files Backup and Restore feature.
What are System Files?
Files necessary for any operating system to function are called system files, and a loss of even one can cause fatal issues. Therefore, keeping a backup of all system files is vital. In other words, we can say the backup of system files in Windows file backup.
How can System Files Backup and Restore prove to be helpful?
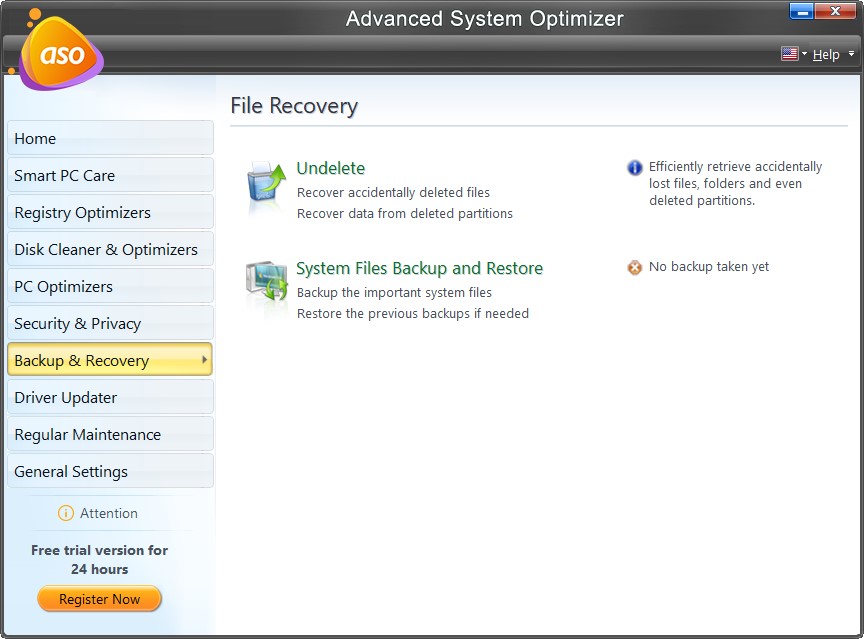
In the present scenario, taking a backup of system files is inevitable. For a layman, tracking down the system files and managing a backup of each file is not easy. Moreover, keeping Windows 10 file backup is a tedious & time-consuming task. But, using System Files Backup and Restore, users can easily identify the system files and take the backup of Windows 10 and other essential files in an organized manner.
The System Files Backup and Restore module offered by Advanced System Optimizer takes the complete backup of all system files needed for Windows to operate. Also, it facilitates easy restoration options in case of system failures. Furthermore, it has additional features that assist in importing backups taken previously or backups taken by other users to its own Backup List.
How to Use System Files Backup and Restore?
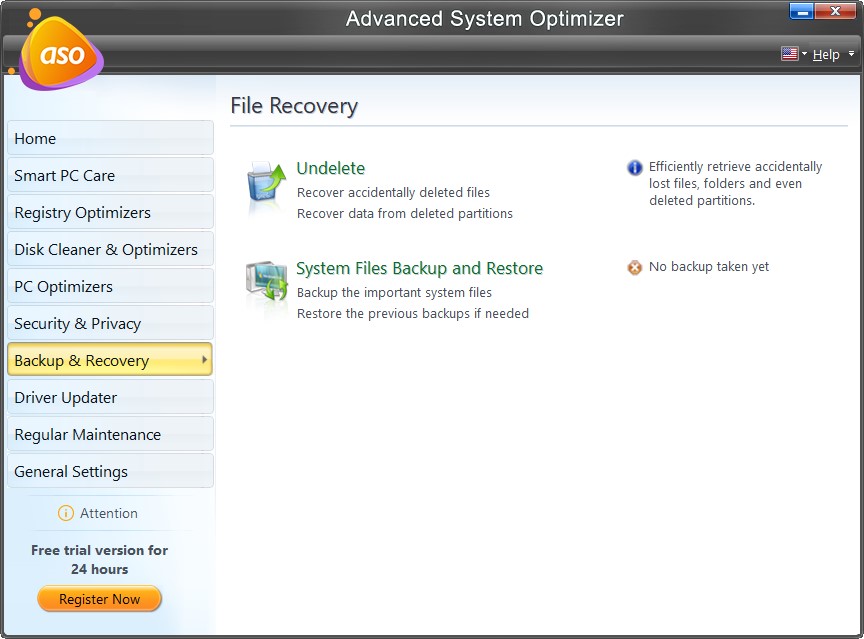
The complete System Files Backup and Restore is summarized with a very simple user interface and the three tabs in the application. The “Backup” tab helps in taking a complete backup of system files, while the “Restore” tab is there to support the restore activity, and the “Import Backups” helps upload system backups taken previously.
Backup Tab
System Files Backup and Restore takes the backup of all system files in three easy steps (see left panel):
1). Welcome
2). Backup Progress
3). Finish
Step1: Welcome
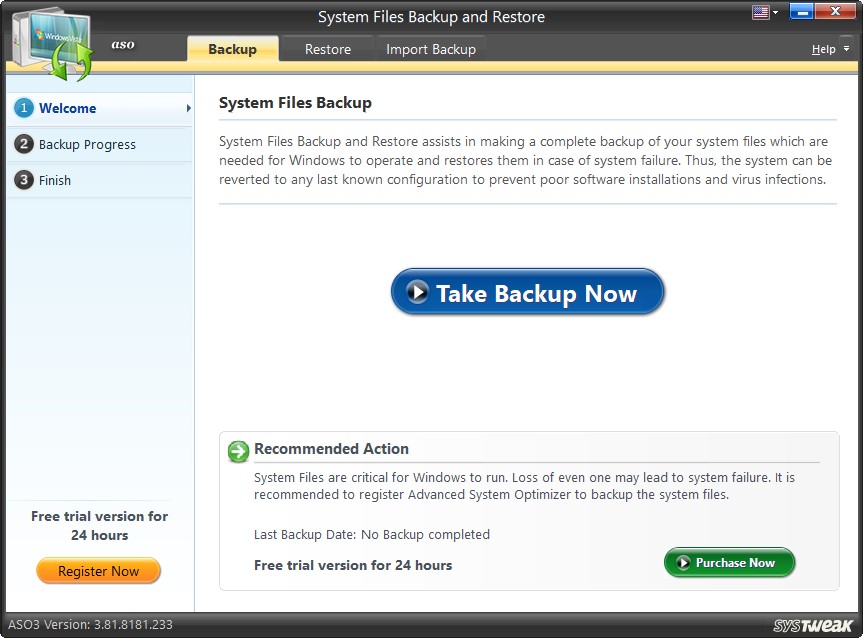
The welcome screen shows a button “Take Backup Now” in the middle of the screen that specifies the action in itself. By clicking this button, the system files backup process is initiated.
The lower half of the screen displays the System Summary
- Date of Last Backup and
- No. of existing backups
Clicking "Take Backup Now" opens a new window asking for the location to save the backup. To select a suitable location, click on the icon in the right-hand corner of the box and browse through Windows Explorer
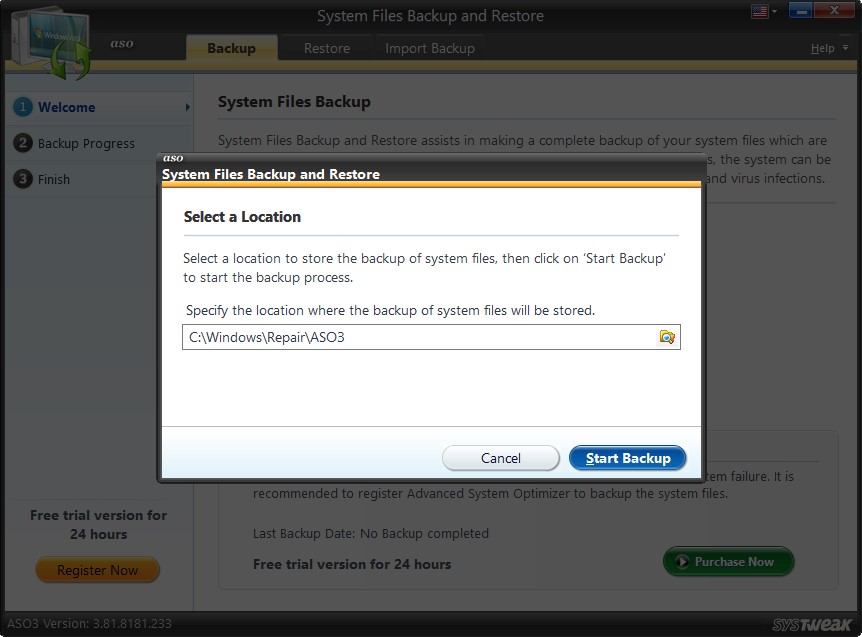
Thereafter, press the "Start Backup" button. System Files Backup and Restore will start Windows 10 file backup.
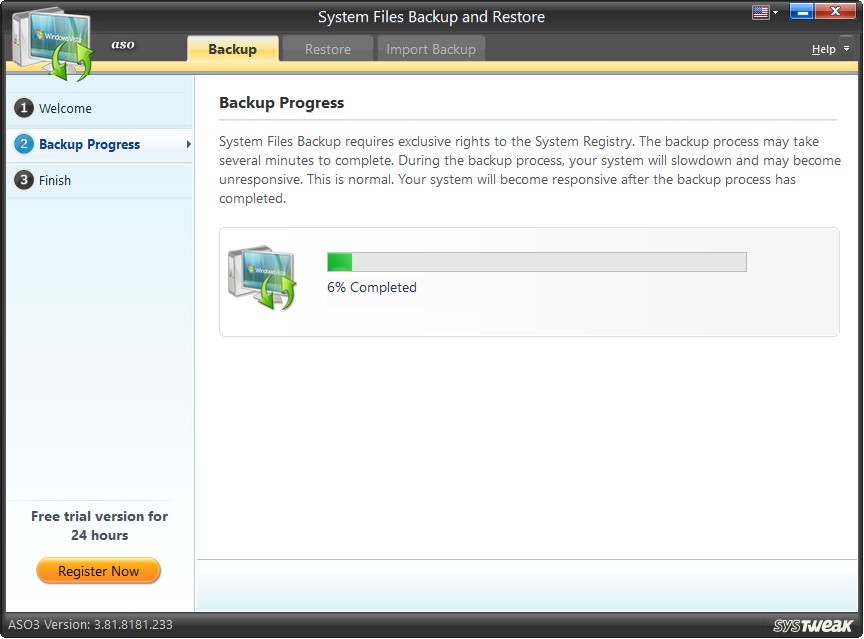
Step2: Backup Progress
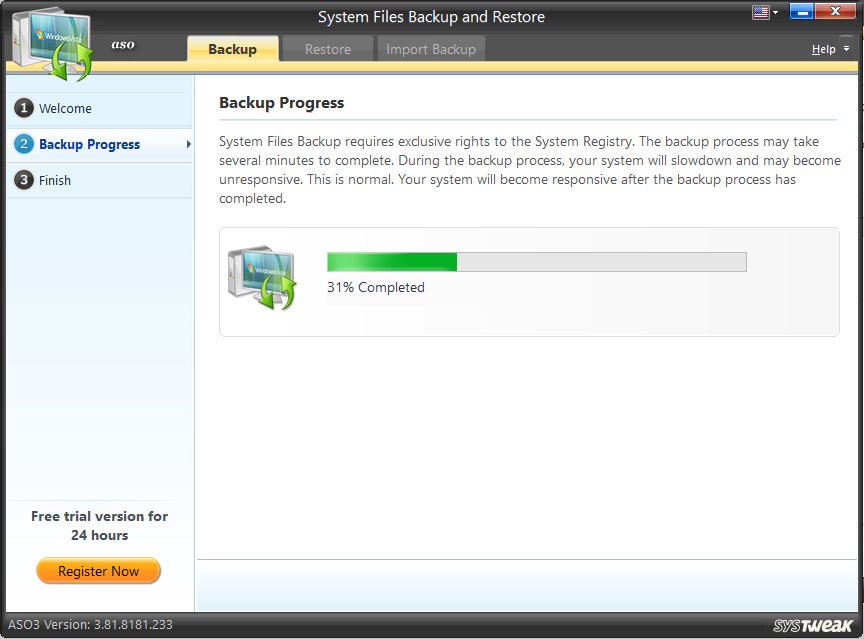
System Files Backup and Restore will now take the complete backup of all system files. While taking the system file backup, the system might slow down, but there’s nothing to worry about. Since the system is in use, this happens sometimes. Therefore, we recommend backup Windows 10 files (system files) when the system is idle.
Step3: Finish
Backup Summary
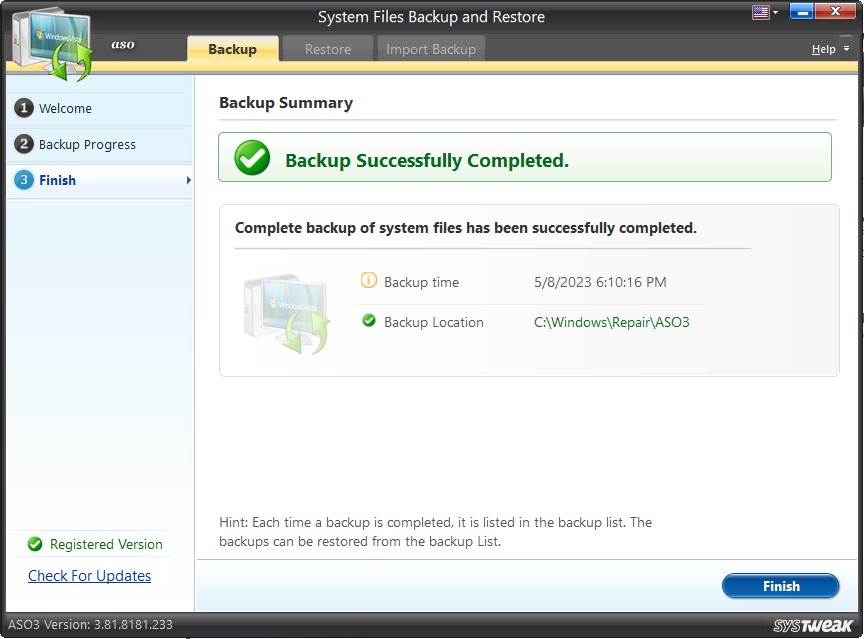
The last step shows the successful completion of the system file backup. Here, the displayed information shows - Backup time and Backup Location.
You may click on the "Finish" button to restart the process.
Restore Tab
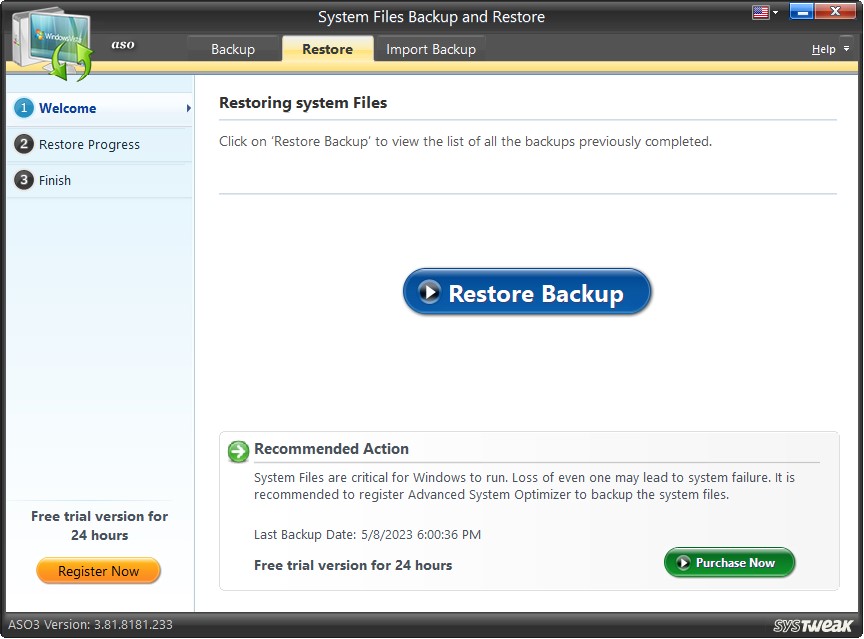
In case of system failures or malware infection, or problems caused due to improper software uninstallation using the Restore tab, the backups taken can be put back
The system can be restored to the last best configuration known in three easy steps (see left panel):
1). Welcome
2). Restore Progress
3). Finish
Step1: Welcome
Restoring System Files
The Welcome screen shows a "Restore Backup," a button clicking on, which helps view the Backup List. This list consists of all the backups taken so far with the date, time, and the path where the backups are stored.
You can select any backup that you consider suitable from the list and restore the system to that configuration by clicking on the "Start Restore" button.
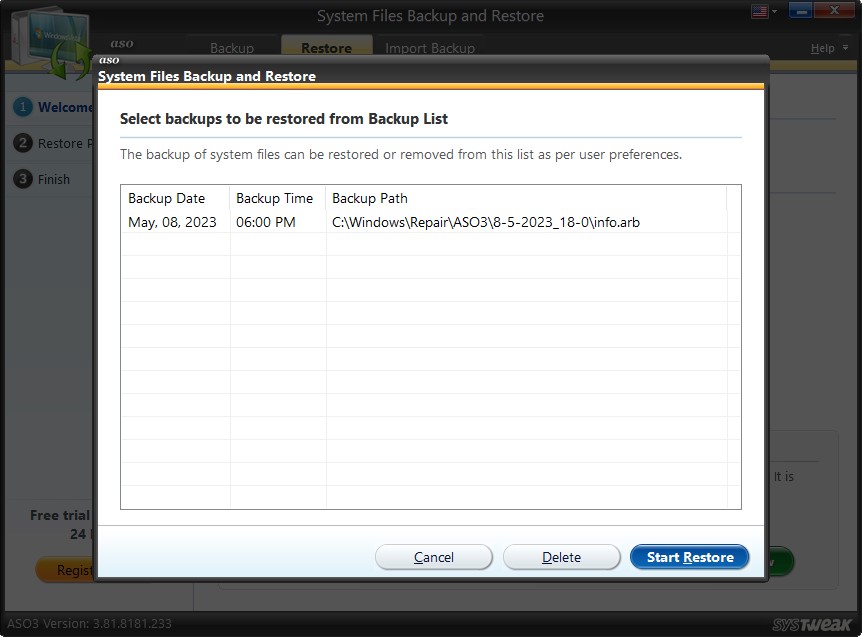
Note: If you think some backups are too old, you can remove them from the Backup List by clicking on the "Delete" button. Clicking the “Cancel” button helps go back to the previous screen.
Step2: Restore Progress
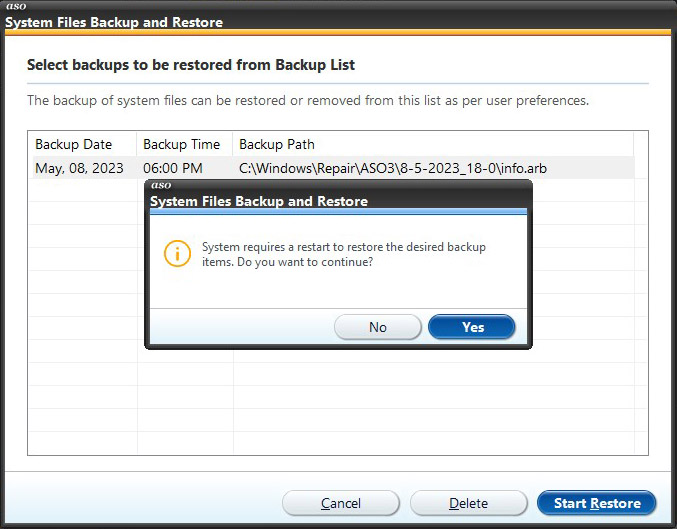
To restore the selected backup system requires restarting; you will see this message click “Yes” to continue.
Step3: Finish
After the system restarts, your system will be restored.
How to Import Backup?
In case the Backup List in System Files Backup and Restore does not contain the system backups taken, you can use this section.
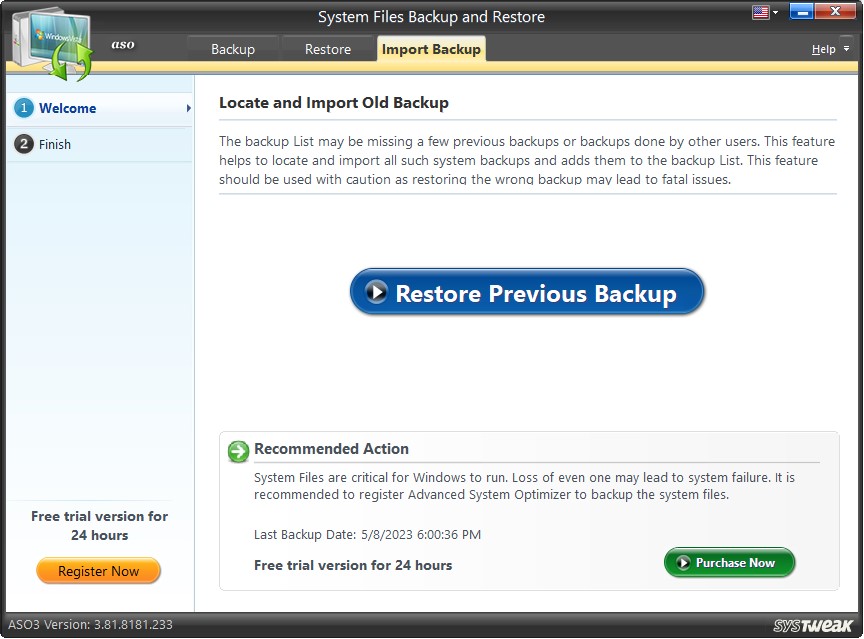
Explanation: When system backups are taken using some other applications, these backups might not be seen under System Files Backup and Restore. But using this option, these backups can be imported.
Note: One should be very careful while restoring these imported backups. Some backups might take you to unhealthy system configurations that may be fatal for the system. In extreme situations, the operating system may have to be reinstalled. Therefore, when importing and restoring backup, be very careful.
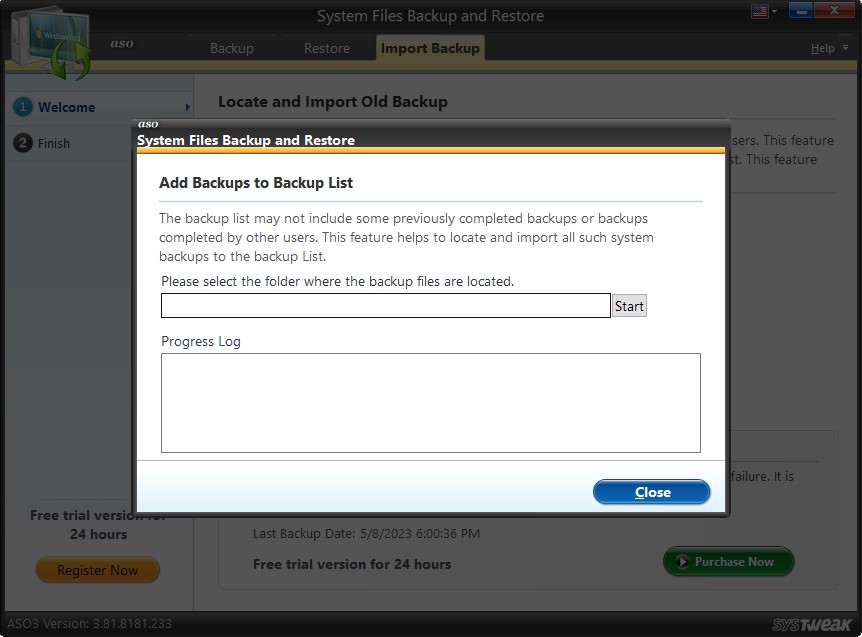
This operation is divided into 2 steps (see left panel):
1). Welcome
2). Finish
Step1: Welcome
Restore the Previous Backup
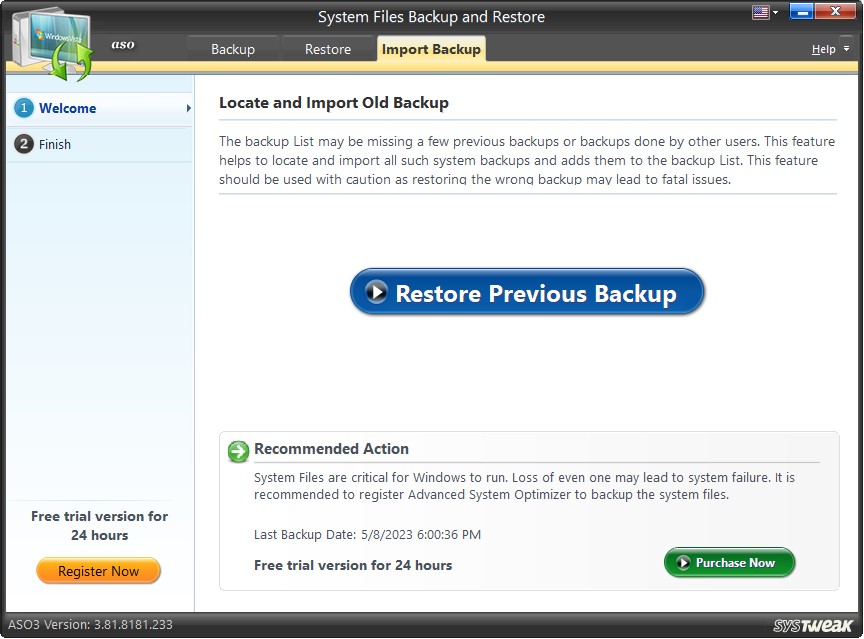
System Files Backup and Restore assists in adding the previously taken backups on the same system into the existing Backup List. For this purpose, click on the "Restore Previous Backup" button.
After that, select the location where backups have been stored > click on the “Start” button.
You can see the import progress in the lower half of the screen.
During the import process, two cases might occur.
1). If the backup to be imported already exists in the Backup List, it will not be imported.
2). If the backup to be imported does not exist in the Backup List, it would be imported and added.
Once backups are imported to the Backup List, these can be restored if deemed necessary. But this should be done with full caution. Restoring unknown backups may prove fatal to the extent that Windows may need to be installed again.
Step2: Finish
Import Backup Summary
After successfully importing backups, the import summary shows the Import Details and Import Location.
To return to the Welcome screen, you may click on the “Finish” button and repeat the process.
